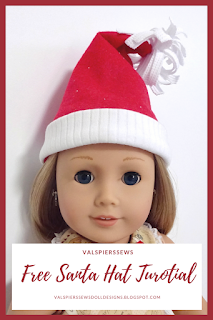
Dolls are so accommodating and don't mind dressing up warm in our sweltering hot Christmas season in Queensland Australia. Of course, it's not Christmas unless there is a summer outfit too.
This year I found the most amazing nordic style knit in Aldi of all places.
It was a big Santa sack so I have plenty to make some vests or dresses next year. I made a big sweater for this Christmas. I will be publishing a collection of bulky knit designs later in 2019.
The Santa sack was lined with red felt so I just had to try my hand at a Santa hat too.
I decided to do a quick and easy Christmas dress for our summer Christmas. The 1804 dress pattern comes with a collar that has a narrow collar cutting line drawn on it. I used the narrow collar with lace edging to give the dress a bit of a festive look.
The dress pattern is on special until Christmas Day. It comes with the add on bibs for free.
There is probably just enough time to make up a Christmas dress for your doll. If you keep it sleeveless and simple you can add some buttons or a sash and team it with a little cardigan for a more winter look.
Making a Santa hat pattern to fit any doll.
Use a tape measure to measure around your doll's head where you want the hat to sit.
Decide how high you want the hat. I just guessed about 6" for my 18" doll.
Divide that by 2
Measure out a line on the side of a piece of printer paper.
From the centre of the line measure up the height of your hat.
Draw lines to make a triangle.
Fold your page so you can cut out two triangles.
Tape them together along the sides.
Smooth out the brim edge with a curve.
Place the whole lot on a new sheet and create 1/2" ease and seam space down each side and add 1/4" seam allowance to the brim edge.
Cut it out and label it.
You can use the same method for different size dolls. You may have to adjust the height of the hat. If your doll is very small you may have to adjust the 1/2" ease and seam allowance down a bit.
Sewing it up
- To make the Santa hat you cut out the main part in red fleece or felt and the band in white fleece or felt.
- Band is 2/1/2" wide for an 18" doll and long enough to fit your hat.
- Double the band and stitch it to the right side of the hat with a 1/4" seam. Use a 1mm wide zig zag stitch so the hat will give a bit as you put it on the doll.
- Turn up the band to the right side. Bring the back seam right sides together and stitch with a 1/4" seam.
- Make a pom pom with fleece of felt. Cut a rectangle about 3" wide and 5" long. Roll it up and tie it tight in the middle, leaving thread tails so you can sew it on the hat.
- I tied mine with crochet cotton.
- To tie it on i doubled the thread and brought the two ends through the loop so I could pull it tight on the fabric roll. separate the ends and tie them around the roll with a few knots.
- Snip the felt or fleece to make it stringy and fluff it out. Stitch it on the top of the hat.
- I used a needle with a big eye to thread the two ends of the crochet cotton to the wrong side of the point at the top of the hat. I spaced them about 1/4" apart so I could just tie a few knots to secure it.
If you think others might like this idea don't forget to pin it.
Merry Christmas,
Val


No comments:
Post a Comment
Note: Only a member of this blog may post a comment.