Friday, December 22, 2017

How to sew doll clothes - Creating a V-Neckband for a Sweater or Vest

A little while ago I posted a picture of my latest creation. As requested I am posting some more details on how to do the V-neck band.
This design will be out for sale soon.

valspierssews doll clothes


  • You can easily change a T-shirt or knit top that already has a a round neck band into a V-neck top. Just fold the front in half and cut the V starting from about halfway down the armholes at the centre front and finishing at the original cutting line at the shoulder.
  • If your original design is not made for a neck band you may have to trim off the seam allowance before cutting your V so there is room for the extra width of the band.


So, after cutting out my top and sewing the shoulder seams it is time to do the neck band.


Use the front pattern 
piece to mark the point 
of the V at the seam line.

Don't try to guess where to stop. It is always
further than you would expect. Use the pattern
piece to mark it.


The band is about 2" shorter than the neck 
(1" when folded in half).

Fold the band wrong sides together and pin it all
the way along.


To adjust the length I pinned it at one end then stretched it
gently but firmly to the CF. I held it in place then stretched
the band along the rest of the neck.

After stretching it along the second half of the neck
I have a bit extra.

Just trim off the bit extra. I had about an inch extra
because my jumper knit is soft and stretchy.


Find the centre of the neck band then pin it to the V
at the centre front.

Use both hands to stretch that half of the band and
use your thumbs and pointers to hold it in place over the
shoulder seam then pin it in place.
Stretch each quarter and put a pin in the middle. Pin the other half of the band in the same manner staring by pinning it at the back.


Using a narrow zig zag, stitch the neck band with the
sweater bodice facing up so you can see where the snip is.
The neck should be pretty straight for sewing as you open
out the snip.


Fold the band up pushing the seam allowance
towards the bodice. Top stitch with a straight
stitch on the right side of the bodice close to
the seam.
Just check as you sew that you are stitching
the seam allowance in place. It tends to roll
around a bit.
Look under then push it into place with your
right thumb as you sew.

Fold the neck in half so you can stitch a little dart
in the V of the neck band.

Don't stitch the pleat parallel to the centre front!

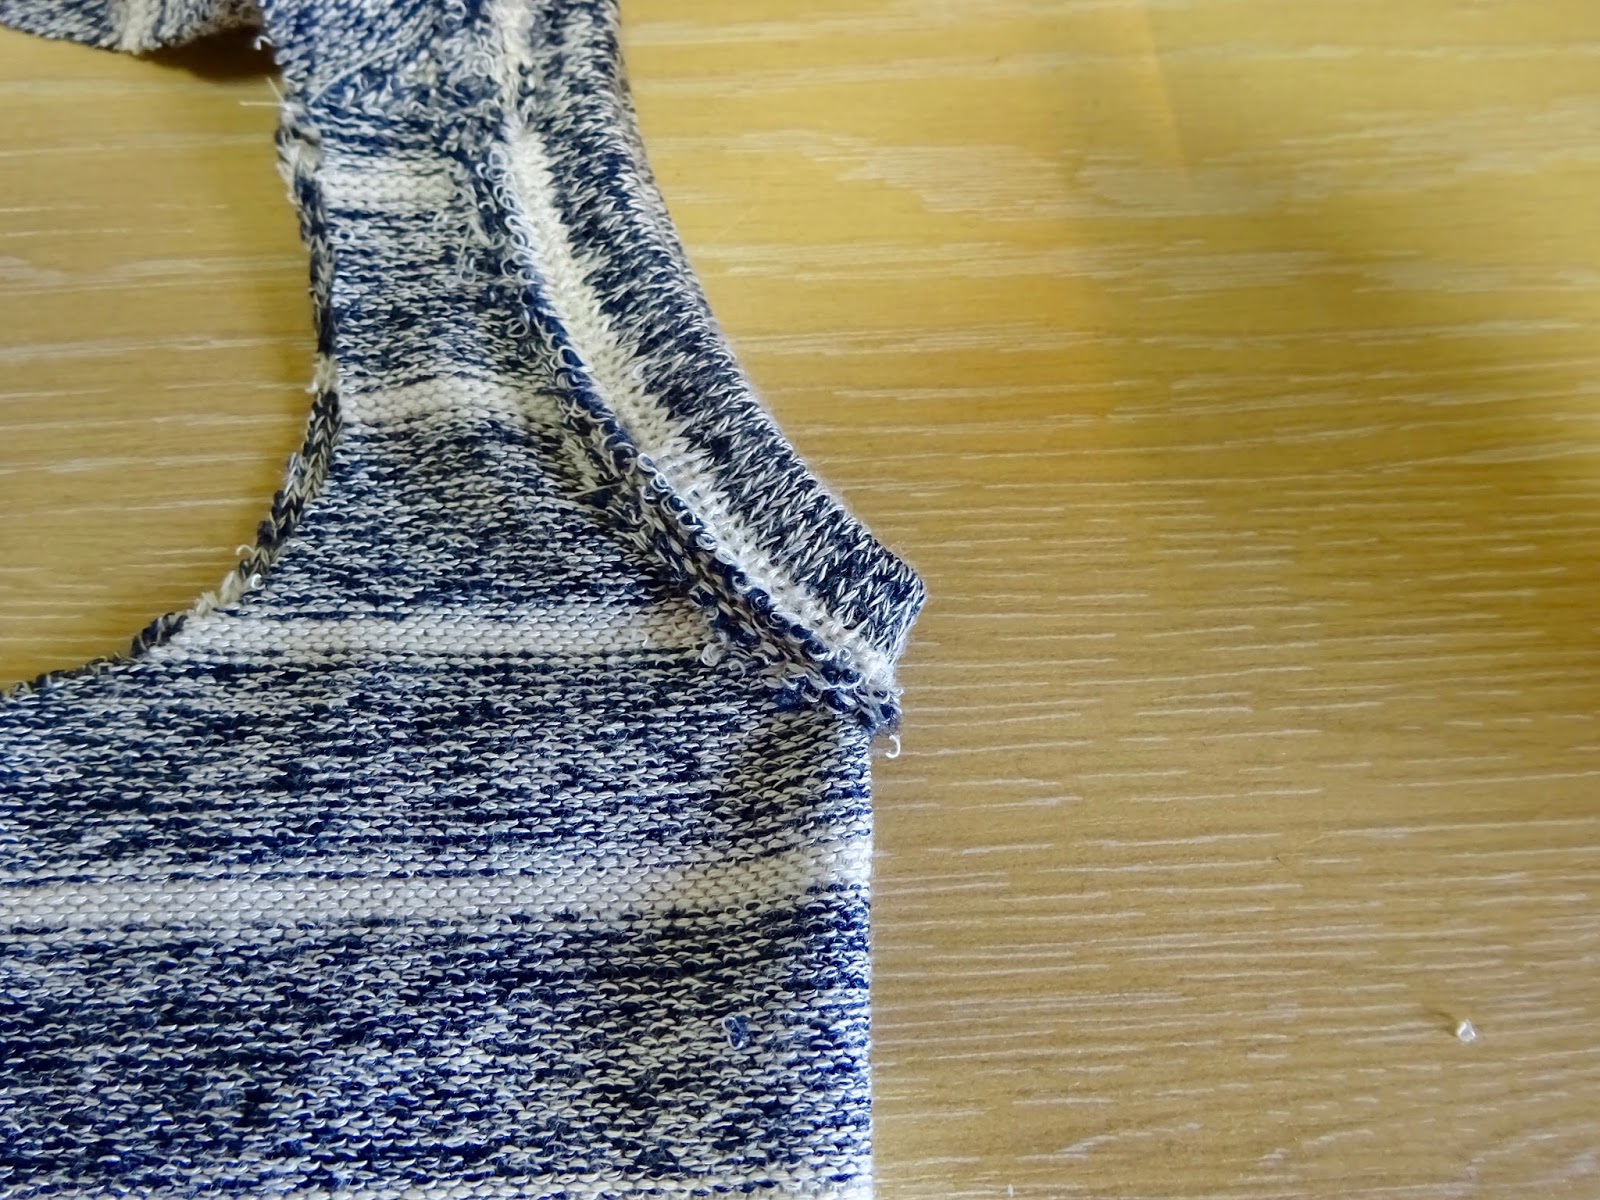
Start the pleat closer to the fold. Try to stop at the
seam line in the centre of the v so you don't get a
little pleat. you just want a dart.

This is my finished v-neck. (You can see that little pleat.
It is driving me nuts but I don't think I can make it any
better and I don't want to nick the fabric by trying to
unpick it).
Next up I have to put in the armhole bands, stitch the side seams and do the waist band.
Trust me it is such fun to dress your doll in knit tops. I am no expert and even if it doesn't turn out perfect on your first try I can guarantee your knit top is going to look so cute.

Happy Sewing and Crafting,
Val

Tuesday, December 5, 2017

Make a Christmas Stocking for your Doll

pattern by valspierssews
Deck the Halls or Trim the Tree

Grab a free Christmas Stocking Pattern for your doll this Christmas.


It is such fun at this time of the year to create cute accessories for our dolls.

Easy to make with felt

No fraying to worry about and no bulky seams to turn.
Just cut out the pieces and stitch them together.


6 Steps to a cute Stocking

For the heart window design
  1. Cut out the heart window
  2. Pin and stitch the fabric behind the window
  3. Stitch the stocking top on the front stocking
  4. Pin the two stocking pieces together with a ribbon loop in between
  5. Stitch the top of the stocking together
  6. Stitch the bottom of the stocking together.

2 different styles

  • View 1 has the little heart window to showcase some Christmas characters or pretty fabric.
  • View 2 uses scrap lengths of ribbon for a festive affect.

Ribbon Stocking from my sewing blog

I adapted the ribbon method to decorate my stocking. 
You can use pinking shears to cut out the felt pieces for a nice affect as well as add bows or beads.
It is also easy to make fusible applique motives from decorative fabrics to iron on when your stocking is finished. Just remember to place a cloth over the felt when you use the iron.


I made my tree decorations sealed at the top with a bit of plastic filling to give it some weight. You can use rice too.


Free download. Just Print, Sew, Play

Because my next newsletter will be a bit close to Christmas I have posted this design on my blog. I only discovered the stocking on the sewing blog last week when I was looking for some Christmas ideas.
Normally I put my freebies in the Newsletter so make sure you sign up. The form is at the top in the side bar.
I am working on a cute little hobo bag making the instructions and pattern fit my image. It will make a perfect little holiday kids project and only takes a short time to make. The pattern and instructions for the bag will be in my next newsletter out on Friday 22nd December. You may even have time to make it as a Christmas present for your doll.

There are two files for the stocking design:


Happy sewing and crafting,
Val

Friday, December 1, 2017

Have the best dressed baby doll in town!

doll clothes patterns

I have just published a new baby doll pattern to fit baby Born 17" doll. The design is cute little rompers. So easy to dress your doll in these side opening rompers and of course all the little girls will want some dresses to fill out their wardrobe.
photo

Easy to dress your doll

  • Watch my video to see how easy it is to get these rompers on your doll

  • I always use velcro patches. They are so easy to do up and undo yet they hold the outfit together really well.


  • If you know your little one won't be able to tie a knot for the belt just add 3/4" to the end next to the fold and don't cut it on the fold. Sew each end and down one side so most of the other side is open. Finish it off like the one piece belt then put velcro patches at the back. Put it on the doll and tie up the knot. Now just use the velcro at the back to take it on and off. You may need to also make a special one for a head band.
Lots of dresses for those family get togethers


  • Rompers are OK for playing but special visits need something a bit more dressy.


  • The BD Dress is perfect for creating all sorts of dress variations. You could even make the rompers with singlet and pants fabric and make the dress into a top with a shorter skirt. Just fold up 1" to make the skirt pattern into a little over top.
  • The dress pattern comes with two sleeves, two collars and pockets.

Download the patterns from my Etsy shop


Organise your patterns so you can use them over and over

  • Watch my video on how quick it is to make a booklet of instructions to go into your envelope.


  • I keep all my patterns in folders with plastic pockets. 
  • The folder divider page keeps my folders in order when I take out the pattern
  • The envelope keeps my pieces in order while I have the pattern out for sewing.
  • The instructions as booklet style fits neatly next to my sewing machine.
You may think my videos are a bit ordinary but the only way for me to get better is to just jump in and make some. I hope you enjoyed seeing me and my sewing room in my dress up video. I nearly dropped the doll trying to do up the belt knot so you could see what I was doing and it was really hard to cut out some of the dumbest bits and keep the commentary making sense.

I did make an effort to dress well. The check shirt I had on for the day was just a bit busy to hold the doll in front of and I figured if I was changing I may as well go all out and find a nice necklace.

I couldn't believe how hard it was to get the booklet into the envelope. I should have seen that coming. I might have to have a word with the props manager.

I hope you head on over to my shop now if not before. I have lots of 18" doll clothes patterns as well as the 3 Baby Doll patterns.
You should also sign up for my Newsletter. I send out free things exclusively for my subscribers as well as keep you in the loop with new patterns and tutorials. The form is at the top in my side bar.

Happy Sewing and Crafting,
Val

Friday, November 17, 2017

A bit of designing, sewing and shopping.

Today I am well on the way to completing the work on the new bodice I have designed.
It has darts and a wide neck and extended shoulders. I have been really working on the extended shoulders lately. It is such a flattering style. I am happy with the fit. I just need to draft some neckline variations.
This dress is not quite finished. I am still trying to decide on the trims and I wish I had some gold shoes.

Doll clothes patterns by valspierssews
Work in progress

Inspiration from Pinterest
I was browsing through pinterest as I usually do and discovered lots of cute Barbie size dresses that had a wide neck and extended shoulders. I loved how they could be made to look so different using different embellishments, trims and fabric combinations.


I am always collecting new design ideas on Pinterest. https://www.pinterest.com.au/valspierssews/

The first draft
I just had to try this for the 18" doll so I whipped up a first draft using my 1804 dress bodice as a sloper. I was surprised that it fit so well the first time. It is not always so easy. Especially with those extended shoulders. You have to get the shape just right. This is my first draft from a while back. It is similar to the bodice in 1827 but the shoulders extend quite a bit more.


Using it with the longer gathered skirt
Now I knew the bodice would fit I wanted to create a lovely dress. I went on a special shopping trip to find some nice Christmas fabric. The fabrics with the sparkly finishes look so festive and elegant. I bought this gorgeous red and gold fabric. It was quite expensive at $25.95 AUD a metre. This is around $20 USD a yard.


I chose the longer skirt from my 1804 pattern because I wanted it to have a formal look to it. I love the skirt and I am thinking I will make a petticoat so it puffs out more. I will include just that one length in the new pattern. There is so much more in 1804


Using it with other skirts
I love making patterns that have lots of potential. This one is no different. The waist of the bodice is based on the 1804 bodice like many of my designs so you can use it with the pencil skirt from 1828 and also the circle skirt from 1827 or the half circle skirt from 1810. I really want to try it out with the pencil skirt.

Plans to make different necklines
I have plans to make the neckline to match the other options in my fashion doll Pinterest board. I like the square neck and I'm sure I can do a scoop neck and a V-neck to go with the extended shoulders.

Embellishment
How to embellish my Christmas dress is something I have been thinking about. I like the idea of narrow ribbon close to the neck edge but I am also keen to sew on some seed beads. I haven't done that before. I would do a random scattering around the neck and shoulders. The waist always looks a bit plain on the dresses but I envisaged a fussy ribbon or flower. As a temporary measure I have put on four strands of narrow ribbon and tied a bow.


When I went looking for fabric I really wanted to visit the shop I had heard so much about in the town about an hour away. Luckily the community bus was planning a trip to the markets there so I booked a seat. I spent a lovely day out at the markets and then the fabric store. This store is an old fashioned type haberdashery. They had just about anything you could use for sewing.


I spent so much time looking at the fabrics that I didn't really get a good look at all their laces and trims. I will definitely be going back. As well as the Christmas fabric I got some cute Minnie Mouse fabric. I will probably use it to make another version of my new bodice.


So that is what I have been up to lately. I plan to do some work on the 1820 Bulky Knit Sweater by adding lots more features and variations to create more of a collection as a long term project but the next design on the drawing board is looking like it will be a coat or jacket of some type. I'm still trying to sew up a wardrobe capsule from my basic designs. I really need some good denim for the jeans to make things look right so I have been putting it off. I saw something that looks good in the Spotlight catalogue so it looks like another fabric shopping trip is on the cards. What a surprise!

Happy Sewing,
Val

Tuesday, November 14, 2017

Photo Tutorial for the Pencil Skirt from 1805

doll clothes patterns by valspierssews
Great modern look
There are a couple of different ways to make the skirt from 1805.
I found that the gathered method was by far the easiest but I think the little pleats look the best.

Gathered Skirt
No need to mark the pleats but you do need to mark the back on the side of the placket with a pin.
Gather the front and back separately. You sew two gathering threads starting and finishing 1/2"  from each end. (I forgot to do the gathering threads before the side seam. I think I was worried about getting the seams mixed up like I did on the blue skirt.)

Cut out the skirt


Mark the back piece on the placket side. Stitch gathering threads on the back and the front.
Gathering Tip: Back stitch at one end for short lengths
Do a back stitch at one end because it is such a short length to gather. I always leave long tails at both ends for full gathered skirts.

Place the front on the back, right sides together. Stitch the unmarked side seam and overlock it.
I always mark the back if I need to know back from front.

Overlock the other side seam edges and the hem edge. Press up the 1/4" hem to crease it.

Stitch the unmarked seam and overlock the 3 raw edges

Pull up the gathering threads a bit ( to 6" front and back) so they roughly fit the waist band.

Pull up the gathering threads


Fitting Tip: Waist band length check
I found that the waist band was a bit too long for one of my dolls so I have decided to make sure the waist band fits the doll I am sewing for by folding it in half and placing it around her waist. The ends will overlap and I pin it in place. Depending on how you want to use the skirt and what fabric you are using you will make it tight or create some ease. If you want to tuck things into the skirt you will need some ease. If you are using a medium to heavy weight fabric you will need some ease. 
It always amazes me how much length you lose when you sew a seam and fold the garment along the seam line. The folding takes up an 1/8" to 1/4"  for thick fabrics.
The overlap needs to be a scant 1". Trim the end of the overlap so the overlap is 1".

Check the waist band is a good fit. Too much overlap
Trim the overlap back to 1 inch
Press under 1/4" along one long side of the waist band.

The back half of my waist band is 1/4" longer than the front half so to find the side seam mark I fold the waist band with 1/4" sticking out on the back half. Mark the side seam point on the waist band with a pin.

Find the centre of the waist band


Place the right side of the waist band against the wrong side of the skirt. Pin the side seam.
Pin the back of the skirt - marked with a pin - so the the waist band is 1/2" past the skirt. I extended mine 5/8" past because I am using quite a thick fabric.

The waist band extends 1/2" past the back edge

I'm not worried about the fit because I left some ease when I checked the length and this fabric is a knit so it gives a bit.

Fold in and finger press the side seam allowance on the skirt front, just at the waist edge. Pin the waist band on so it extends 1/4" past the skirt.

Fold in  seam allowance at the front and extend waist band 1/4" past

Pull up or let out the gathering threads so the skirt fits the waist band and knot the threads.

Gathering Tip: Knotting the thread tails
Tie two knots then swap hands with the thread tails and tie two more knots. This prevents slipping.

Even out the gathering across the skirt sections and add more pins.

Match the skirt to the waist band an tie off the threads.

Pinning Tip: Right angles to the seam or hem edge
I often start pinning on one side then turn the garment over to finish pinning and stitch. By pinning at right angles to the fabric edge I can always see my pins as I stitch.

Stitch the waist band seam. Trim it back slightly.
Fold the waist band back on itself, right sides together. Stitch across the ends with a 1/4" seam allowance.

This back part sticks out past the skirt edge after you have stitched it.

Trim the ends a bit. Don't cut too much off because it makes it harder to tuck it all inside the waistband when you sew.

The front part of the waist band is flush with the edge of the skirt.
Turn the band and press. If I was using this fabric again I would cut the waist band about 1/4" wider than the pattern. The thick fabric rolls rather than creases so the fold takes up nearly a 1/4" extra.

Push out the corners of the waist band and pin it in place along the stitching line of the waist band seam so it just covers it up. Stitch the waist band in place.

Stitch the placket side seam a bit more than halfway up from the hem edge. Turn the seam to the front and pin the placket closed. Come in from the waist band edge and stitch across the lower edge of the placket. Stitch the seam down on the front edge of the placket.

Side placket

With the skirt right side out. Turn up the hem and stitch it inside the skirt tunnel along the wrong side so you can see to catch the hem properly.

Add a velcro patch to the waist band. Hooks on the inside of the front and the loops on the outside of the back.

I have been crazy about buying shoes for a while now. They really make an outfit and the regular shoes are only 3 or 4 USD with free postage on Allie Express.

This one has the little flats. Looks like a high schooler.
This one has the lace ups and socks. Looks more like a middle schooler.
These shoes need a bit pf persuasion to get them on with socks.
A 5 yr old couldn't do it but a 10yr old could.
The little tie is just a strip of gross grain ribbon tied like a tie. The blouse is my open neck design 1806 View 1.

The skirt is the Bonus Pencil Skirt from 1805. That skirt in the photo is from 1817. Unfortunately 1817 is on the back burner until I get lots more motivation. One day.


The skirt is in this pattern
Hope I have inspired you to make more skirts. I think the gathered one looks best with this shirt rather than a T-shirt. The pleated one is nice for having the top tucked in.

Happy Sewing,
Val