Showing posts with label Free pattern. Show all posts

Saturday, March 19, 2022

Free doll clothes patterns are great for all levels of doll dressmakers

valspierssews doll clothes patterns

A free pattern is a great way to get hooked on doll dressmaking.

And if you want to obsess about something then sewing doll clothes is not a bad thing.

Even if you can't sew very well and you can't alter pattern pieces if your life depended on it - 

you can get really into using ribbons and trims and buttons and ruffles and contrasting colours and amazing florals and that is just for starters. 

There is a world of fabrics and colours and styles that is waiting for someone to just like you to jump in and be creative.

If you are already into doll dressmaking then free patterns are feel good patterns that make you want to sew even more.

Free patterns are for newbies

If you are a newbie and want to start making doll clothes for your granddaughter's doll then free patterns are a no risk way to get some experience under your belt. The free patterns I create are set out just like my bought ones so it is easy to transition to more complex designs.


Free patterns are for doll dressmakers


If you are already great with your sewing machine then you can start your doll dressmaking journey with free patterns. You can create full outfits from the free patterns I offer. Make items in lots of colours and different combinations. Fill out your collection for your own dolls or get started with your doll clothes business with cute classics that everybody wants and rapidly build your sales numbers.

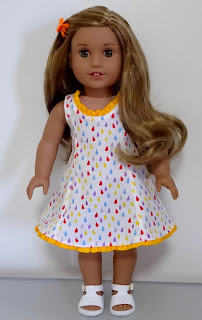
I dressed this one up with some appliqué.


Free patterns are for advanced doll dress makers


Once you are confident sewing doll clothes you can use free patterns get even more creative. The free patterns I offer are generally easy to sew and classic styles. There is a lot of room for customising with extra seams or ruching or trims or different methods of finishing neck and armholes.
The series of free petticoats is a treasure trove of advanced designs with lots of potential to add underwear to your dresses. Some are also perfect to make into dresses rather than petticoats.

You can read more about some of the free petticoats in these blog posts


Free patterns are for designers too


Maybe you are looking for some free designs to use as building blocks for more intricate designs that you are dreaming up. With just the fitted a-line skirt you can create yoked skirts, pleated skirts, skirts with pockets and skirts with extra seams for features.


The free petticoats are great for designing dresses too even without changing the pattern pieces. The styles are classics and varied so you can play with different designs knowing that you are starting with a pattern that fits.


I bet you are keen to know where I keep all my free patterns so you can get a-hold of them.
You can get instant access by clicking the link below.


If you are into doll dressmaking you should check out my You Tube channel for free step by step drafting instructions to create amazing designs from basic pattern pieces that you probably already have.


Happy Doll Dressmaking,
Val

Friday, January 14, 2022

Sewing room update

Valspierssews sewing room


I'm sitting at my computer wondering if I will ever get used to the customer journey detail that Mailchimp has added. 

I feel a little stressed about my ignorance around getting it set up.

Out of the corner of my eye I can see my cutting table and little table overflowing with fabric and dolls. 

I think this is the real source of my unease.

I'll be tidying up as soon as I finish this blog post.

So why is the Customer Journey item so difficult you might ask? (Well, I guess if you don't do computers much you don't care.)

The visual on the screen is like a black box. I can't see which email is which and having to scroll down to see the whole thing means I lose count of where each email is supposed to be.

I just went back and worked out how to label the rectangles with the emails!


The sequence has gone out all skewiff for the first few subscribers. It is quite a steep learning curve for me but who doesn't like a challenge. I will prevail!

At least all the information is saved in the Newsletter Patterns and Tutorials folder so any subscriber can get it from there.

I still have a bit of tweaking to do with the new Basic A-line Skirt folder inside the main folder. 

I have to accept that everything is at least 80% functional. I have come a long way with my mindset and my confidence and I feel sure that I am not as stressed or worried as I would have been about something similar a few years ago.

The newsletter folder seems to be working well. It's not perfect but it gets my work out there. 

This is what it looks like.


Subscribers get the link to access the folder and download any of the files.

I apologise to the few who got the 50% working email sequence. It should be all fixed now.

I'm just about to put all my fabrics in the cupboard and get onto some more sewing.

Happy Doll Dressmaking,

Val

P.S.

Much better.

It's a bit tricky to keep it tidy. I am waiting on book shelves to go along that whole wall. The bookshelf that is there will go in another room.


Tuesday, July 20, 2021

Start your new creative endeavour with some of my free patterns for 18" dolls

Free hobo bag doll clothes pattern for 18” dolls like AGD

So why do I publish free patterns?

Mainly because I like to give something to you that has been made with passion and creativity.

Other reasons are:

That some designs are just so simple for me to put together that I don't think it is right to charge for them, or

Some of my wonderful customers have been buying from me for many years and I just like to give them patterns.

Way back when I started designing and selling my patterns I wrote a bit of a manifesto in my About Page on my blog. The doll clothes concept was all about using lots of nice fabrics and satisfying my passion for design. The Sales concept was all about creating the sorts of patterns that I would like to buy and make them great value.

Over the years my prices have increased a little and I have also added some higher priced items to my shop but I still keep a wide range of classic and fun patterns around $5AUD and less because I haven't lost site of why I started designing and sharing them in the first place.

My free patterns are just the same as my paid patterns. They have some photos, step by step instructions with diagrams, full sized computer drawn pattern pieces and usually a file folder page and an envelope.

Just because they are free doesn't mean they have zero value. I create them with the same care for formatting and fit that I approach the paid patterns.

1804 Dress $10.25AUD

Free Hobo Bag


There are lots of ways to use the free patterns. I love making doll clothes capsules with several garments.
This little outfit is made from the free infinity scarf, the free tank top and the free chiffon skirt.
Nos 2, 12 and 15 in the Newsletter folder


If you would like to get instant access to the free Newsletter patterns folder then just click here to add your email to the list.

If you are not into mailing lists then I have been publishing the free patterns on Etsy for just $1.25AUD
There are several up there and I am adding more.

Happy Doll Dressmaking,
Val


Friday, April 26, 2019

How to sew a doll skirt with a waist band

How to sew a skirt for doll clothes


How to sew a doll skirt

A friend of mine asked me if I would make an outfit for her vintage doll to replace the original clothes the doll came dressed in. You know how it is. The clothes were just gone.

If you think you are ready to move onto making a gathered skirt with a waist band I am slotting this blog post ahead of more elastic waist variations because I promised to dress the vintage doll.

I have quite a few skirt patterns in my Etsy shop. I have yet to publish them in my Aussie shop. Just let me know if there is something you want me to upload.

I love these vintage suspender skirts


Make sure you check out this tutorial for the Glitter Girl gathered skirt HERE.

And you can find lots more about designing a gathered skirt in this blog post HERE
Also you can join my free resources library.

How to sew a gathered skirt for your doll

The skirt part

This doll is about 14" tall so I am going to use the same size skirt that I made for the Glitter Girl because that amount of width at the hem looks good on this doll too.
I am cutting the skirt strip 4 1/2" x 24". I ended up using the same pattern piece that I used for the netting in this skirt HERE

valspierssews doll clothes patterns


If I was making the skirt for my:

  • 18" dolls I would cut the skirt strip 6" x 30"
  • 19" Gotz Hannah doll I would cut 6" x 30"
  • 20" Australian Girl Doll I would cut 6 1/2" x 30"

This allows for a waist seam of a good 1/4" and a hem of a good 1/4".
I say 'good' because I find that you always need a bit more to cover the gathering threads and you always cut a fraction off when you overlock the hem edge.

Skirt Pieces
Overlock the back facing edges.
Overlock the hem edge and turn up a 1/4" hem.
Press in the back facing about a 1/2".


The waist band

Just remember that the thicker your fabric the longer the waist band needs to be.
My waist band will enclose the waist seam and overlap by 1/2" at the centre back.
This means I need to measure the doll's waist then add 1/2" for the overlap as well as another 3/4" for the seams on each end. I say 3/4" because it always seems to work out as a bit more than a 1/4" overhang at the backs when you pin on the waist band. If you want the skirt to go over a blouse or T-shirt you should measure the doll's waist over the blouse or shirt or add an extra 1/8" on a small doll and closer to 1/4" for big dolls.

The vintage doll waist is a bit less than 8 1/2" so I am going to use 8 1/2" + 1/2" +3/4" = 9 3/4 for my waist band strip.


Because the doll is small I will use a 3/8" finished width for my waist band. For bigger dolls I would use 1/2" finished width. If your fabric is thicker than light cotton or polycotton you should allow an extra 1/4" for folding the seams into the waist band.

Press in a 1/4" on one long side of the waist band.
Pin the right side of the waist band to the wrong side of the skirt.
Keep the back facings folded in and extend the ends of the waist band 1/4" past the skirt backs.

valspierssews doll clothes patterns


Stitch then trim the seam a bit. Press the waist band up towards the seam.
Fold in the ends of the waist band then....
Fold the turned under edge to the front and stitch it down. I use a small patch of hook and loop at the waist in the back.
I now have a skirt pattern I like for this doll. I will be making the outfit skirt next.


If you are looking for patterns for various skirts for various sized dolls you should look out for my Pattern Club opening soon.

New Pattern Club Coming Soon

I am starting up a membership site in the next few months. I already have a few patterns in place and I have 3 great new patterns lined up for the first month's instalment. I will be opening the enrolment for 10 days only. Founding members will have the lowest price of $10USD/month. Every six months over a couple of years I will be opening membership with an increased price. The final subscription fee for a huge pattern resource and continuing new additions will be around $20USD


If you don't want to miss out on the sign up period click the link below and leave your email address. (This is a separate list from my newsletter)

Sign up to be notified when the Valspierssews Pattern Club is open to join

I will still be adding free resources to my Resource Library at dolldressmaking.teachable.com 
If you are not already signed up you should check it out.


Happy Doll Dressmaking,
Val


Monday, April 8, 2019

How to sew a doll skirt for 18" American Girl dolls

valspierssews

While researching and sewing for the doll skirts blog posts I came across this old post. I have updated the post. I thought it would also be a good time to revisit the free apron I included in the newsletter last year. You can find it in the Doll Accessories Section in the Free Resource Library

Skirt Length

The skirt looks best with the waistband a bit above the waistline. You need to add 1/2" to each of the skirt lengths listed. 1/4" for the waist seam and 1/4" for the hem. Finished skirt lengths that I like are:

4" for a cute dolly look. (high gather for a Betsy McCall look)


5" for a nice party dress or day dress and a more demure look.


7" for midi skirts and a casual look. (at least mid gather)

9" + shoe height for ankle length just above the floor. (at least mid to high gather)

9 1/2" + shoe height just skims the floor. (at least mid to high gather)

Remember, you need to add 1/4" or 1/2" for the waist seam and 1/4", 3/8" or 1/2" for a hem.

Skirt Width

There are 3 widths of skirt that work well depending
on how much gather you want. I have also found that 
the longer the skirt the more width you need to get 
the right look.

Short skirt/low gather 24" wide

The 4" skirt and the 5" skirt are as long as I would go when using a 24" width for gathering. This little blue skirt is cut in 2 6 1/2" wide pieces that i stitched at the side seams. You can see how to make this skirt HERE


Knee and just below/mid gather 30" wide

This is my usual skirt length and skirt width. I find that 36" for a knee length skirt is just a bit too flouncy. My 1804 pattern has the skirt pattern pieces for the front and the back so you can fit it onto a fat quarter. A 30" gather means you save 6"on trims too. 

*************

Doll clothes patterns by valspierssews
Just one of the many variations for 1804 dress pattern

Long floor length/high gather 36" to 40" wide

The longer the skirt the wider you want it to be at the hem. Floor length skirts are OK at 30" wide but 36" is better.

This dress pattern along with the princess dress are not published.
I took them down to rewrite the instructions. They will go back up one day.

Long floor length/super high gather 50" wide (Not for the faint hearted. You have to pull up the fabric as much as it goes to get the right width.)

I have only tried 50"once. I used satin fabric for a princess dress and had so much trouble trying to pull it up enough. The gathers also create a lot of thickness so I had to make my waist band about 13" to get it all to fit on the doll. I ended up not liking the skirt as much as the one on the witch.


If you want to make an economical, easy to sew, great looking skirt go for a 24" x 5 1/2" rectangle with a 12" to 12 1/2" Waistband. If you want the skirt and waist band to overlap by a 1/2" you need to fold your fabric to mimic the waist band then wrap it around the doll and any shirt you want to tuck in. The overlap needs to be 1". You can see how I check the waist band length HERE

Waist Band Ease

The wider the skirt (more gathers) or the thicker your fabric the more ease you need in the waistband.

A cut length between 12" and 12 1/2" fits on a 30" gathered skirt so the skirt can be worn over a shirt or t-shirt. Check that the cut length fits around your doll and any tops to tuck in, with a 1" overlap. The super high gather waistband is 1" longer at 13".

The thickness the fabric you are tucking into the skirt also has to be considered. A T-shirt needs more ease than a lawn blouse.
An all purpose 12 1/2" waistband will be my "go to" waistband for my skirts now because I like to mix and match and never know which tops I want to tuck in or how much underwear she will have on. The width is a matter of taste but 3/8" to 1/2" finished width is a good look.
Remember that thicker fabric requires a longer and a wider waist band.

Free Patterns

You can add to your skirt experience by downloading a free apron accessory pattern from the Valspierssews Resource Library


An apron is a perfect accessory because you can create cute, whimsical, romantic, vintage, cooking or themed outfits by just adding an apron in the right fabric.

(The link is to a bundle. I am still testing out the Teachable site. If you have enrolled in the separate sections I am not sure that enrolling in the bundle is necessary. Get onto me at valspiers@dolldressmaking.com if there is any problem or confusion.)

Find your free apron pattern to download in the Doll Size Accessories section of my Free Resource Library.


Happy Doll Dressmaking,
Val


Sunday, March 24, 2019

Gathered skirts are perfect for dolls: Part 2 - How to make your own pattern and Free 14" skirt pattern


Please share this great pattern by Pinning the image above or sharing on FB.

Gathered skirts are a quick and simple garment for any doll.

If you have a skirt or dress that fits your doll you can make a pattern for a gathered skirt.

  • Measure the circumference of the skirt hem
  • Measure from the place you want the finished skirt to start and end. Just above the true waist (narrowest part of the torso) down to just above the knee.
  • Add what is needed for the type of casing you want. 
  • Add what is needed for the hem you want.
  • Measure the elastic around the waist of the doll dressed in a top that will tuck in. The ends of the elastic should just meet.
I have been experimenting with the skirt for the 14" Glitter Girl Doll. I trust it will fit the 14" Wellie Wisher Doll.
Even knowing the 5 steps above there is some trial and error involved. 
  • I tried several different ways to gather the waist
  • I tried several different types of elastic
  • I had to adjust the length a couple of times to get it looking just right.
  • I also found that for the smaller doll the hems and trim made the skirt stick out too much because they made the hem edge to stiff for the length of the skirt
Because I am a designer I like to experiment and see what affect different variables have on the finished garment.

I want to share the latest project with you.


It is a gathered skirt with an underskirt and a top skirt. It has two layers of netting for the underskirt that stick out below the top skirt by about a 1/2". The top skirt has a 1/4" hem and is made from light weight woven fabric that is not too stiff. Patchwork cotton works well.

I stitched the two layers of netting right side up on top of the right side of the top skirt using a 1/4' seam. I didn't trim the seam allowance.

I folded the layers so the seam was enclosed then stitched the casing rows.


It is easy to thread the elastic from CB to CB across the waist edge then you just stitch the CB seam.

If you would like to have a go making this skirt for your 14" doll I have created a new item in the Fashion File and Patterns section of my Free Resources on Teachable. You will have to sign up or sign in if you are returning. 

You get the pattern and a photo tutorial.


If you are new to Teachable, when you sign up I will transfer your email to my mailing list. If you decide you don't want my newsletter it is easy to unsubscribe. However, you will stay signed up to access the Free Resources.

Over the next few months I will be tooting my horn about the amazing sterling silver earrings that I design and my husband hand crafts by cutting out the shapes from silver sheets.
I have just set up another Etsy shop called AussieHandmade.


Even if you don't want to buy earrings I hope you will go and have a look and favourite the shop or a few items. They are really well made but I think he is a bit nervous about putting them out there.

Don't forget: 


and


Wednesday, August 1, 2018

Free Petticoat Patterns through my Newsletter Valspierssews News

Valspierssews


Petticoats are just so sweet. They have a distinctly dolly feel these days because hardly anyone wears petticoats anymore.

The first one in my free collection is a simple vintage looking design.
It is very quick to make.

You can add lots of trims or just a bit. I bought a packet of ready tied bows that are perfect to add to underwear.


I have placed the skirt pieces at the top a the page so you can easily adjust the hem edge before you cut out the pattern pieces. Make pattern pieces for several different dress lengths or customise the length for each dress you make.


Valspierssews dress patterns have just enough ease to fit over the petticoat and still do up.


I have included instructions for two views. One with the finished border edge and one with a lined bodice.


Make sure you are subscribed to my newsletter before 14th August Australian time so you don't miss out. There will be 5 different petticoat patterns. One each month for the rest of this year.

When the second newsletter comes out for that month I will take down the free file and put it in my shop.

You can sign up for my newsletter HERE

Happy Sewing,
Val