Wednesday, November 13, 2019

Vintage doll clothes suspender trousers pattern for 18” dolls


These cute 50s style trousers have slant pockets, elastic in the back and suspenders that cross in the back.


The turtle neck sweater is perfect to wear for the colder weather. It is easy to make with collar and cuffs from the same knit fabric. No need to find matching ribbing.


As an extra for Halloween there is an easy to create spooky eyes costume made from a variation of the turtle neck sweater. A full pattern for this round neck sweater and instructions and diagram for the applique eyes is ready to down load and save as an idea for next Halloween.


I made this little round neck sweater from stretch velvet and I used lace trim to hem the neck and wrists


You can find these patterns in my store
In Etsy  


Happy Doll Dressmaking,
Val


Friday, September 13, 2019

Cute button front skirt pattern for 18” dolls

Button front skirt for 18" dolls


Some styles are just perfect for dolls. I love the way a flat front yoke or waist band makes a doll outfit look like a mini person outfit.


This modern little skirt was inspired by a Vogue skirt design I saw in Australian Vogue Magazine. The little belt loops and belt are an easy way to glam up the skirt.

I noticed this skirt has a bit more gather and a button band down the front. That will be a good idea for a variation on this design. I will keep that in mind for another time.


Happy Doll Dressmaking,
Val


Vintage Skirt and Blouse for 18" dolls

valspierssews vintage 50s skirt and blouse doll clothes pattern

Aren't vintage outfits cute on dolls?

I am really taken with the 50s designs for little girls and I love translating them into doll clothes.

In order to get a good idea of the type of clothes children used to wear in the 50s I looked up the archived pages of the Betsy McCall paper doll that came out in the McCalls magazine over several decades.

You can find the paper doll pages year by year HERE

You can find out more about Betsy McCall HERE

The page I started with is July 1951 and Betsy is going to visit her grandma on a farm.  I have recreated the red skirt style and the blouse.


Happy Doll Dressmaking,
Val


Saturday, September 7, 2019

The 50s L-seam petticoat pattern for 18” dolls

Free petticoat patterns by valspierssews


I love to design and when I started designing petticoats I just kept going. After 5 designs, including the drafting, the sewing and the instruction writing I decided it was time to get back to some dresses. I wouldn't expect you to make all 5 petticoats at once but making a dress and a petticoat at the same time is an easy way to create a beautiful outfit.
You will also find some panties patterns in the pattern library that are easy to make as well.

It's always fun to complete an outfit with underwear and there is no need to use the same old petticoat pattern for every dress you make. I created this petticoat collection to showcase some of the best designs from different eras so you can choose the perfect design to suit the dress you have made.

The 50s L seam petticoat

  • Perfect fit for dolls like American Girl Doll or Our Generation Dolls
Don't you hate it when a pattern doesn't fit your doll!

When I create patterns I include enough ease to help them fit a range of doll tummies. This petticoat just fits my vintage Kit with a waist of 11", yet it still looks good on the slimmer dolls. The tapered waist on the bodice pattern pieces make it easy to adjust the waist by just straightening out the side edge before you cut out.
  • Full step by step instructions
Do you like instructions that are made for printing out?
Do you like the idea of minimal pages with clear neat diagrams?

Your instruction pages consist of line diagrams with some shading and easy to read 12pt text. This makes them perfect for printing out.


The diagrams clearly depict each step and you will find the right side of the fabric lightly shaded and the linings marked with a simple hash mark to make it obvious what you are looking at. Since the diagrams can be smaller than photos and still show the details, patterns written by me rarely have more than 8 pages.

The clarity of the diagrams and the size of the text make the instruction pages perfect for making into 1/2 page booklets using the booklet button in Adobe Reader.


Free petticoat by valspierssews


You can read more about this petticoat and more photos in this blog post


These petticoats will be added to the newsletter pattern vault for subscribers.
See the signup box at the top of the blog.


Happy Doll Dressmaking,
Val

Sunday, August 25, 2019

How to create Butterfly sleeves for doll dresses

How to create Butterfly sleeves for doll clothes patterns

One of the reasons I keep getting behind on the pattern instructions is that I love to experiment with pattern pieces instead of making the one dress and writing up the pattern.

Last year I had a go at making a ruffle sleeve based on what I had seen for ruffles in other patterns, not particularly butterfly sleeve patterns. This time I just used sleeve patterns and cut off the bottom part. I can't believe I didn't think of doing that before.

This was my first attempt:

A few weeks ago I found a dress on pinterest that I just loved. It had sort of arm hugging butterfly sleeves. My first thought to recreate them was to use the blouse sleeve from my 1806 blouse. I knew it had a bit of gathering on the sleeve head but was fairly fitted down the arm.

This is how I adjusted it tp make it flutter just a bit.


I thought it turned out great. This cute pink gingham midi dress pattern is available to buy from my Etsy shop.


valspierssews doll clothes


Armed with lots of confidence I decided to make it flutter a bit more.

I used the basic puffed sleeve that I have used in several of my early patterns. It is the puffed sleeve that normally has a sleeve band.

Here is how I adjusted it:

The deeper curved hemline is the one I have tried in this floral dress.


I have just finished the bodice so that is all you see of this one.
Now I think it looks OK and I will probably use this pattern again for various garments but I thought it was just a tad overwhelming on this delicate looking doll. It does look a bit better on one of the other dolls.

Anyway, I have made another adjustment to the puffed sleeve so the flutter is quite as broad.
You can see that when I drew the lines for the new cutting lines I in the armhole part of the sleeve at the point that i thought looked about halfway down the armhole from the shoulder. Don't forget you have to take into account that the sleeve head has to be gathered quite a lot so it is not halfway between the centre of the sleeve and the underarm.

  • Once you have hemmed the bottom edge and added trim you gather the sleeve head.
  • Place the gathered edge right sides together with the main bodice armhole and baste in place. 
  • I put dots on my bodice pieces so I could tell where the pointy part had to go.
  • Place the bodice lining right sides together with the main lining to enclose the sleeves. Stitch around the armholes and down the back edges. Leave the neck edge open and bind it after turning your bodice.


I hope these guidelines will encourage you to customise lots of the patterns you already own. I'm sure you will be able to find a couple of suitable sleeves to use.
Just incase you don't have any you can find the blouse pattern HERE and the puffed sleeve on this dress HERE or HERE.

If you just want to make a nice dress with butterfly sleeves the Gingham Midi one is in my shop.

Monday, May 13, 2019

How to sew the side seams on a sleeveless lined doll dress

How to line a sleeveless doll dress bodice by valspierssews


If you love making doll dresses from pretty cotton fabrics that quilters use then lining the bodice with a similar fabric gives a lovely smooth neat finish.
  • Don't get carried away with trying to fully line a bodice so you can't see any exposed seams.
  • These days clothes rarely have a separate lining. 
  • Historically outfits were lined to stop perspiration spoiling the fabric. 
  • You should be lining doll clothes to create the best look. 
  • Just line the bodice but leave the sleeve seams and side seams exposed.


You can enclose the side seams on a sleeveless bodice

Here's how I use lining to create neat a very neat finish both inside and out for a sleeveless dress.
You leave the side seams for last so they are hidden between the main bodice and the lining.
This method eliminates the need for neck and armhole facings or fiddly 1/4" hems.

Start by sewing the shoulder seams for the main and the lining. Baste the collar in place on the right side of the main bodice.

Place the main and lining right sides together and stitch the back and neck and around each armhole.

Turn the bodice right side out and press it.

The hardest part is working out how to do the side seams.


It is a matter of pinning the main sides together and the lining sides together.


Download a PDF with a photo tutorial of how to sew the side seams. 
You can get access to a variety of instructions and doll clothes patterns when you join my monthly Newsletter

I love this little dress. You could make a whole summer wardrobe for your doll with this one design. Just use different fabrics and add some different trims. This is my 1804 The 18" Dress.  There are lots of variations with sleeves and collars and skirt lengths included in the pattern. Read more about the 1804 dress pattern here. or just Buy it NOW


Happy Doll Dressmaking
Val


Friday, April 26, 2019

How to sew a doll skirt with a waist band

How to sew a skirt for doll clothes


How to sew a doll skirt

A friend of mine asked me if I would make an outfit for her vintage doll to replace the original clothes the doll came dressed in. You know how it is. The clothes were just gone.

If you think you are ready to move onto making a gathered skirt with a waist band I am slotting this blog post ahead of more elastic waist variations because I promised to dress the vintage doll.

I have quite a few skirt patterns in my Etsy shop. I have yet to publish them in my Aussie shop. Just let me know if there is something you want me to upload.

I love these vintage suspender skirts


Make sure you check out this tutorial for the Glitter Girl gathered skirt HERE.

And you can find lots more about designing a gathered skirt in this blog post HERE
Also you can join my free resources library.

How to sew a gathered skirt for your doll

The skirt part

This doll is about 14" tall so I am going to use the same size skirt that I made for the Glitter Girl because that amount of width at the hem looks good on this doll too.
I am cutting the skirt strip 4 1/2" x 24". I ended up using the same pattern piece that I used for the netting in this skirt HERE

valspierssews doll clothes patterns


If I was making the skirt for my:

  • 18" dolls I would cut the skirt strip 6" x 30"
  • 19" Gotz Hannah doll I would cut 6" x 30"
  • 20" Australian Girl Doll I would cut 6 1/2" x 30"

This allows for a waist seam of a good 1/4" and a hem of a good 1/4".
I say 'good' because I find that you always need a bit more to cover the gathering threads and you always cut a fraction off when you overlock the hem edge.
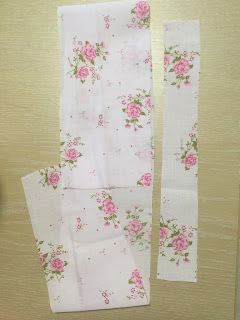
Skirt Pieces
Overlock the back facing edges.
Overlock the hem edge and turn up a 1/4" hem.
Press in the back facing about a 1/2".


The waist band

Just remember that the thicker your fabric the longer the waist band needs to be.
My waist band will enclose the waist seam and overlap by 1/2" at the centre back.
This means I need to measure the doll's waist then add 1/2" for the overlap as well as another 3/4" for the seams on each end. I say 3/4" because it always seems to work out as a bit more than a 1/4" overhang at the backs when you pin on the waist band. If you want the skirt to go over a blouse or T-shirt you should measure the doll's waist over the blouse or shirt or add an extra 1/8" on a small doll and closer to 1/4" for big dolls.

The vintage doll waist is a bit less than 8 1/2" so I am going to use 8 1/2" + 1/2" +3/4" = 9 3/4 for my waist band strip.


Because the doll is small I will use a 3/8" finished width for my waist band. For bigger dolls I would use 1/2" finished width. If your fabric is thicker than light cotton or polycotton you should allow an extra 1/4" for folding the seams into the waist band.

Press in a 1/4" on one long side of the waist band.
Pin the right side of the waist band to the wrong side of the skirt.
Keep the back facings folded in and extend the ends of the waist band 1/4" past the skirt backs.

valspierssews doll clothes patterns


Stitch then trim the seam a bit. Press the waist band up towards the seam.
Fold in the ends of the waist band then....
Fold the turned under edge to the front and stitch it down. I use a small patch of hook and loop at the waist in the back.
I now have a skirt pattern I like for this doll. I will be making the outfit skirt next.


If you are looking for patterns for various skirts for various sized dolls you should look out for my Pattern Club opening soon.

New Pattern Club Coming Soon

I am starting up a membership site in the next few months. I already have a few patterns in place and I have 3 great new patterns lined up for the first month's instalment. I will be opening the enrolment for 10 days only. Founding members will have the lowest price of $10USD/month. Every six months over a couple of years I will be opening membership with an increased price. The final subscription fee for a huge pattern resource and continuing new additions will be around $20USD


If you don't want to miss out on the sign up period click the link below and leave your email address. (This is a separate list from my newsletter)

Sign up to be notified when the Valspierssews Pattern Club is open to join

I will still be adding free resources to my Resource Library at dolldressmaking.teachable.com 
If you are not already signed up you should check it out.


Happy Doll Dressmaking,
Val


Monday, April 8, 2019

How to sew a doll skirt for 18" American Girl dolls

valspierssews

While researching and sewing for the doll skirts blog posts I came across this old post. I have updated the post. I thought it would also be a good time to revisit the free apron I included in the newsletter last year. You can find it in the Doll Accessories Section in the Free Resource Library

Skirt Length

The skirt looks best with the waistband a bit above the waistline. You need to add 1/2" to each of the skirt lengths listed. 1/4" for the waist seam and 1/4" for the hem. Finished skirt lengths that I like are:

4" for a cute dolly look. (high gather for a Betsy McCall look)


5" for a nice party dress or day dress and a more demure look.


7" for midi skirts and a casual look. (at least mid gather)

9" + shoe height for ankle length just above the floor. (at least mid to high gather)

9 1/2" + shoe height just skims the floor. (at least mid to high gather)

Remember, you need to add 1/4" or 1/2" for the waist seam and 1/4", 3/8" or 1/2" for a hem.

Skirt Width

There are 3 widths of skirt that work well depending
on how much gather you want. I have also found that 
the longer the skirt the more width you need to get 
the right look.

Short skirt/low gather 24" wide

The 4" skirt and the 5" skirt are as long as I would go when using a 24" width for gathering. This little blue skirt is cut in 2 6 1/2" wide pieces that i stitched at the side seams. You can see how to make this skirt HERE


Knee and just below/mid gather 30" wide

This is my usual skirt length and skirt width. I find that 36" for a knee length skirt is just a bit too flouncy. My 1804 pattern has the skirt pattern pieces for the front and the back so you can fit it onto a fat quarter. A 30" gather means you save 6"on trims too. 

*************

Doll clothes patterns by valspierssews
Just one of the many variations for 1804 dress pattern

Long floor length/high gather 36" to 40" wide

The longer the skirt the wider you want it to be at the hem. Floor length skirts are OK at 30" wide but 36" is better.

This dress pattern along with the princess dress are not published.
I took them down to rewrite the instructions. They will go back up one day.

Long floor length/super high gather 50" wide (Not for the faint hearted. You have to pull up the fabric as much as it goes to get the right width.)

I have only tried 50"once. I used satin fabric for a princess dress and had so much trouble trying to pull it up enough. The gathers also create a lot of thickness so I had to make my waist band about 13" to get it all to fit on the doll. I ended up not liking the skirt as much as the one on the witch.


If you want to make an economical, easy to sew, great looking skirt go for a 24" x 5 1/2" rectangle with a 12" to 12 1/2" Waistband. If you want the skirt and waist band to overlap by a 1/2" you need to fold your fabric to mimic the waist band then wrap it around the doll and any shirt you want to tuck in. The overlap needs to be 1". You can see how I check the waist band length HERE

Waist Band Ease

The wider the skirt (more gathers) or the thicker your fabric the more ease you need in the waistband.

A cut length between 12" and 12 1/2" fits on a 30" gathered skirt so the skirt can be worn over a shirt or t-shirt. Check that the cut length fits around your doll and any tops to tuck in, with a 1" overlap. The super high gather waistband is 1" longer at 13".

The thickness the fabric you are tucking into the skirt also has to be considered. A T-shirt needs more ease than a lawn blouse.
An all purpose 12 1/2" waistband will be my "go to" waistband for my skirts now because I like to mix and match and never know which tops I want to tuck in or how much underwear she will have on. The width is a matter of taste but 3/8" to 1/2" finished width is a good look.
Remember that thicker fabric requires a longer and a wider waist band.

Free Patterns

You can add to your skirt experience by downloading a free apron accessory pattern from the Valspierssews Resource Library


An apron is a perfect accessory because you can create cute, whimsical, romantic, vintage, cooking or themed outfits by just adding an apron in the right fabric.

(The link is to a bundle. I am still testing out the Teachable site. If you have enrolled in the separate sections I am not sure that enrolling in the bundle is necessary. Get onto me at valspiers@dolldressmaking.com if there is any problem or confusion.)

Find your free apron pattern to download in the Doll Size Accessories section of my Free Resource Library.


Happy Doll Dressmaking,
Val