Saturday, April 21, 2018

1870 Module 4 Side Seams for Reversible Jacket

To make the jacket reversible you need to stitch the side seams this way. You finish the bottom hem edge after.

The heart fabric is my lining. Lay the jacket flat.

Lift the lining ...

...and separate the lining and main at the wrist seam

Fold it and bring the ends of the wrist seams together. Pin.

Move along the lining bringing the edges together and pinning.
Match the underarms.

Bring the side edges together. Lining back to lining front and pin
at the hem edge.
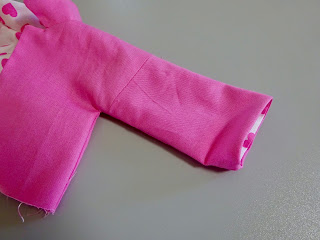
Do the same for the main sleeve and side seams.

You get an odd looking ring.

I pin with the outsides facing me but I sew on the inside of the ring.
If your pins are at right angles to the edge this is easier.

Stitch.

Clip into the corners at the underarms. Finger press the seams open.

Put your thumbs in the main sleeve and use your fingers to start turning it
right side out.

Keep working it right side out.

Stop when you see the lining.

Try to keep the seams open as you bring the main and lining together along
the sleeve and side seams.  Press.

Saturday, April 7, 2018

Easy Designing without Drafting with Valspierssews: Fashion File 29

valspierssews


I love creating new designs with the pattern pieces from more than one pattern.

If that is not your thing you can purchase the pattern and instructions in my shop.

I call the process "Easy Designing without Drafting"

It is OK sometimes to make things from scratch but most of the time I like to mix and match fashion elements from different patterns. That way I know it is going to fit.

This is how I made my Easter Dress and Daisy Dress.

You will need:

  • the pleated puffy sleeve from 1810
  • the sleeve band from 1810
  • the bodice from the line dress in 1804
  • the cut down peter pan collar from the unlined dress in 1804
  • a strip for the skirt 33" long x 8 3/4" wide or 2 backs 9" x 8 3/4" and one front 16" x 8 3/4"
  • 2 strips 15" x 2" for the sash ties
Using the same fabric for the lining you will need 19" of 45" wide fabric.

If you would like to know when I create new designs or put up another great blog post about doll clothes you should sign up for my Newsletter.

Sleeve Pleats


  • Crease the pattern piece along the pleat fold lines.


  • To make the sleeve pleats mark the fold lines on each side of the sleeve. 


  • Add a pin or two as a guide in the middle.

  • Press to fold them then stitch 1/4" away from the fold across the sleeve so you make a 1/4" pleat. Sew the second pleat. 

  • Press them down.
When the pleats are completed:
  • Gather the bottom edge of the sleeve and put on the band. See 1810 or 1804
  • Complete the lined bodice with the collar. See 1804
  • Gather the top of the sleeve and stitch it to the bodice.

Sash Ties

  • Make the sash ties by pressing the strips in half. 
  • Open them out and press in 1/4" along both long edges. 
  • At one end open out the seam allowance and fold it right sides together.
  • Trim the end to a slight angle.
  • Stitch the last inch and across the end.
  • Turn it and press it then stitch down the open side across the end and up the folded side. 
  • Place the raw end of the sash tie in the side seam of the bodice 1/4" up from the waist edge so it doesn't get sewn into the waist seam. Baste them both in place then stitch the side seams.

Growth Pleats

  • I am using the pattern pieces from FF29 Kit.
  • I like side seams to help adjust the gathering.

  • Crease the fold lines on the pattern pieces.

  • Mark the growth pleat folds lines using the pattern pieces 
  • Or measure up 2 1/2" and 4 3/8" from the bottom edge and mark the fold lines.
  • Use a few pins to mark across the middle.

  • Fold each one and press it.
Before stitching the growth pleats
  • Overlock the hem edge of the skirt and the back edges.
  • Press up 1/2" hem and stitch by hand or with the blind hem stitch.
  • Stitch the growth pleats 1/2" from the fold. Press the pleats down.
  • Gather and sew on the skirt. See 1804
  • Stitch the growth pleats 1/2" from the fold.

  •  Press the pleats down.

Finishing

Complete the rest of the dress.
  • Gather and sew on the skirt. See 1804
This is an easy project. You just need a bit more time to measure and sew the pleats.
Once you realise that Easy Designing without Drafting is a great way to expand your design collection you will be creating up a storm.

If you like the idea of just getting all the pattern pieces and the instructions in a neat kit you can
buy FF29 in my shop.

Happy Sewing,
Val

P.S.
If you like this blog post don't forget to sign up for my Newsletter so you don't miss anything.

Thursday, April 5, 2018

Going, Going, Gone: Special Offer on Doll Clothes Patterns


Going, Going, Gone

I have put together a special bundle of my tailored fashions.
  1. The jeans, 
  2. the jeans jacket and 
  3. the boyfriend shirt. 
I started designing with the idea that I would make multi-use patterns. These designs are fun but they will always be jeans, a jacket and a shirt.
I like to keep coming back to my designs and create new variations or use the fashion elements somewhere else. So out they go.

Limited time offer so you can put away some patterns for your winter sewing.

There are just 100 in the store and when they are gone the bundle disappears.

Pop on over to the shop now.


Also the jeans jacket with lots of detailing.


Jump on over to the shop now.

Wednesday, April 4, 2018

Custom Creation Doll clothes by Valspierssews

Use my Designing without Drafting method to make Custom Creations with a Fabulous Fit.

I have been saying how easy it is to create your own designs using my patterns because it just is.
Here is the cute school dress I put together using fashion elements from various patterns.


You can read about it here

The latest variation on 1827 bodice is a square neck. I haven't tested this out yet so fingers crossed it looks great. I plan to combine the bodice with the pencil skirt from 1828. I will be using the blouse as is from 1827 to go under the dress.

I'm still testing out the square neck pattern piece but when you make your own creations you will be using pattern pieces that you know look great from other Valspierssews patterns.

There are lots of sleeve variations across my designs and they can be used with almost any other pattern. The same with the skirt styles and there is a growing number of bodice styles too.

How you can do it:


  • Print out a blank envelope with the doll outline on it.
  • Draw up your design from your head or a picture you have.
  • Choose patterns that have the fashion elements you are after.
  • Print out a new set of the pieces you want.
I will be posting a link to the envelope soon.

If the square neck dress looks good you will be able to download the square neck variation soon too.


Print out a blank envelope with the doll outline on it.
Draw up your design from your head or a picture you have.


Choose patterns that have the fashion elements you are after.

Print out a new set of the pieces you want.


Print out a new set of the pieces you want.
You will be able to keep all your new designs neatly stored.
When you sign up to receive my newsletter you won'y have to worry about missing any free content upgrades because I always put links to the blog posts for that fortnight in the newsletter.


Happy Sewing,
Val