Showing posts with label vintage design. Show all posts

Wednesday, November 13, 2019

Vintage doll clothes suspender trousers pattern for 18” dolls


These cute 50s style trousers have slant pockets, elastic in the back and suspenders that cross in the back.


The turtle neck sweater is perfect to wear for the colder weather. It is easy to make with collar and cuffs from the same knit fabric. No need to find matching ribbing.


As an extra for Halloween there is an easy to create spooky eyes costume made from a variation of the turtle neck sweater. A full pattern for this round neck sweater and instructions and diagram for the applique eyes is ready to down load and save as an idea for next Halloween.


I made this little round neck sweater from stretch velvet and I used lace trim to hem the neck and wrists


You can find these patterns in my store
In Etsy  


Happy Doll Dressmaking,
Val


Friday, April 26, 2019

How to sew a doll skirt with a waist band

How to sew a skirt for doll clothes


How to sew a doll skirt

A friend of mine asked me if I would make an outfit for her vintage doll to replace the original clothes the doll came dressed in. You know how it is. The clothes were just gone.

If you think you are ready to move onto making a gathered skirt with a waist band I am slotting this blog post ahead of more elastic waist variations because I promised to dress the vintage doll.

I have quite a few skirt patterns in my Etsy shop. I have yet to publish them in my Aussie shop. Just let me know if there is something you want me to upload.

I love these vintage suspender skirts


Make sure you check out this tutorial for the Glitter Girl gathered skirt HERE.

And you can find lots more about designing a gathered skirt in this blog post HERE
Also you can join my free resources library.

How to sew a gathered skirt for your doll

The skirt part

This doll is about 14" tall so I am going to use the same size skirt that I made for the Glitter Girl because that amount of width at the hem looks good on this doll too.
I am cutting the skirt strip 4 1/2" x 24". I ended up using the same pattern piece that I used for the netting in this skirt HERE

valspierssews doll clothes patterns


If I was making the skirt for my:

  • 18" dolls I would cut the skirt strip 6" x 30"
  • 19" Gotz Hannah doll I would cut 6" x 30"
  • 20" Australian Girl Doll I would cut 6 1/2" x 30"

This allows for a waist seam of a good 1/4" and a hem of a good 1/4".
I say 'good' because I find that you always need a bit more to cover the gathering threads and you always cut a fraction off when you overlock the hem edge.
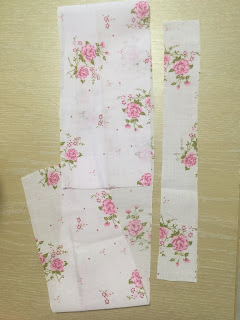
Skirt Pieces
Overlock the back facing edges.
Overlock the hem edge and turn up a 1/4" hem.
Press in the back facing about a 1/2".


The waist band

Just remember that the thicker your fabric the longer the waist band needs to be.
My waist band will enclose the waist seam and overlap by 1/2" at the centre back.
This means I need to measure the doll's waist then add 1/2" for the overlap as well as another 3/4" for the seams on each end. I say 3/4" because it always seems to work out as a bit more than a 1/4" overhang at the backs when you pin on the waist band. If you want the skirt to go over a blouse or T-shirt you should measure the doll's waist over the blouse or shirt or add an extra 1/8" on a small doll and closer to 1/4" for big dolls.

The vintage doll waist is a bit less than 8 1/2" so I am going to use 8 1/2" + 1/2" +3/4" = 9 3/4 for my waist band strip.


Because the doll is small I will use a 3/8" finished width for my waist band. For bigger dolls I would use 1/2" finished width. If your fabric is thicker than light cotton or polycotton you should allow an extra 1/4" for folding the seams into the waist band.

Press in a 1/4" on one long side of the waist band.
Pin the right side of the waist band to the wrong side of the skirt.
Keep the back facings folded in and extend the ends of the waist band 1/4" past the skirt backs.

valspierssews doll clothes patterns


Stitch then trim the seam a bit. Press the waist band up towards the seam.
Fold in the ends of the waist band then....
Fold the turned under edge to the front and stitch it down. I use a small patch of hook and loop at the waist in the back.
I now have a skirt pattern I like for this doll. I will be making the outfit skirt next.


If you are looking for patterns for various skirts for various sized dolls you should look out for my Pattern Club opening soon.

New Pattern Club Coming Soon

I am starting up a membership site in the next few months. I already have a few patterns in place and I have 3 great new patterns lined up for the first month's instalment. I will be opening the enrolment for 10 days only. Founding members will have the lowest price of $10USD/month. Every six months over a couple of years I will be opening membership with an increased price. The final subscription fee for a huge pattern resource and continuing new additions will be around $20USD


If you don't want to miss out on the sign up period click the link below and leave your email address. (This is a separate list from my newsletter)

Sign up to be notified when the Valspierssews Pattern Club is open to join

I will still be adding free resources to my Resource Library at dolldressmaking.teachable.com 
If you are not already signed up you should check it out.


Happy Doll Dressmaking,
Val


Saturday, July 21, 2018

1883 High Waist Suspender Skirt Doll Clothes Pattern by Valspierssews

valspierssews


If you have been waiting for the high waist suspender skirt with the circle skirt then I am happy to announce that you can now purchase it in my Etsy Shop.

The two suspender skirt designs are very cute and very 50s looking. Especially if you add the vintage blouse with the piping.


There are two styles for the circle skirt. View 1 has the front cut on the fold and View 2 has a centre front seam and is cut on the bias. The skirt with the CF seam is perfect for plaids, checks and even stripes.


I did my bias cut version out of a light weight wool fabric to make a winter outfit. The bias cut makes it drape nicely. For the top I made a turtleneck from double knit ponte fabric using my Classic Knits pattern that will be out soon.


You won't find any knit patterns in the shop except the easy-t just yet because I am revamping the original 1801.  The original was a bargain but it was a bit over the top for inexperienced doll dressmakers. I got a bit carried away in the early days thinking that everyone could just throw together any option they liked from lots of pattern piece variations. 

Slight adjustment for light winter fabric

If you want to make a winter suspender skirt I explain in the high waist pattern that you will need to make just a slight sewing adjustment for the waist band. All you need to do it stitch each end of the waist band at 1/8" seam allowance but the top edge is still 1/4" seam allowance. This makes the waist band about 1/4" longer allowing for the thicker fabric in the skirt as well as the thicker fabric you may want to use for the sweater top. You will also need to adjust the back facing of the circle skirt down to 3/8" instead of the usual 1/2".


Because this design is simple as far as I am concerned it will go up at $4 AUD like the other simple suspender skirt design. My usual price is $5 AUD (about $3.70 USD) with the occasional more time consuming design up around $6 to $8 AUD.
You may find that each year I add a bit more as sales drop off on the earlier patterns and my skills improve for the later patterns but my aim is to provide top quality at a price I think is reasonable for an instant download.
I can't compete with the Joanne's sales on tissue patterns but I also think a pdf download that you can print out on sturdy printer paper and renew whenever it gets a bit rough, makes instant downloads better value.

I have lots of great instant downloads in my Etsy Shop.
Make sure you have a look around when you pop over the get your copy of 1883 High Waist Suspender Skirt.

Happy Sewing,
Val

Saturday, May 19, 2018

Vintage Suspender Skirt Pattern for 18" Dolls

1882 Suspender skirt

Sometimes you just want to make something cute for your doll. This suspender skirt design is perfect for a 50s look. Team it with a blouse or a turtleneck or even a t-shirt.


It looks pretty simple to design but why bother designing your own when you can just buy the pattern already neatly drawn with clear instructions. You know when you make it up it will fit your 18" doll. It is designed to fit dolls similar to the American Girl Doll®.

No need to experiment.

These outfits are made by teaming the skirt with 1806 Open Neck Blouse View 1.


If you like to design you can try the circle skirt from 1827 on this waist band. Just put the skirt pieces together then trim off 1 1/2" from the hem edge.

Or you can just wait for the next suspender skirt that I am working on. It has a high waist and the short circle skirt.


Buy the gathered suspender skirt in my Etsy shop.

Happy Sewing,
Val

Saturday, April 7, 2018

Easy Designing without Drafting with Valspierssews: Fashion File 29

valspierssews


I love creating new designs with the pattern pieces from more than one pattern.

If that is not your thing you can purchase the pattern and instructions in my shop.

I call the process "Easy Designing without Drafting"

It is OK sometimes to make things from scratch but most of the time I like to mix and match fashion elements from different patterns. That way I know it is going to fit.

This is how I made my Easter Dress and Daisy Dress.

You will need:

  • the pleated puffy sleeve from 1810
  • the sleeve band from 1810
  • the bodice from the line dress in 1804
  • the cut down peter pan collar from the unlined dress in 1804
  • a strip for the skirt 33" long x 8 3/4" wide or 2 backs 9" x 8 3/4" and one front 16" x 8 3/4"
  • 2 strips 15" x 2" for the sash ties
Using the same fabric for the lining you will need 19" of 45" wide fabric.

If you would like to know when I create new designs or put up another great blog post about doll clothes you should sign up for my Newsletter.

Sleeve Pleats


  • Crease the pattern piece along the pleat fold lines.


  • To make the sleeve pleats mark the fold lines on each side of the sleeve. 


  • Add a pin or two as a guide in the middle.

  • Press to fold them then stitch 1/4" away from the fold across the sleeve so you make a 1/4" pleat. Sew the second pleat. 

  • Press them down.
When the pleats are completed:
  • Gather the bottom edge of the sleeve and put on the band. See 1810 or 1804
  • Complete the lined bodice with the collar. See 1804
  • Gather the top of the sleeve and stitch it to the bodice.

Sash Ties

  • Make the sash ties by pressing the strips in half. 
  • Open them out and press in 1/4" along both long edges. 
  • At one end open out the seam allowance and fold it right sides together.
  • Trim the end to a slight angle.
  • Stitch the last inch and across the end.
  • Turn it and press it then stitch down the open side across the end and up the folded side. 
  • Place the raw end of the sash tie in the side seam of the bodice 1/4" up from the waist edge so it doesn't get sewn into the waist seam. Baste them both in place then stitch the side seams.

Growth Pleats

  • I am using the pattern pieces from FF29 Kit.
  • I like side seams to help adjust the gathering.

  • Crease the fold lines on the pattern pieces.

  • Mark the growth pleat folds lines using the pattern pieces 
  • Or measure up 2 1/2" and 4 3/8" from the bottom edge and mark the fold lines.
  • Use a few pins to mark across the middle.

  • Fold each one and press it.
Before stitching the growth pleats
  • Overlock the hem edge of the skirt and the back edges.
  • Press up 1/2" hem and stitch by hand or with the blind hem stitch.
  • Stitch the growth pleats 1/2" from the fold. Press the pleats down.
  • Gather and sew on the skirt. See 1804
  • Stitch the growth pleats 1/2" from the fold.

  •  Press the pleats down.

Finishing

Complete the rest of the dress.
  • Gather and sew on the skirt. See 1804
This is an easy project. You just need a bit more time to measure and sew the pleats.
Once you realise that Easy Designing without Drafting is a great way to expand your design collection you will be creating up a storm.

If you like the idea of just getting all the pattern pieces and the instructions in a neat kit you can
buy FF29 in my shop.

Happy Sewing,
Val

P.S.
If you like this blog post don't forget to sign up for my Newsletter so you don't miss anything.

Sunday, October 9, 2016

1843 Publishing a new doll clothes pattern

valspierssews doll clothes


I have really enjoyed creating this pattern from such a cute design. It was a request from one of my followers and it has stretched me but also made me more aware of how much I am capable of.

I had to work out the best way to do the yoke and settled on cutting the curve in the front and back dress and stitching on the curved yoke. I was surprised at how easily the two curves fit together for sewing.


I had to reshape my existing sleeves to make the cream puff rounded shape and was thrilled that it worked first go.


I suppose the greatest challenge was drawing the flared and curved diagrams for the instructions. I had to copy from the actual fabric stages to get the perspective right. I imagine that those of you making this dress will look at your fabric item and use it to make the diagrams more clear if you need to.


My other big news is the arrival of a new doll. Well, actually she is an old doll. I bought an original Kit Kittredge so I could make sure my designs fit the older American Girl dolls as well as the modern dolls. I know Kit is circa 2000 but I am not exactly a collector and wasn't prepared to pay the high prices being asked for the pre-Mattel dolls. I will post a bit more about Kit later.


Here are some photos of the dress and how it goes together. They are the same as the ones in my Facebook album for 1843.


The pink dress has more flare than the yellow dress which makes it look longer as well. I think I like the fuller flare more than the original flare that I designed.
I also tried piping around the yoke. I think the lace ruffle or any ruffle looks better than the piping mainly because it is much easier to do than the piping. I had to use my piping foot for the first time too. I think ruffled broderie anglaise would look good too.


You can find this pattern 1843 in my Etsy Shop. I have several 50's designs.

Happy Sewing,
Val