Showing posts with label 1882. Show all posts

Wednesday, July 4, 2018

New Vintage Blouse Pattern for 18" Dolls

Valspierssews
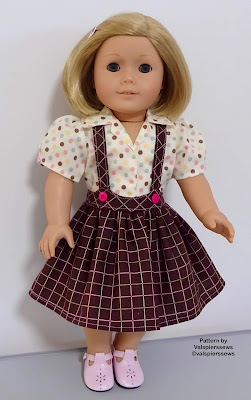
Blouse with high waist skirt 1883

I know you will love this blouse and suspender skirt combination.

SHOP NOW

Both the skirt and the blouse are easy to sew.


I decided to put the blouse and high waist skirt up separately because I know some of you will enjoy creating the high waist skirt from patterns 1882 and 1827.


Don't be hesitant about sewing a facing in the front of the blouse. If you line up the seam lines for the facing and the shoulder it all sits perfectly.


I will be experimenting with adding a narrow bias binding strip on top of the collar and under the facing when you sew on the collar but for now I am happy with the seam showing. You only see it when the blouse is not on the doll.

This blouse is part of my Snugfit Range so you can swap the sleeves between this one and the the Open Neck Blouse 1806.

The collar for 1806 is easier than the very curved collar in this vintage blouse and looks just as nice. You can use the piping sleeves to retain the vintage look.

Look out for the high waisted skirt soon. It will be 1883.


You can find the vintage blouse and the regular waist suspender skirt in my shop now.


Happy Sewing,
Val Spiers Sews
Tinker, Tailor, Doll Dress Maker.

Monday, July 2, 2018

Easy velcro patches on doll clothes. Much better than strips.

I always use velcro patches instead of strips.
This is a vintage blouse with piping.

I love piping but I am definitely not a fan of putting piping on the collar. However, I am really happy with how it turned out.

I will probably stick with piping on the sleeves, a plain collar and coloured buttons to match the piping. It looks great. I will put up some pictures soon.

Today I am working on acute vintage blouse that goes with any of the suspender skirt patterns I am making.

Skirt 1882 is in the shop for just $4 AUD.  It is teamed with 1806 Open Neck Blouse.
See how you can make a circle skirt version here or keep an eye out for the circle skirt version in the shop.


The vintage blouse will be published soon. Keep an eye out.

I like to use just three patches on a blouse.
Do the top and bottom first then just centre the middle one by eye.
I will not line a garment unless it has no sleeves or no collar. I find lining for the sake of it just makes the garment stiffer and less normal looking. The front facing I have drafted fit very neatly into the shoulder. You would never know there is just a facing.

The hooks go on first under the right front.
Then the loops go on top of the left front.

I lay the fronts like this so I can position the loops.
Just hold it in place to put it under the needle.

All done. It only takes a few minutes.
It is easy to close and open and the small pieces
are easy to get out of the hair if that is where they end up.
Ready for the buttons.
I have used matching thread in the bobbin so the stitching hardly shows.
I think I used a velcro strip on my first ever garment and never again. I am really happy with the patches. You should give them a go.

Happy Sewing,
Val

Thursday, June 21, 2018

Doll Clothes Circle Skirt Length Adjustment for 18" Dolls

Valspierssews


Creating your own custom designs is easy when you have some well fitting basic pattern pieces.

You can buy my pattern for the cute dirndle skirt with the shaped waist band and suspenders but you don't have to settle for just that design.

Valspierssews


I worked out that you can add a 1/2" to the depth of the waist band without affecting how it fits then combine it with the circle skirt from 1827 and you have a whole new look. It is easy to make a few adjustments to the length of the suspenders before you sew them on with the buttons.

I have started laying out my photo tutorials with the instructions written in the photo caption area. I noticed that when you convert it to a PDF to save or print out the photos tend to end up all over the place compared to the body text. However, the caption sticks to the photo.

The circle skirt for 1827 is a longer vintage length but it needs to be a bit shorter and cuter for the suspender skirt design.


Print out the 3 skirt pages for 1827. Make sure you make them 100%.

Cut them out and tape the sections together.

I liked the length of my dirndle skirt. It measured 5" so
I made the unfinished length 5 1/2" for my circle skirt.

Work around the skirt putting marks at the 5 1/2" length.

Make them close together enough so you can easily join them up.

Draw the cutting line by joining the marks.
Cut it off then do the other pattern piece. 

It is now ready to cut out for your pretty suspender skirt. Of course, you can always just make a regular skirt with a straight waist band and put a poodle applique on it.

My newsletter readers already have the custom designs pattern envelope to use for their custom designs. Just print it out and put it together then draw the new suspender skirt design on the doll outline. Pop in your new pattern pieces.

I haven't gotten around to putting a link to the custom envelope pieces in my blog but I will soon. Look out for it.

Some of my favourite customers have already made up the suspender skirt as in the pattern and with the wider waist band. I know some of them aren't keen to do much drafting so I will be publishing this wider waist band and short circle skirt in my shop soon. I just want to make a matching blouse pattern before it goes up. So look out for those too.

Happy Sewing,
Val

Saturday, May 19, 2018

Vintage Suspender Skirt Pattern for 18" Dolls

1882 Suspender skirt

Sometimes you just want to make something cute for your doll. This suspender skirt design is perfect for a 50s look. Team it with a blouse or a turtleneck or even a t-shirt.


It looks pretty simple to design but why bother designing your own when you can just buy the pattern already neatly drawn with clear instructions. You know when you make it up it will fit your 18" doll. It is designed to fit dolls similar to the American Girl Doll®.

No need to experiment.

These outfits are made by teaming the skirt with 1806 Open Neck Blouse View 1.


If you like to design you can try the circle skirt from 1827 on this waist band. Just put the skirt pieces together then trim off 1 1/2" from the hem edge.

Or you can just wait for the next suspender skirt that I am working on. It has a high waist and the short circle skirt.


Buy the gathered suspender skirt in my Etsy shop.

Happy Sewing,
Val