Showing posts with label Doll clothes patterns. Show all posts

Wednesday, November 13, 2019

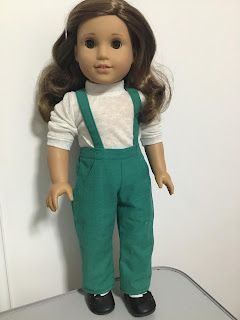
Vintage doll clothes suspender trousers pattern for 18” dolls


These cute 50s style trousers have slant pockets, elastic in the back and suspenders that cross in the back.


The turtle neck sweater is perfect to wear for the colder weather. It is easy to make with collar and cuffs from the same knit fabric. No need to find matching ribbing.


As an extra for Halloween there is an easy to create spooky eyes costume made from a variation of the turtle neck sweater. A full pattern for this round neck sweater and instructions and diagram for the applique eyes is ready to down load and save as an idea for next Halloween.


I made this little round neck sweater from stretch velvet and I used lace trim to hem the neck and wrists


You can find these patterns in my store
In Etsy  


Happy Doll Dressmaking,
Val


Friday, September 13, 2019

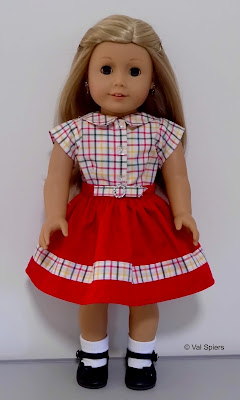
Vintage Skirt and Blouse for 18" dolls

valspierssews vintage 50s skirt and blouse doll clothes pattern

Aren't vintage outfits cute on dolls?

I am really taken with the 50s designs for little girls and I love translating them into doll clothes.

In order to get a good idea of the type of clothes children used to wear in the 50s I looked up the archived pages of the Betsy McCall paper doll that came out in the McCalls magazine over several decades.

You can find the paper doll pages year by year HERE

You can find out more about Betsy McCall HERE

The page I started with is July 1951 and Betsy is going to visit her grandma on a farm.  I have recreated the red skirt style and the blouse.


Happy Doll Dressmaking,
Val


Friday, April 26, 2019

How to sew a doll skirt with a waist band

How to sew a skirt for doll clothes


How to sew a doll skirt

A friend of mine asked me if I would make an outfit for her vintage doll to replace the original clothes the doll came dressed in. You know how it is. The clothes were just gone.

If you think you are ready to move onto making a gathered skirt with a waist band I am slotting this blog post ahead of more elastic waist variations because I promised to dress the vintage doll.

I have quite a few skirt patterns in my Etsy shop. I have yet to publish them in my Aussie shop. Just let me know if there is something you want me to upload.

I love these vintage suspender skirts


Make sure you check out this tutorial for the Glitter Girl gathered skirt HERE.

And you can find lots more about designing a gathered skirt in this blog post HERE
Also you can join my free resources library.

How to sew a gathered skirt for your doll

The skirt part

This doll is about 14" tall so I am going to use the same size skirt that I made for the Glitter Girl because that amount of width at the hem looks good on this doll too.
I am cutting the skirt strip 4 1/2" x 24". I ended up using the same pattern piece that I used for the netting in this skirt HERE

valspierssews doll clothes patterns


If I was making the skirt for my:

  • 18" dolls I would cut the skirt strip 6" x 30"
  • 19" Gotz Hannah doll I would cut 6" x 30"
  • 20" Australian Girl Doll I would cut 6 1/2" x 30"

This allows for a waist seam of a good 1/4" and a hem of a good 1/4".
I say 'good' because I find that you always need a bit more to cover the gathering threads and you always cut a fraction off when you overlock the hem edge.
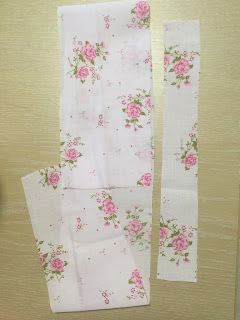
Skirt Pieces
Overlock the back facing edges.
Overlock the hem edge and turn up a 1/4" hem.
Press in the back facing about a 1/2".


The waist band

Just remember that the thicker your fabric the longer the waist band needs to be.
My waist band will enclose the waist seam and overlap by 1/2" at the centre back.
This means I need to measure the doll's waist then add 1/2" for the overlap as well as another 3/4" for the seams on each end. I say 3/4" because it always seems to work out as a bit more than a 1/4" overhang at the backs when you pin on the waist band. If you want the skirt to go over a blouse or T-shirt you should measure the doll's waist over the blouse or shirt or add an extra 1/8" on a small doll and closer to 1/4" for big dolls.

The vintage doll waist is a bit less than 8 1/2" so I am going to use 8 1/2" + 1/2" +3/4" = 9 3/4 for my waist band strip.


Because the doll is small I will use a 3/8" finished width for my waist band. For bigger dolls I would use 1/2" finished width. If your fabric is thicker than light cotton or polycotton you should allow an extra 1/4" for folding the seams into the waist band.

Press in a 1/4" on one long side of the waist band.
Pin the right side of the waist band to the wrong side of the skirt.
Keep the back facings folded in and extend the ends of the waist band 1/4" past the skirt backs.

valspierssews doll clothes patterns


Stitch then trim the seam a bit. Press the waist band up towards the seam.
Fold in the ends of the waist band then....
Fold the turned under edge to the front and stitch it down. I use a small patch of hook and loop at the waist in the back.
I now have a skirt pattern I like for this doll. I will be making the outfit skirt next.


If you are looking for patterns for various skirts for various sized dolls you should look out for my Pattern Club opening soon.

New Pattern Club Coming Soon

I am starting up a membership site in the next few months. I already have a few patterns in place and I have 3 great new patterns lined up for the first month's instalment. I will be opening the enrolment for 10 days only. Founding members will have the lowest price of $10USD/month. Every six months over a couple of years I will be opening membership with an increased price. The final subscription fee for a huge pattern resource and continuing new additions will be around $20USD


If you don't want to miss out on the sign up period click the link below and leave your email address. (This is a separate list from my newsletter)

Sign up to be notified when the Valspierssews Pattern Club is open to join

I will still be adding free resources to my Resource Library at dolldressmaking.teachable.com 
If you are not already signed up you should check it out.


Happy Doll Dressmaking,
Val


Friday, February 22, 2019

3 Suggestions to Vary the Princess Line Doll Clothes Dress 1843: Part 2


Don't you just love ruffles! All the Princess Line Dresses are perfect for adding ruffles or trims and ties. If you have an 8 panel dress pattern it shouldn't be a big leap to draft some of the designs below.
  1. You can make the two centre panels into one
  2. You can split your single front panel down the middle and and create a button down front by adding a front facing
  3. You can reduce the flare so it looks more A-line as well as add more seams, gathered sections, colour blocks. 
The 8 panel style offers great potential for many different looking designs. If you are interested in discussion on designing and drafting please come along to my Facebook group.

Dresses with 1 Central Panel

Some of the princess line designs only have three panels in the front. What I would do to make the two front panels into one is trim the seam allowance off the centre front seam line on the pattern pieces. Then lie them up together and work out what needs to be done with the centre flare. You don't want to just cut it out all together because it will change the shape of the dress front but not the back.

I suggest cutting some of the flare out of the centre front then increasing the flare on the sides of the centre panel as well as increasing the flare a fraction on the side panels. Fold the new centre panel in half and cut the neckline how you want. 

You can make some styles like this:

 1930's

 1940's

 1940's


Dresses with a Button Down Front

If you want to create one of the variations that has buttons all down the front. I suggest that you cut a front facing piece using the front piece as a guide. Just don't forget that you need to overlap the fronts this time so you need to add 1/4" to extend the centre front piece at the centre front seam only. Copy it then use the copy to create the facing.

I really like the ones with the scalloped fronts.

Here are some examples of button down versions:


1940's


1940's


1940's
You would need to keep the back opening for this one and
add extensions for the front placket.

Many of the A-line designs from the 60s use the princess line.

It is probably easier to use an A-line dress to create the panelled A-line designs. You can use the curved side seam of the princess line dress 1843 to shape the A-line in at the waist a bit if you like.
This one looks like it shapes in at the waist. You can do the top part of the bodice with an add-on yoke rather than sew it as a seam.


This one also shapes in at the waist just a bit.


This one is a simple A-line with straight panels. Not princess line because it doesn't shape in at the waist but the panels look great.


There are also variations that have an extra piece as a yoke at the top and gathers below. It wouldn't be too hard to cut the centre panel then add 3 or 4 inches to the centre front edge of the panel.

From what I have read, you draw the grain lines of the panel perpendicular to the Centre front and centre back lines. In the next instalment I will be showing you step by step how I create one of these designs from dress pattern 1843.

See Part 1introducing the Princess Line, and

Part 3 a tutorial on how to vary pattern 1843

Happy Doll Dressmaking,
Val

Saturday, November 3, 2018

Doll Clothes Petticoat Pattern with a 50s Look and Some Life Philosophy.

I love designing and one way to share my designs with as many doll dressmakers as possible is to offer them for free sometimes.


My next newsletter is due out in early November 2018 and if you are on my mailing list or join up before I send out the November newsletter you will be able to download the 50s petticoat pattern for free.
It only comes out in this one newsletter. You will not see this pattern for free any where else or at any other time. You must be subscribed to the newsletter before it comes out.

There is no link to the free petticoat pattern on this blog post. If you would like this petticoat pattern for free you   need to be signed up for my newsletter   before November 9th 2018.

The design has princess seams on the bodice. The bodice is shaped in the front and straight across the back and there are ribbon straps.
The skirt is a circle skirt made up of 4 quarter circles. The waist points down in the front and the garment opens all the way down the back with a 1/2" overlap for closure.


This petticoat bodice is lined so if you want the lace trim to stand up properly after stitching the bodice to the lining you will need to fold the ends of the lace at a right angle so it is not caught in the back seam. I will go into more detail on this in my Facebook Group this month. You can Join Here

I used the pattern from Underwear No. 5 to start developing this design. I used the same back pieces and changed the front. I already had some work done on the pointed front with another design but adding the point is very simple. For the skirt you just echo the point for the front skirt.
So if it is so simple to make a new design why do people buy my patterns? The main reason is that doll dressmakers want to make one garment and use their best fabric.

This pink petticoat is my first draft. There are a couple of things I am going to change to make it even better. This is my prototype.
What needs work?

  • The front points need to be a bit higher. I have tried to pull it up a bit in front for this photo so you can see it has some wrinkles. I couldn't believe how amazingly better it looked when I raised the bodice by 1/4".
  • I am going to deepen the point a bit. I have decided on 1/8" lower.
  • I'm happy with this length but I had to cut off an inch from the original skirt.
  • I only stitched the strap into the front bodice and sewed it on top for the back. I had to do this so I could judge the length of the strap. Now I know the length and the angle I have to cut it in the back so the next version will have the strap enclosed in front and in back.
I am always analysing why I do things. 
Back in June I posted on my Life Blog about how I hoped other people would see me. 
The following thoughts help me know that what I am doing is in alignment with my life values. I have quite a list of values that are important to me. For example, I strive to be creative, honest, passionate, generous and sincere and self-confident. It is quite empowering to have such strong guidelines. It makes life and business decisions much easier.

A bit of philosophy on why I turned my designing into a business.

I will be making at least two more petticoats while writing and checking the instructions for this design. All my efforts provide value for doll dressmakers. 
  • You can be 99% sure the garment will fit and look great. (You should always check the waist of any pattern bodice against your doll first)
  • You only have to make one but you won't want to stop at one when you see how versatile each pattern is.
  • You can use nice fabric first go.
  • You can follow the instructions to get all the steps in the right order. This saves mistakes and unpicking.
  • You can be confident the design will look as you expect.
A bit of philosophy on why I do some things for free.

Why am I offering such great designs for free? There are a number of reasons.
  • I love helping other doll dressmakers
  • I want to spread the word on how great my patterns are.
  • I want to promote my newsletter because I love connecting with like minded people.
  • I am passionate about designing doll clothes and want to share my skills.
  • It helps me grow in self confidence and independence because it helps my business grow.
  • All this is part of my grand plan to be happy and successful, share my knowledge and skills and be financially free to continue helping and sharing in all sorts of ways.
I am constantly being inspired by all the wonderful doll dressmakers all over the world. 
I hope you enjoy my patterns.

Cheers,
Val


Sunday, September 9, 2018

Doll clothes pattern vintage petticoat design to fit American Girl dolls

American Girl Doll clothes pattern by valspierssews. Doll underwear.

This little girls' vintage petticoat design from the 50s era is perfect for dolls. I love the flat front panel and gathered side skirts. Without much more effort than a regular gathered skirt petticoat you can create this beautiful petticoat with stand out design features.


You can also make it without the ruffle. Just extend the hemline.


If you intend to sew this one I have written up some details that may be helpful.

Batiste
The best fabric for underwear is batiste. It is a moderately lose weave fabric that has a nice crisp feel to it. The slight stiffness is perfect for holding out dress skirts.


Polycotton
Another fabric I used was polycotton. This closely woven fabric is a bit softer and thinner than quilters 100% cotton and still fits under the dresses I make using my 1804 pattern.
I have started putting a 3/4" facing allowance on my designs so you can easily finish the egde as you please. I have done a single fold hem on this one.


Synthetic Lining
I had some synthetic lining fabric that I thought might be good. It is thin yet still has some body to it. Unfortunately it tends to fray easily and makes a fluffy ball of threads in seconds if you handle it a lot like when you are gathering the ruffle.


If I was to use this fabric again I would overlock the edge and pull up the overlocker thread to gather. You can see where the trim is that it is starting to fray.


I also tried zig zagging over a thin cord but found that the edge got messy as I stitched and I had to move further in than the 1/4" seam allowance. So if you want to zig zag over cord to gather the ruffle for this fabric you will need a wider seam allowance.

Adding trim to the ruffle
Because the ruffle edge is straight you will need to finish the edge to stop it fraying either before you sew on the trim or as you sew on the trim.
Some flat laces could be overlocked on. For other trims it is best to use pinking shears and just shave off the very edge so you don't reduce the seam allowance.


Trim at the neck and arm holes
The stretchiness of the gathered lace trim allowed the hem to turn smoothly. However, whenI used the rick rack I had to put a few snips at the tightest section of the curves to help it lie flat.
The raw edge on the garment and the snipping is not a problem because the curved edges of the neck and arm holes resist fraying.


The rick rack I used measures 1/4" from the crest to the trough so it just fits nicely on my 1/4" seam allowance leaving the little bumps to show when I turn it in.


Length
The length of my pattern finishes about 1/2" above the just on the knee skirt length for dresses I make with my 1804 pattern.
I haven't tried making it shorter or longer but my educated suggestion is that to make it longer you should lengthen the body section by just adding to the bottom edge. You will then have to lengthen the side skirt pattern piece by the same amount. Just make sure you lengthen the hem edge not the side edge. I have labelled the waist edge and the side edge on the pattern pieces.

Fit and resizing

Vintage AGD: I have found that this petticoat fits my plumper vintage Kit Kitridge doll without any changes and the 1804 dress goes over it also without any changes.
 

Our Generation Doll: If you just have an Our Generation Doll you can make a permanent change to the back facing by folding it in 1" and trimming it back to 1/2" when you hem the raw edge.

Both AGD and OGD: If you want the petticoat or 1804 dress to fit both OGD and AGD you can put a wider velcro patch for the hooks only, then you can pull it across further on the thinner OGD.

Australian Girl Doll: I have tried my AGD petticoat on the Australian Girl Doll and even though I haven't included fitting for the Australian Girl Doll you should be able to make a lovely petticoat for her by just adding 3/4" to the bottom of the main pieces and the side skirts so it is longer. This will make it about 1/2" shorter than the 2004 dress pattern. I will probably do up pattern pieces with the extra length soon so if you want Australian Girl pattern pieces you can convo me through your receipt or email valspierssews at gmail dot com with an image of the title page for the free version. Just give a a week or two to sew up one first.

Closure
As with nearly all my garments I have used velcro patches for closure. They don'y get in such a  muddle as the long strips do yet they seam to hold just as well for dressing. I have used my coloured velcro that I got from Allie Express. I cut off a piece just wide enough to fit on the facing.


I hope you enjoy this design. I have a dress or two planned using the same flat front panel design.

Look out for the petticoats as a collection in 2019. Sign up for my newsletter so you will always be kept up to date.

This petticoat is the second in a series of 5 that I am giving away for free in my newsletter.

Happy Sewing and Dress Making
Val


Wednesday, July 4, 2018

New Vintage Blouse Pattern for 18" Dolls

Valspierssews
Blouse with high waist skirt 1883

I know you will love this blouse and suspender skirt combination.

SHOP NOW

Both the skirt and the blouse are easy to sew.


I decided to put the blouse and high waist skirt up separately because I know some of you will enjoy creating the high waist skirt from patterns 1882 and 1827.


Don't be hesitant about sewing a facing in the front of the blouse. If you line up the seam lines for the facing and the shoulder it all sits perfectly.


I will be experimenting with adding a narrow bias binding strip on top of the collar and under the facing when you sew on the collar but for now I am happy with the seam showing. You only see it when the blouse is not on the doll.

This blouse is part of my Snugfit Range so you can swap the sleeves between this one and the the Open Neck Blouse 1806.

The collar for 1806 is easier than the very curved collar in this vintage blouse and looks just as nice. You can use the piping sleeves to retain the vintage look.

Look out for the high waisted skirt soon. It will be 1883.


You can find the vintage blouse and the regular waist suspender skirt in my shop now.


Happy Sewing,
Val Spiers Sews
Tinker, Tailor, Doll Dress Maker.