Showing posts with label 1804. Show all posts

Monday, May 13, 2019

How to sew the side seams on a sleeveless lined doll dress

How to line a sleeveless doll dress bodice by valspierssews


If you love making doll dresses from pretty cotton fabrics that quilters use then lining the bodice with a similar fabric gives a lovely smooth neat finish.
  • Don't get carried away with trying to fully line a bodice so you can't see any exposed seams.
  • These days clothes rarely have a separate lining. 
  • Historically outfits were lined to stop perspiration spoiling the fabric. 
  • You should be lining doll clothes to create the best look. 
  • Just line the bodice but leave the sleeve seams and side seams exposed.


You can enclose the side seams on a sleeveless bodice

Here's how I use lining to create neat a very neat finish both inside and out for a sleeveless dress.
You leave the side seams for last so they are hidden between the main bodice and the lining.
This method eliminates the need for neck and armhole facings or fiddly 1/4" hems.

Start by sewing the shoulder seams for the main and the lining. Baste the collar in place on the right side of the main bodice.

Place the main and lining right sides together and stitch the back and neck and around each armhole.

Turn the bodice right side out and press it.

The hardest part is working out how to do the side seams.


It is a matter of pinning the main sides together and the lining sides together.


Download a PDF with a photo tutorial of how to sew the side seams. 
You can get access to a variety of instructions and doll clothes patterns when you join my monthly Newsletter

I love this little dress. You could make a whole summer wardrobe for your doll with this one design. Just use different fabrics and add some different trims. This is my 1804 The 18" Dress.  There are lots of variations with sleeves and collars and skirt lengths included in the pattern. Read more about the 1804 dress pattern here. or just Buy it NOW


Happy Doll Dressmaking
Val


Friday, February 8, 2019

Princess Line Doll Clothes: Part 1


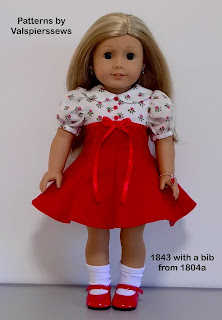
18" doll clothes pattern by valspierssews. Variation on 1843 to fit American Girl Doll

  • Mixing up gores and panels and princess line
  • Fabulous vintage panels
  • Using 1843 to create these designs


Mixing up Gores, Gussets, Godettes and Princess line panels

I rediscovered the panelled dress that I made some time ago. I went looking for the pattern. It's title is 8 gore dress so I thought I would do a bit of research on what gores were because I had a feeling that I was not naming it correctly.

First I looked up the meaning of gore. It seems it is synonymous with gusset. The dress making version comes from a word meaning arrow.
The following comes from Wikipedia:
The word is derived from Old English gār, meaning spear. In the course of time the word came to be used for a piece of cloth used in making clothes. In dressmaking and hat making, it refers to triangular or rhomboid pieces of fabric which are combined to create a fuller three dimensional effect.

I also came upon this fabulous website called The Renaissance Tailor that I have book marked for some later reading. There looks to be lots of great information on historical outfits, drafting, sewing techniques and more. I have put the link to the site map because the menus seem a bit haphazard.
There was a great section on gores and gussets that helped clear up some misconceptions I had.

So a skirt can be made from trapezoidal gores. My 8 gore skirt pattern is correctly named. I also made a godette skirt pattern. It seems that gore and godette are the same but I tend to lean towards a godette being the triangular insert in a gored skirt.

So what is the princess line? 
Well, this is a relatively new fashion term thought to be introduce by Charles Frederick Wentworth in the 1870s. he named it after the elegant Princess Alexandra of Denmark.

A princess line is cut in long panels without any waist seam. the curve of the panels shapes the waist.

In 1951 Christian Dior presented a collection called the Line Longue that was based on the princess line.
I found a useful A to Z of sewing and fashion terms at the Business of fashion website

So I am going to rename my 8 gore dress to the 8 panel princess line dress.


Fabulous Vintage Panels

I looked up some examples of princess line dresses and some variations. The princess line is common in vintage designs.


You can find all these and more in my Pinterest board


Using 1843 to Create These Designs

My Princess line dress pattern is a great starting pint for recreating all these vintage designs. I love the pockets set between the panels.
I'm thinking I will have to include a round neck version in the pattern. At present it is a sweet heart neckline but if you cut straight across from the shoulder point then sew the panels together you can use any bodice pattern piece to shape the neckline.

This is pattern 1843...


... and this is a variation I made using the add-on bibs collection 1804a and the collar from 1804.


If you want to join the discussion on designing doll clothes then you need to join my Facebook Group


See Part 2 on how to vary the princess line design, and

Part 3 a tutorial detailing how to use 1843 to make a new design.

Happy Doll Dressmaking,
Val

Friday, January 25, 2019

3 Ways to Add Hearts to Doll Clothes for Valentine's Day

Doll clothes dress for Valentine's day with applique hearts by valspierssews

  • It is always fun to make themed outfits for your 18" dolls.
  • Hearts are perfect because they are not just for Valentine's Day.
  • 3 ways you can add some heart to your doll clothes sewing.

Dress ups is fun for girls and their dolls

A really quick and easy way to comply with themed days is to add applique to either existing doll clothes or make something simple like a dress or skirt or t-shirt to put the applique on.
I love hearts! They are so simple to draw and there are lots of ways to arrange them to create your own unique outfits. They go well on girls' clothes too.

This dress has applique hearts that I cut out with the pinking shears. I had some little bows that I thought looked cute.

Hearts for a doll clothes dress for valentines Day


I have been working on a jacket with binding around the edges so I made a practice one that went with the dress.


You can use the raw edge applique method, also called fusible web applique to apply cute images from patterned fabric to your garments. When you are making doll clothes that won't be washed much you can get away with not stitching the applique on at all. the fusible web holds is without fraying really well. That's what makes it so good for using on garments you already have made up.

If you have never done raw edge applique before this you tube video gives you the basics.

You can download a heart shape from lots of web sites. Here is a search I did on Pinterest.


Dolls and hearts go together really well - Not just for Valentine's Day

Pink is so nice on any doll and hearts are cute and girly.
I used flannelette with hearts on for these wonderful winter pyjamas


And this heart fabric is perfect for the stand out lining on this little jacket made from my Bolero Series. I think it would have gone well with the dress I just made but I no longer have this jacket.


Ways to add hearts to your doll clothes

Using fusible applique to add hearts to your doll clothes is pretty simple but as you can see in the examples above there are lots of beautiful heart fabrics to make an outfit. The fabric speaks for itself.

Another really simple way to add to a new dress or an old outfit is to use heart shaped buttons. Like applique you can apply the buttons to finished garments without much trouble.

I love how the heart buttons provide some wow factor to this simple contrast add-on bib style yoke.
This dress is from 1804a Add-on Bibs. You add the bibs to the bodice of 1804.

The heart dress I made using 1804 18" Round Neck Dress. 1804 has different sleeves, different collars and different skirt lengths all in one pattern. Read more about the 1804 dress pattern here. You can get it from my Etsy Shop


Happy Doll Dressmaking,
Val


Friday, December 14, 2018

1804 Christmas Special Doll Clothes Pattern

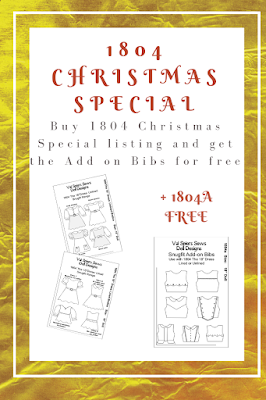
I know how much fun it is to make some Christmas dresses for the dolls so I have wrapped up a Christmas Special on the 1804 Dress.

If you buy the 1804 Christmas Special Listing in my Etsy shop you will find the 1804a Add on Bibs included for free. Offer is available until midnight 25th Dec Australian time.

Just click the image to go to my shop.

Doll clothes patterns

Happy sewing,
Val

Sunday, September 9, 2018

Doll clothes pattern vintage petticoat design to fit American Girl dolls

American Girl Doll clothes pattern by valspierssews. Doll underwear.

This little girls' vintage petticoat design from the 50s era is perfect for dolls. I love the flat front panel and gathered side skirts. Without much more effort than a regular gathered skirt petticoat you can create this beautiful petticoat with stand out design features.


You can also make it without the ruffle. Just extend the hemline.


If you intend to sew this one I have written up some details that may be helpful.

Batiste
The best fabric for underwear is batiste. It is a moderately lose weave fabric that has a nice crisp feel to it. The slight stiffness is perfect for holding out dress skirts.


Polycotton
Another fabric I used was polycotton. This closely woven fabric is a bit softer and thinner than quilters 100% cotton and still fits under the dresses I make using my 1804 pattern.
I have started putting a 3/4" facing allowance on my designs so you can easily finish the egde as you please. I have done a single fold hem on this one.


Synthetic Lining
I had some synthetic lining fabric that I thought might be good. It is thin yet still has some body to it. Unfortunately it tends to fray easily and makes a fluffy ball of threads in seconds if you handle it a lot like when you are gathering the ruffle.


If I was to use this fabric again I would overlock the edge and pull up the overlocker thread to gather. You can see where the trim is that it is starting to fray.


I also tried zig zagging over a thin cord but found that the edge got messy as I stitched and I had to move further in than the 1/4" seam allowance. So if you want to zig zag over cord to gather the ruffle for this fabric you will need a wider seam allowance.

Adding trim to the ruffle
Because the ruffle edge is straight you will need to finish the edge to stop it fraying either before you sew on the trim or as you sew on the trim.
Some flat laces could be overlocked on. For other trims it is best to use pinking shears and just shave off the very edge so you don't reduce the seam allowance.


Trim at the neck and arm holes
The stretchiness of the gathered lace trim allowed the hem to turn smoothly. However, whenI used the rick rack I had to put a few snips at the tightest section of the curves to help it lie flat.
The raw edge on the garment and the snipping is not a problem because the curved edges of the neck and arm holes resist fraying.


The rick rack I used measures 1/4" from the crest to the trough so it just fits nicely on my 1/4" seam allowance leaving the little bumps to show when I turn it in.


Length
The length of my pattern finishes about 1/2" above the just on the knee skirt length for dresses I make with my 1804 pattern.
I haven't tried making it shorter or longer but my educated suggestion is that to make it longer you should lengthen the body section by just adding to the bottom edge. You will then have to lengthen the side skirt pattern piece by the same amount. Just make sure you lengthen the hem edge not the side edge. I have labelled the waist edge and the side edge on the pattern pieces.

Fit and resizing

Vintage AGD: I have found that this petticoat fits my plumper vintage Kit Kitridge doll without any changes and the 1804 dress goes over it also without any changes.
 

Our Generation Doll: If you just have an Our Generation Doll you can make a permanent change to the back facing by folding it in 1" and trimming it back to 1/2" when you hem the raw edge.

Both AGD and OGD: If you want the petticoat or 1804 dress to fit both OGD and AGD you can put a wider velcro patch for the hooks only, then you can pull it across further on the thinner OGD.

Australian Girl Doll: I have tried my AGD petticoat on the Australian Girl Doll and even though I haven't included fitting for the Australian Girl Doll you should be able to make a lovely petticoat for her by just adding 3/4" to the bottom of the main pieces and the side skirts so it is longer. This will make it about 1/2" shorter than the 2004 dress pattern. I will probably do up pattern pieces with the extra length soon so if you want Australian Girl pattern pieces you can convo me through your receipt or email valspierssews at gmail dot com with an image of the title page for the free version. Just give a a week or two to sew up one first.

Closure
As with nearly all my garments I have used velcro patches for closure. They don'y get in such a  muddle as the long strips do yet they seam to hold just as well for dressing. I have used my coloured velcro that I got from Allie Express. I cut off a piece just wide enough to fit on the facing.


I hope you enjoy this design. I have a dress or two planned using the same flat front panel design.

Look out for the petticoats as a collection in 2019. Sign up for my newsletter so you will always be kept up to date.

This petticoat is the second in a series of 5 that I am giving away for free in my newsletter.

Happy Sewing and Dress Making
Val


Saturday, August 25, 2018

Must Read Insights into The School Uniform Dress and Patterns 1804 and 2004


While making the school uniform dress I perfected a lot of my skills in making dresses.

If you have the Uniform Pattern No.1 It is worth reading through this post to get a better feel for why I have done things a certain way.

If you have the 1804 or 2004 Dress Pattern you should also have a read because you may be able to improve how you sew the dresses by applying some of the points. You should try adding an extra 1/4" to the back facings. One day I will redo the pattern pieces but not for a while yet.

There are some slight variations to the way I used to make dresses that I think make it easier to get a perfect result.

I will point out the things I did differently for the school dress and explain why I did them that way.


  1. I made the back facing 3/4". I did this so you can finish the raw back edge with a single fold hem or a rolled hem or overlocking while cutting off 1/8"
  2. I pressed the back facing fold line before finishing the back edge so you can just measure 3/4" and fold and press. If you do it after neatening the back edge you would have to check where the fold line was by using the pattern piece.
  3. When stitching the collar pieces together use a short 2mm stitch. This makes it easier to go round the curves and also helps to stop the corner poking out and breaking through the stitches while you are pushing out the corner.
  4. I placed and basted each collar 1 at a time. In the past I just pinned them on and basted right across. I also place the doll's left collar on first so the other collar lies on top at the CF. This makes it easier to sew across the front when you sew on the collar.
  5. The collars have to be at lest 1/4" from the facing fold line so you can overlap the backs to close.
  6. When I stitch on the collar I am happy with stitching the seam then overlocking it. Press it then under stitch on the right side 1/8" away from the seam line, keeping the collar out of the way.
  7. For the School dress I have added a bias facing to the neckline. I experimented with a 1" wide piece folded in half then I experimented with a 1 1/8" bias piece folded in half. Even though the narrower facing only just covers the trimmed seam it works best. When stitching it down you aim along the middle of the strip so you are close to the seam line and it all turns out good.

    If you use the wider strip you end up with a fraction too much facing width so you have a choice of stitching close to the neck seam line and having a flappy facing edge or sewing close to the facing edge and having trouble getting the neck to sit flat.
  8. I made the bias facing strip about an inch too long because there is nothing worse than finding you are just a fraction short with strips. This means that if you find that your are just a fraction short on fabric for the bias strip you can cut it back about 3/4" shorter and it should still work. I don't recommend doing this unless you have tried the design with the full strip at least once to calculate for yourself how much shorter you can make it.
  9. I am still not set in one way to do the hem and fold the back facings in. Sometimes I overlock the hem the fold in the back facing and stitch across the facing on the hemline. You then turn the back facing and stitch the hem. I do it this way in some of my instructions.
  10. Another way it to overlock the hem leaving thread tails at each end. Press up the hem tucking in the thread tails then fold in the back facing and stitch the hem and back facing at the same time. I do it this way in some of my instructions.
  11. A third way to do the hem is to overlock the hem leaving thread tails. Press up the hem tucking the tails in. Stitch the hem then turn in the back facing.
Happy Sewing,
Val

Saturday, March 31, 2018

3 Steps to a Custom Doll Clothes Design for 18" Dolls


Valspierssews


  1. The cute bodice on 1827 is perfect for using with lots of different skirt styles.
  2. You need 1827 and you just replace the front bodice with the V-neck one.
  3. For the skirt I used the 'just below the knee' pattern pieces from 1804. on Etsy .    Read more about the 1804 dress pattern here. 
  4. There are several length choices for the gathered skirt in the 1804 design.
    I used the V-neck variation that you can get for free when you join up the to the newsletter. Look for pattern number  24_1827 Vneck bodice front.
  5. Read more about the v-neck variation here.


I sewed the braid on after completing the bodice because I wasn't sure if it would look just right. If I do the braid again I will sew it on the main bodice before joining it to the lining. I centred it on a line 3/8" from the seam line.


Other feature that made a huge difference to the overall look were the 3 button down the front and the red top stitching around the neck and armholes. It looked really boring without the buttons and the neck looked too low without the top stitching because the braid seemed to look like the edge of the neckline.


The dress is so fast tp make and using different fabric for the bodice and skirt means you can use smaller pieces left over from other projects.

The belt is a rectangle 1 1/2' wide by 15 1/2".

I folded it in half and creased the fold then turned under 1/4" along each side. I also turned under 1/4" at one end. I stitched it together down both long sides and across the finished end.

I slipped the raw end into the buckle and sewed it together to hold it in place.


You can buy 1827 from my Etsy shop now.
It comes with a gorgeous full circle skirt for the dress and a cute blouse to wear under it as a jumper dress.
Next I am going to use the pencil skirt from 1828 with the original neckline and the blouse to go under.

Happy Sewing,
Val


 Join the newsletter mailing list below for a variety of free patterns.

Join My Newsletter List

Happy Doll Dressmaking,
Val


Thursday, March 29, 2018

Spring Dress for my 18" Doll

valspierssews


I was really happy with the concept of this spring dress. After I made the Easter dress I realised I needed a few changes to the design. The fit was perfect because I used pattern pieces from other Snugfit Range patterns. I have designed them specially to be swapped around so you can create favourite designs you see for little girls or easily create your own custom designs.

Based on the things I noticed with the Easter dress I have;


  1. Used the narrow peter pan collar from 1804
  2. Used a floral pattern without an obvious design that will be affected when I pleat it
  3. Made the growth pleats 1/2"
  4. Made them look closer together (by making them wider)
  5. Made the ties from a strip that I folded in half.
  • One more thing I did was go back to the narrower sleeve band that is in the 1810 pattern. I just think it looks a bit daintier than the wider band I created for the Easter dress.

I have to admit I would call myself awkward when it comes to trims.
With lace I have trouble choosing the right sort and deciding where to put it.
With braid I have trouble with scale and colour.
I consider myself great with buttons and pretty OK with ribbon so I use buttons a lot and ribbon bows at the neck or ribbon stripes.

The growth pleats don't show up in the photo very well.
They look nice in real life.

The only thing I think I could have done different on this dress is to have used a narrower rick rack around the collar so it would sit better.


I love the improvements I made  and think I will be doing more designs with that sleeve. There are a few more things I can try with that particular shape. 


If you like this dress design you can make it for yourself following the instructions I will post in a few days. I just need to get the Fashion File kit ready for the shop. The kit is a great way to file the design in your collection but the DIY version is a great way to get a new design for free if you already have 1810 and 1804. You can buy these two patterns in my shop.

Happy Sewing,
Val

P.S.
In the post with the instructions I will include free skirt pattern pieces with the growth pleats. I am experimenting with some automatic emails and signing up to get the free things I offer on my blog. Each free file leads to its own mailing list so even if you already get my newsletter you will need to sign up to get the free file offered on any of my blogs of late. When I do something else with the pattern related to the free file I will send out an email to that particular list. 

As I work on the automated emails there will end up being 3 or 4 emails after you get the free file suggesting new ideas or suitable patterns to combine with it and the like. As usual, you are free to unsubscribe at any time.

I love designing these marketing actions almost as much as designing the doll clothes. It certainly works the mind.

Cheers,
Val

Tuesday, March 27, 2018

5 Things You Need to Know When Designing an 18" Doll Dress

Valspierssews

Valspierssews patterns are great for mixing around fashion elements to get different custom looks. But not everything is meant to go together.
I used the regular collar from 1804 instead of the narrow collar not even thinking about the collar touching the sleeves. It was also my first go at growth pleats. However, I knew it was going to fit perfectly because all the patterns in the Snugfit range use the same basic sizing. I'm just being a bit picky because one day I will put this design in my shop as a Fashion File.

Valspierssews


I have learnt some great tips while creating this one that can be applied to all sorts of custom dress designs.

  1. Use a narrow collar when you have very puffy sleeves or don't use a collar at all.
  2. Don't use growth pleats on fabric that has faces or images of cartoon characters or people.
  3. Make your growth pleats more than 1/4".
  4. Make your growth pleats close together.
  5. Make the ties for the waist from a strip folded in half so it is double sided rather than a single layer strip with rolled hem edges.

You can see how the collar bumps on the puffy shoulder of the sleeve.


You can see how the rabbits have their faces shortened. The pleats just look a bit too narrow for the skirt. They also seem to be a bit too far apart.


The sash is difficult to tie so the wrong side doesn't show. This would be OK with most plain fabrics.

When I make the next dress in this style I will be applying the things that I learnt from the bunny dress. Once I get it perfect I will be putting up some instructions so you can have a go at making it for yourself. It uses pattern pieces from 1804 and 1810. The skirt with the growth pleats is new and I will be putting up the measurements for that when I am sure it is just right.

In the mean time you might like to make a dress like this one using the same sleeves from 1810 and the pointed bib from 1804a. It uses the skirt and bodice from the lined version of 1804.


Look out for the next blog post featuring my improved design.

Happy Sewing,
Val