Friday, January 25, 2019

3 Ways to Add Hearts to Doll Clothes for Valentine's Day

Doll clothes dress for Valentine's day with applique hearts by valspierssews

  • It is always fun to make themed outfits for your 18" dolls.
  • Hearts are perfect because they are not just for Valentine's Day.
  • 3 ways you can add some heart to your doll clothes sewing.

Dress ups is fun for girls and their dolls

A really quick and easy way to comply with themed days is to add applique to either existing doll clothes or make something simple like a dress or skirt or t-shirt to put the applique on.
I love hearts! They are so simple to draw and there are lots of ways to arrange them to create your own unique outfits. They go well on girls' clothes too.

This dress has applique hearts that I cut out with the pinking shears. I had some little bows that I thought looked cute.

Hearts for a doll clothes dress for valentines Day


I have been working on a jacket with binding around the edges so I made a practice one that went with the dress.


You can use the raw edge applique method, also called fusible web applique to apply cute images from patterned fabric to your garments. When you are making doll clothes that won't be washed much you can get away with not stitching the applique on at all. the fusible web holds is without fraying really well. That's what makes it so good for using on garments you already have made up.

If you have never done raw edge applique before this you tube video gives you the basics.

You can download a heart shape from lots of web sites. Here is a search I did on Pinterest.


Dolls and hearts go together really well - Not just for Valentine's Day

Pink is so nice on any doll and hearts are cute and girly.
I used flannelette with hearts on for these wonderful winter pyjamas


And this heart fabric is perfect for the stand out lining on this little jacket made from my Bolero Series. I think it would have gone well with the dress I just made but I no longer have this jacket.


Ways to add hearts to your doll clothes

Using fusible applique to add hearts to your doll clothes is pretty simple but as you can see in the examples above there are lots of beautiful heart fabrics to make an outfit. The fabric speaks for itself.

Another really simple way to add to a new dress or an old outfit is to use heart shaped buttons. Like applique you can apply the buttons to finished garments without much trouble.

I love how the heart buttons provide some wow factor to this simple contrast add-on bib style yoke.
This dress is from 1804a Add-on Bibs. You add the bibs to the bodice of 1804.

The heart dress I made using 1804 18" Round Neck Dress. 1804 has different sleeves, different collars and different skirt lengths all in one pattern. Read more about the 1804 dress pattern here. You can get it from my Etsy Shop


Happy Doll Dressmaking,
Val


Friday, January 18, 2019

How to Make a Doll Quilts Part 3: Step by Step Free Tutorial by valspierssews

How to make a doll quilt step by step by valspierssews


I work using the Pomodoro method. It took me about 3 hours or six time blocks to make this quilt in several sittings.

If you are a quilter you will have a pretty good idea of how to put the quilt together. You will just need the measurements and layout.

If you are a doll dressmaker/quilter you will understand that when you are making quilts for your dolls you don't have to rigorously follow the method for a human quilt. Also when I am making small mats I will do what I can to make it fast and easy but make it look good on the table. If it gets a tea stain on it the first time I use it I'm not devastated. Same with your children's doll quilts.


Little quilts are not just for dolls.

So keep in mind I am not teaching you how to make a quilt. I am showing you how to make a perfectly respectable doll quilt using some quilting techniques.

As I mentioned in part 2, you don't have to use wadding or even backing fabric. You can use a bath towel that you can cut up. You can put backing fabric on if you want pretty fabric on the back or you can leave it just as a towel back.

For this particular quilt I have used wadding. I have however, used poly cotton for the backing because that is what I had. These quilts don't have to last a lifetime. Personally I would rather make a few new quilts each year and give any spares to the thrift shop.
I made the quilt then I submerged it in cold water and squeezed it a few times. I rolled it up and rung it out firmly. I then pegged it on the line in the sun. When it was dry I pressed it firmly with steam. It looks great. You wouldn't know I had washed it.


So don't be concerned that you have to make your doll quilt a certain way. Just have fun making it. You have nothing to lose if you use quilters fabric and take care with sewing your 1/4" seams.

I am outlining the main steps here.

If you would like to download a complete photo tutorial  see my doll quilt resources at dolldressmaking.teachable.com.

I have called this one "small small squares" because it is as small as I would make to fit nicely over a doll and the squares are as small as I can be bothered fitting together. As I mentioned, I expect that a quilt I make for my child to play with doesn't need to take 3 months to make. It just needs to look good.


Cutting out the doll quilt
  • Cut out strips of fabric. 3 from one fabric and 3 from another fabric. It is easier to cut them width of fabric (WOF) but for this quilt you need 9 x 2/12" or 22 1/2". 
  • Cut the strips 23" long.
Sewing the strips and making squares for the doll quilt
  • Sew the strips together alternating the colours
  • Don't worry about pressing the seams yet
  • Fold the panel in half lengthwise and cut sections 2 1/2" wide. You should get 9.
  • Starting form the same colour on each section, press the seams all in one direction.


Making the doll quilt top
  • Reverse each second strip. Nest the seams as you join the strips together.
  • Cut border strips 1/1/2" wide. Cut two short strips the same length as the patchwork short side.
  • Sew them on
  • Cut two long strips the same length as the long side of the quilt.
  • Sew them on.


Finishing the doll quilt
  • Layer the top, the wadding and the backing and pin them together or use basting spray.
  • Do some simple quilting
  • Cut 2" strips and join them together so they fit around the quilt with about 6" extra.
  • Press it double. Pin it to the back of the quilt and sew it around stopping at each corner and turning.
  • Fold it to the front and stitch it down to cover the seam line


More interesting reading

Read this article about the Pomodoro Method. I find it is a technique that really helps me get things done.

I so enjoy making small mats. I made a little bed for my quilting companion (1996-2017). You can se it here.

Sign into dolldressmaking.teachable.com for free resources including a photo tutorial on how to make this doll quilt.

Happy Doll Dressmaking,
Val


Friday, January 11, 2019

How to Make Doll Quilts Part 2

This is the progress on my quilt. I have a finished flimsy.
Doll quilts from little squares are easy and fun to make unique. You can read a bit about the history of doll quilts in Part 1
If you aren't a quilter with a stash of wadding in the cupboard...


...then you can use a towel as wadding or even as wadding and backing in one.

My flimsy is on a bath towel. Whatever you use as wadding trim it so about an inch sticks out all around. You would be surprised how the wadding shrinks as you do the quilting.

I'm going to do some simple quilting diagonally on this quilt.
I will use my wadding and back it with pale pink and do the binding in the same pale pink.

I am making a photo tutorial to put in my resource library on dolldressmaking.teachable.com

Sign into my Resource Library of free and paid tutorials and patterns.

I will blog the basics next week once I have the quilt finished.

Quilts with little squares offer lots of variety. Doll quilts are so quick to make so you can attempt more complex designs, not just rows of squares.

You can make a simple quilt unique by adding
  • some applique
  • changing up the layout
  • and/or using colour to create shapes and designs
I love this wall hanging with the heart applique.
Source: https://pin.it/laxqq642yfkpfi

This one has an extra border of smaller squares.

Source: https://pin.it/filhxnyxgkguiz

One of my favourites is just rows of squares with a binding. You can make your quilt any size. You can make quilts with different size squares. Using 3" squares in a 4x4 layout makes a cute quilt and is very fast.

Source: https://www.pinterest.com.au/pin/281615782922260244/

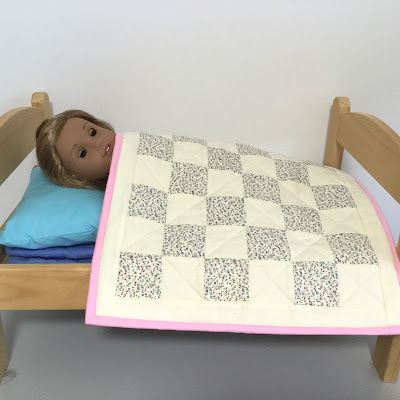
This is how my quilt turns out.


See part 1 HERE

Happy Sewing and Doll Dressmaking,
Val

Friday, January 4, 2019

The HiLo skirt for 18" dolls

HiLo skirt doll clothes pattern to fit 18" dolls by valspierssews


HiLo skirts are a feminine style perfect for light soft or crisp fabrics.
Quilting cotton in pretty floral or patterns with small images are perfect. I have some rayon that I am going to try too. Rayon is very soft and drapy so should give a different look.

This black and white design is a composite of several patterns. You can also use a square neck or a v-neck. The sweet heart neck is the bodice front of 1863 rompers (The rompers pattern is getting some formatting done to the instructions for a little while. It will be back in the shop soon)


I took this pattern out of the shop to make few improvements and now it is back and ready to go to work giving new life to old patterns by adding it to dress bodices from other patterns.

The skirt with a cute top is perfect for stepping out.


You can find the 1849/2049 skirt in my shop.

Happy Doll Dressmaking,
Val