It's important to accept that as your skills improve you find different ways to do things.
Now that I have worked out how to show you the steps to hack a pattern I realise that hacking the scoop front is better than asking you to buy another pattern to get the scoop front. So for the latest version of the school dress you can hack your own scoop neck and use the short gathered sleeves from The 18" Dress pattern. All you need is The 18" Dress pattern to get started.
The pattern hack steps for the scoop front are shown in my You Tube video. (Link is coming)
This blog post is a redo of the sewing instructions for FF19. If you have come here from the old blog post then this is the tutorial you need. There are some slight differences but I think it is an improvement.
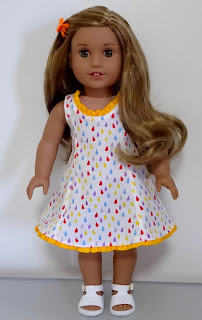
I chose some subtle colours this time so it is more a pretty dress than a school dress.
This is the original dress. I used the blouse sleeves from 1806 for this one and I used the ready done scoop front from 1810
You need a pattern fabric, white for the blouse affect and a plain contrast for the bias strips. You will also need 3 little buttons and enough ribbon to go around the skirt hem edge and make a little neck bow.
You need a light weight lining for the bodice because there are 2 layers of regular fabric in the front bodice to make the pinafore and blouse affect.
I have used lawn.
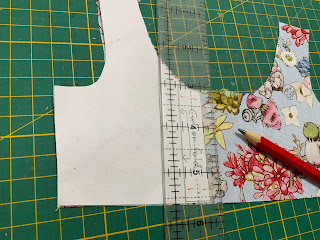
Once you have cut out your scoop neck bodice piece you need to make the button placket pleat.
Fold you pattern piece along the old centre front line and line it up on the fabric piece.
Measure 1/4" from the fold and mark the top and bottom.
Fold the scoop neck front along the marked line and press.
Form the pleat so it measures 1/2" and pin it together.
You can see that the centre of the button placket is level with the centre front of the scoop neck bodice.
Sewing the front bodice
Stitch across the top and bottom of the button placket pleat.
Cut a bias strip of contrast fabric 2.5cm x 20cm (1” x 8”).
Take you 1" x 8" bias strip and press it in half lengthwise, right side out. Open it out and press one long side to the centre crease.
Pin the other long side to the neck. Right side down on the wrong side of the scoop neck bodice. Just add one pin to hold it in place. Make sure it extends about 1/4" past the shoulder edge.
As you stitch slowly, fit the bias strip to the neck edge. Don't stretch it.
Press along the seam line to fold the strip over the seam allowance.
There is no need to trim the seam allowance. Fold in the edge of the strip and fold it over the seam allowance so it just covers the stitching line.
Pin it in a few places.
Stitch the strip n place close to the edge.
Press the scoop neck flat. A bit of steam will shape the bias curve.
Match the scoop neck bodice to the white blouse affect bodice and pin it at the shoulders and side edges.
Stitch or baste them together at the sides.
Cut a bias strip from the black fabric 3.8cm x 15cm (1 1/2” x 6”).
Take your 1/1/2"x 6" bias strip and press it in half lengthwise, right side out.
Pin it to the waist edge go the front bodice matching the raw edges.
Stitch or baste it in place.
Back bodice and collar
Pin the backs and front, right sides together at the shoulders.
Stitch them together and press the seams open.
Sew the collar according to The 18" Cuffed Sleeve Dress directions. Crease the centre front of the bodice.
I have found it easier to get the collar in place if I line it up at the centre front and stitch across just where the collars join.
Mark 1/2" in from the back edges.
Line up the back of the collars with the pins at the back edges and pin them in place.
Stretch the collar gently to make it fit and pin it at the shoulder seams of the bodice.
Stitch slowly, shifting the bodice to avoid little pleats.
The collar doesn't sit flat.
Stitch the shoulder seams of the lining.

Line it up with the main bodice, right sides together and start to match it at all the edges. Pin it.
Add pins around the neck and down the backs because that is where you will be sewing.
I like to pin the lining on with the lining on top but when I sew I turn it over so I can see the stitching line where I attached the collar. I try to stitch on that line or outside it so it doesn't show when I turn the bodice.
Stitch slowly up the back, around the neck and down the other back. Stop and check your raw edges match and readjust the bodice to make it lay as flat as possible as you sew. You will need to trim the seam allowance and clip the curve.
Turn the bodice and press the seams and understitch the collar. You will find these instructions in The 18" Dress pattern pictorial.
Fold your waist bias strip in half and press. Line it up on the waist edge of the front bodice and stitch it just inside the seam allowance to hold it in place.
Buttons and bow
I decided to add the neck bow and the buttons before doing the sleeves but I forgot to take a photo before finishing the dress. To make the neck bow I tied a loose single knot in one end of my ribbon and trimmed the ends on the diagonal so it looked the right size.
I stitched straight down the centre of the bow to hold it in place.
Sleeves
Make your sleeves. I did the short elastic sleeves from The 18" Dress Elastic Sleeves version.
The different layers of the bodice tend to not match up perfectly around the armholes. Rather than stitch the layers together (rows of stitching can increase the already bulky armhole) I suggest you pin them in place around each armhole then repin as you include the sleeve so the layers don't shift.
Side seams
Stitch the side seams.
Skirt
Normally I fold and finish the edges of the back facings before I sew the skirt side seams.
This time I did the side seams.
Then the hem.
Skirt ribbon
I pressed a crease along the skirt 2" from the bottom hemmed edge.
Lay the ribbon so it is centred over the creased line.
Using a narrow 1mm width zig zag, stitch both sides of the ribbon in place.
I use a slight zig zag so the ribbon will lay flat better.
Fold over the 3/4" back facing and press.
Overlock the back edges or turn in 1/4".
Finish the skirt
Sew the skirt to the bodice following The 18" Dress instructions for either version.
Happy Doll Dressmaking,
Val