I love sewing 18" doll clothes. It seemed a natural progression to start designing them too. You can read all about my life journey on valspiers.substack.com
This knit tunic is a great design to quickly add something cute to your doll's wardrobe.
My fabric choice is a knit with an all over small design of Christmas cookies.
I bought this from Spoonflower. There are so many gorgeous prints to choose from and even at full price it is good value to get a pattern that is not in the regular shops.
I chose the cotton knit which is so soft and light. Perfect for doll clothes. It is a regular knit with knit and pearl sides but because it is so soft it doesn't curl at the cut edges enough to cause a problem.
I wanted to do a ribbing neck band so I cut myself a piece of ribbing 1 1/2" wide and 3/4 the length of the neckline. About 6 3/4".
I checked that my ribbing would comfortably stretch to the full 9" before cutting it. Not all ribbings are the same.
To sew it on fold it in half and put a pin at the centre. Find the centre of the neck on the dress and pin the band and the dress right sides together matching the centres.
You need to sew on the neck band after you do the shoulder seams of the bodice
Pin the band to the back edges then stretch out the band and pin it at the quarter position on the neck edge. You may need to pin at the eighth position too.
Lightly press the band away from the bodice so the seam allowance points down.
Top stitch close to the seam line on the right side so you sew the seam allowance to the bodice.
No need to overlock seam edges.
I did use a narrow zig zag stitch and an ordinary needle for this knit.
I sewed the back facings down with a straight stitch.
I added a head band using a scrap piece. It measures 3" x 12"
I sewed the seam with the strip right sides together then I turned it.
I centred the seam then stitched the back seam.
Back
Front
I made up the leggings with the ribbing. I probably could have taken a 1/2" or so out of the middle of the pattern piece since my ribbing is very stretchy.
Add some boots and she is ready to go.
I am a bit of a tea fanatic so I treated myself to this beautiful tea box from The Tea Centre.
I had some birthday money to spend. You can probably notice that I am a bit of a coffee fiend too.
If you want to make a knit tunic for your doll I used this pattern
I added some length to the sleeves to account for leaving off the bands and I made the bodice a bit longer.
Now what about the fabric bindings for the neck wrists and bodice hem?
My first go wasn't perfect but it still looks cute. If I was just making for my family I would be happy with this one. But I need to make things to a much higher standard when I want to sell the pattern.
The bias binding made the wrist a bit too small since it cut out most of the stretch of the knit sleeve.
My second go has a slightly wider sleeve at the wrist.
The neck and hem bands were just right. You just have to stretch the bias strip very gently to stop any wobbles in the knit. You want the edges with the binding to sit nice and flat rather than going wavy.
The front band is a bit narrower and a tiny bit longer.
I had to work out how much bias strip to make and settle on four strips 10" long then sewn together to make one strip.
The idea was to make an outdoor top but the knit I used came from my old pyjama pants and looked like pyjamas so I made some 1813 boxer style trousers to finish the look.
I created a Fall jogging outfit with the grandpa top, leggings and boxer shorts.
Thicker fabric makes a huge difference when you sew small garments.
You can't just wake up one morning and say, "I'm going to use denim instead of quilting cotton".
I would also like to add that if you have trouble with your hands or fingers such as arthritis you will find it difficult to thread elastic through the denim waist band. If you really need denim trousers I recommend the flat front waist trouser patten 1812. There is only half the distance to thread the elastic.
My example is the button tab capris I made end of 2022.
They need:
a button tab
a stitched on waist band
and cuffs included in the inseam
All these require some special treatment to make them work in denim instead of light weight quilting cotton.
Button Tab
If you try to make a strip with a seam in it for the tab you won't be able to turn it right side out. That's my observation anyway.
You could possible sew the seam with right sides out then centre the seam in the back. Just fold down the end like I did in my instructions before you do the seam.
I already had a pattern piece that was going to work if I folded it in 3 to make the tab. This piece was my waist band. I didn't have to measure up a special strip and try to get it just the right width.
I'm all for use what you've got with as little changes as possible.
Not having seam allowances kept my button tab nice and flat.
Waist Band
To make the pockets fit neatly I needed a sew on waist band. This means more seam allowances. So I decided to finish the raw edge for the inside of the waist band and have it overlap the waist seam as one layer rather than turn the edge under. It's not as neat but it also isn't as bulky.
This is my sample garment so this waist band is not as neat as I would like. I thought I could get away without pinking the edge, but not so. In the instructions I have said to pink the edge then zig zag it.
But you can see what I mean about less bulk.
One last thing about the waist band. You have to use 1/2" elastic. 1/4" elastic isn't strong enough to pull-up the denim waist band. The denim stretches out the elastic instead and the waist doesn't hug the doll.
Cuffs and the Inseam
With quilting cotton fabric I generally take the easy way and just sew the inseam with the cuffs rolled up. No-one can see much of that section when the doll wears the pants so cuffs with a seam through them doesn't really matter.
But with the denim, all those layers in the cuffs makes sewing the seam really hard. So you have to unroll the cuffs and wiggle things around a bit so you get the inseams together neatly for sewing.
Sew the seam then roll up the cuffs again. Denim is pretty stiff so the cuff tends to just stay in place.
There is not a lot of room between the tab and the in seam so you just have to make sure you don't accidentally catch some of the cuff.
Look out for this design in my shop before the end of 2022.
A blouse with a convertible collar can be warn with the neck open or buttoned up for two completely different looks. It works for summer or winter with short, long or no sleeves.
You can swap in most gathered sleeves for different looks.
Enlarge the pattern by 2 to 5% and you get pyjama tops and jackets.
An everyday shirt with a business collar
A business style shirt is perfect for boys. It looks great on girls for a cowboy look or as an over shirt for a tank top. You can swap sleeves around to make it more girly with gathered sleeve heads.
Enlarge the pattern by 5% or so to use thicker fabrics like denim or pinwheel corduroy more of a jacket look.
An easy T with dolman sleeves
Want a knit top without too much fiddling. The dolman T is made from just a front and two backs. You can add bands or just do hems. It looks great by itself and it also fits well under jackets and cardigans.
You can check out my post on tips for sewing knits HERE.
I just wanted to add in something that got me thinking. I read a review for one of my coat patterns that said they thought it was very expensive. This pattern was $7 AUD. Most of my patterns are $5 or $6 and some are very low at $2 or $3. This would make a $7 pattern expensive in my store. I had a look around and any kind of coat pattern from another shop is at least $9 and some are $11. Sure my pattern doesn't have tricky panels and seams but it fits great, looks good and has excellent instructions.
It just goes to show that when you start a shop you set the expectations when you set your prices.
Some doll dress designers have all their patterns at around $15 and their sales are great.
I have been getting my jewellery shop ready to go and I am seeing the same sort of thing in the jewellery shops. Some have low prices and some have high prices and they all make good sales.
I will be not feeling any anxiety about setting my jewellery prices at the level I think I deserve.
I do have a particular audience in mind when I design and price my doll clothes patterns and for the end of 2022 and going forward I will be pricing any new patterns at $4AUD. I made this decision because I love making relatively easy to sew designs and after years of experience I can create the design and the instructions faster and more easily.
Everyone likes free things!
Looking for more patterns and tutorials? You can get instant access with the link below.
3. Use the same knit for the bands or don't have bands
Look for Double Knits
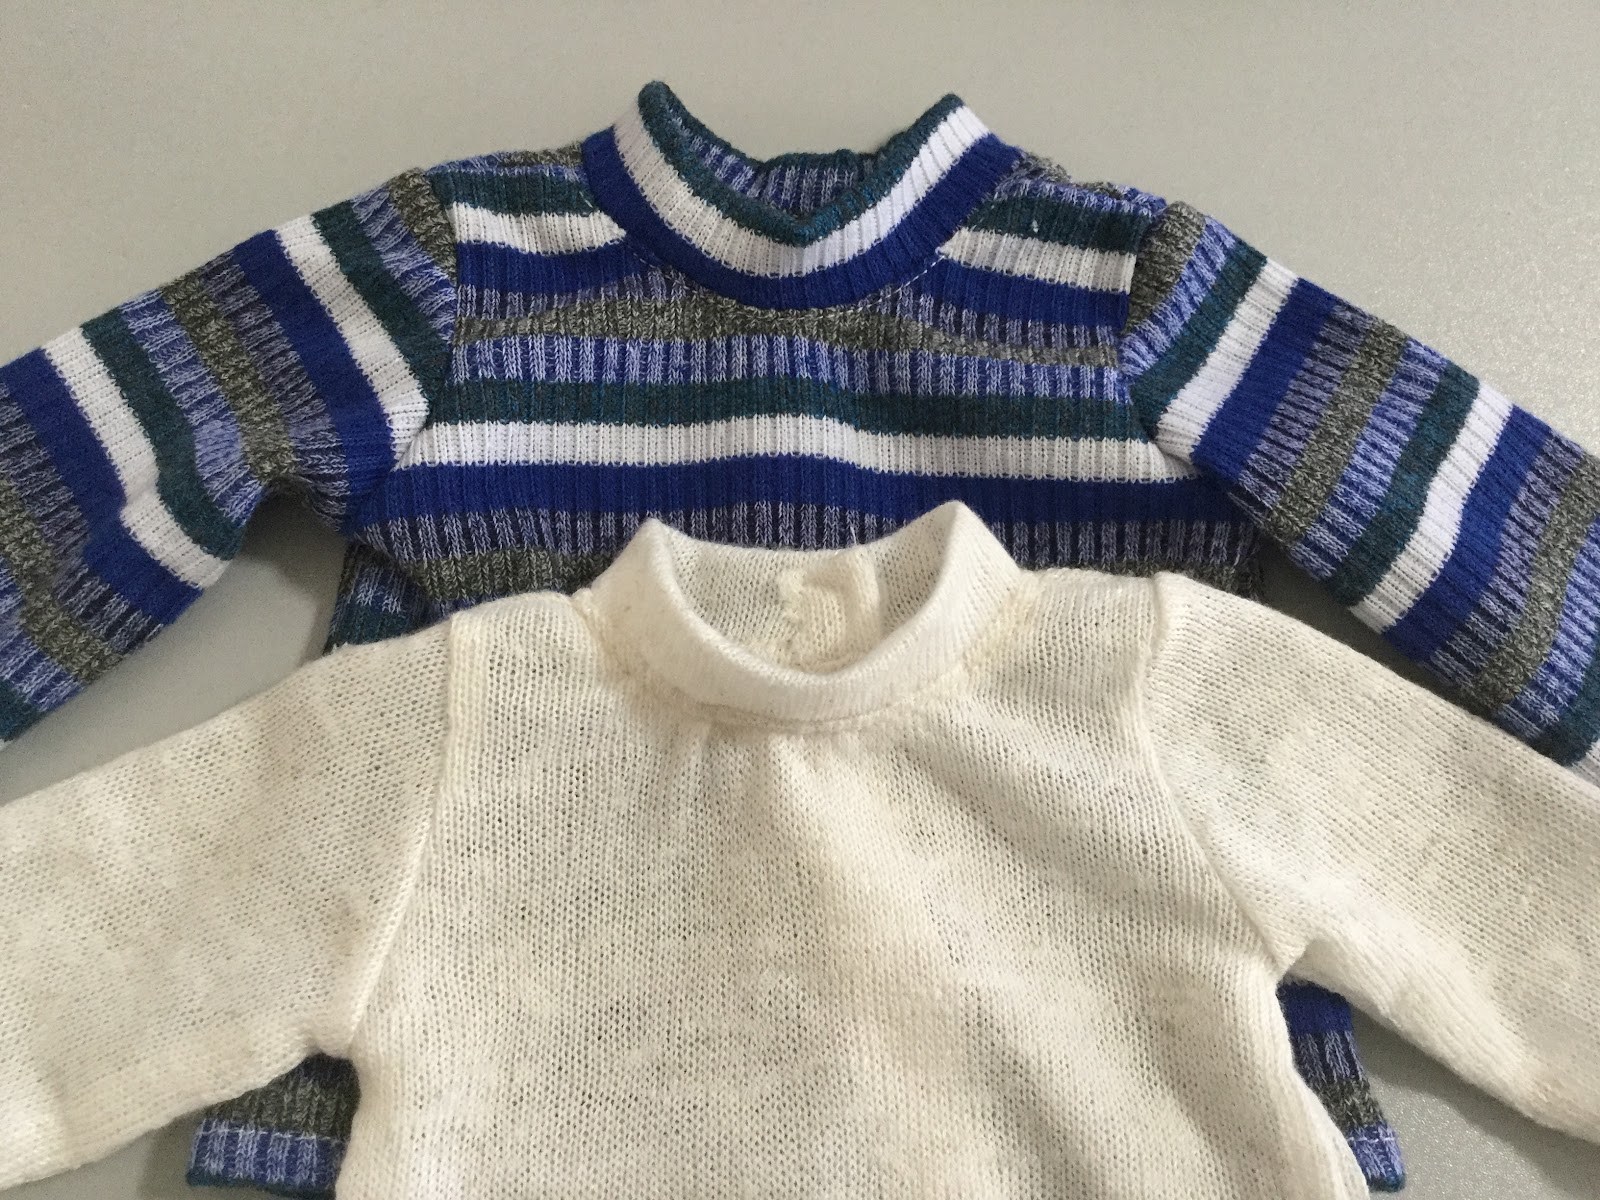
The plain pink knit is the same on both sides.
This one is printed lycra. The all over pink print keeps it from curling.
If you want to make a quick and easy knit top for your doll you should look for double knit fabric. This is the type of knit that looks like stocking stitch on both sides of the the fabric. Most T-shirts are made from this knit. However, many women's knit tops are made from single knit. Since I like to use second hand garments to make many of my doll clothes I have to make sure the knit fabrics will be easy to sew.
Single knit fabrics will curl up on the edges making it almost impossible to sew seams properly or finish off bands with a row of stitching. The seam allowances cult up and you can't get them to lay flat so you can secure them when you do that stabilising row for the bands.
I have found that printed lycra can be quite stable due to the printing. The ink makes it stiffer than usual.
Double knits are great because they are difficult to make run or fray. You don't have to overlock raw edges. Normal use for play should see your garments lasting for ages.
Single knit and double knit are the terms I use.
The more technical terms are:
Jersey or plain stitch. It has two different sides with vertical ribs on the right one and horizontal ribs on the wrong side. The fabric curls towards the right side. Jersey is the most popular type of knit fabrics due to a variety of colors, patterns and useful consumer properties – it is comfy, soft and stretchy.
Interlock. Unlike jersey, both sides of interlock knit are with lengthwise ribs and look the same way. The fabric features good shape retention, medium or heavy weight, smooth texture. (Taken from https://tissura.com/articles/knit-fabrics )
Use 1mm wide Zig Zag Stitch
Width set to just below 1
Stitch type set to zig zag
Since I started sewing my knits with this very narrow zig zag I hardly ever have a problem with the needle pulling the fabric down. You will also find that the narrow zig zag stops the knit from stretching so much as you sew. It doesn't look as wrinkled like a lettuce leaf when you use the narrow zig zag.
I use the narrow zig zag for all the stitching. The seams and the top stitching. 1mm is so narrow that it almost looks like straight stitching.
I find that I don't have to worry about using a knits needle when I use the narrow zig zag.
Use the same knit for the bands or don't have bands
Double knits are great to use as bands. They have plenty of stretch and hardly curl at all when you stitch them to fit.
Bands can be narrow or wide. They can be doubled and sew on with one step. These bands look good with two rows of top stitching on the garment side of the band. The two rows firmly secure the seam allowance.
Band can be done like binding. You sew the garment and band right sides together with the band piece as a single layer. Fold it over to the wrong side so it forms a narrow band over the seam allowance.
Pin it in place and top stitch on the band side of the seam. Careful trim the edge on the wrong side back to 1/8".
Looking for more patterns and tutorials? You can get instant access with the link below.
You don't need to be a designer to make designs like this ruffle top.
With some help from me and a good fitting dress pattern you can draw up your own pattern pieces for this cute button down ruffle blouse.
You can use the bodice pattern pieces for a plain dress that opens in the back and make a pattern for this blouse without buying any more patterns.
I have created a you tube video showing you step by step how to draft the blouse pattern from a dress bodice. I love to share my expertise as a designer.
You can see the video on You Tube or below. When you visit I would appreciate you subscribing to my channel. My hope is to keep making how to draft videos and eventually make an income from the ads. I need 1000 subscribers to even sign up for that so every follower gets me a bit closer.
Buy the pattern pieces instead
Not everyone has the inclination to draft their own patterns so I take it a step further and draw up the new pattern pieces to include in my shop. You can find this ruffle blouse as part of this cute outfit.
The shorts are from 1813 and I include the complete 1813 pattern. The bow headband is from the Free pattern folder in Dropbox and the blouse is the brand new ruffle blouse design. Get instant access to the Patterns and Tutorials folder in Dropbox with the link in the sidebar.
I include a combo file with just what you need to make this cute outfit, along with an outfit divider page and an outfit envelope.
Before rushing out to buy the blouse pattern you should have a go at drafting the pattern pieces yourself from the video. All you need is a round neck dress bodice. If you have my 1804 The 18" Dress you have all you need.
The step by step photo tutorial below shows you exactly how to sew it together.
Bodice
You will need to cut out main bodice pieces and lining bodice pieces.
With right sides together join the main shoulder seams and the lining shoulder seams.
Press the shoulder seams open.
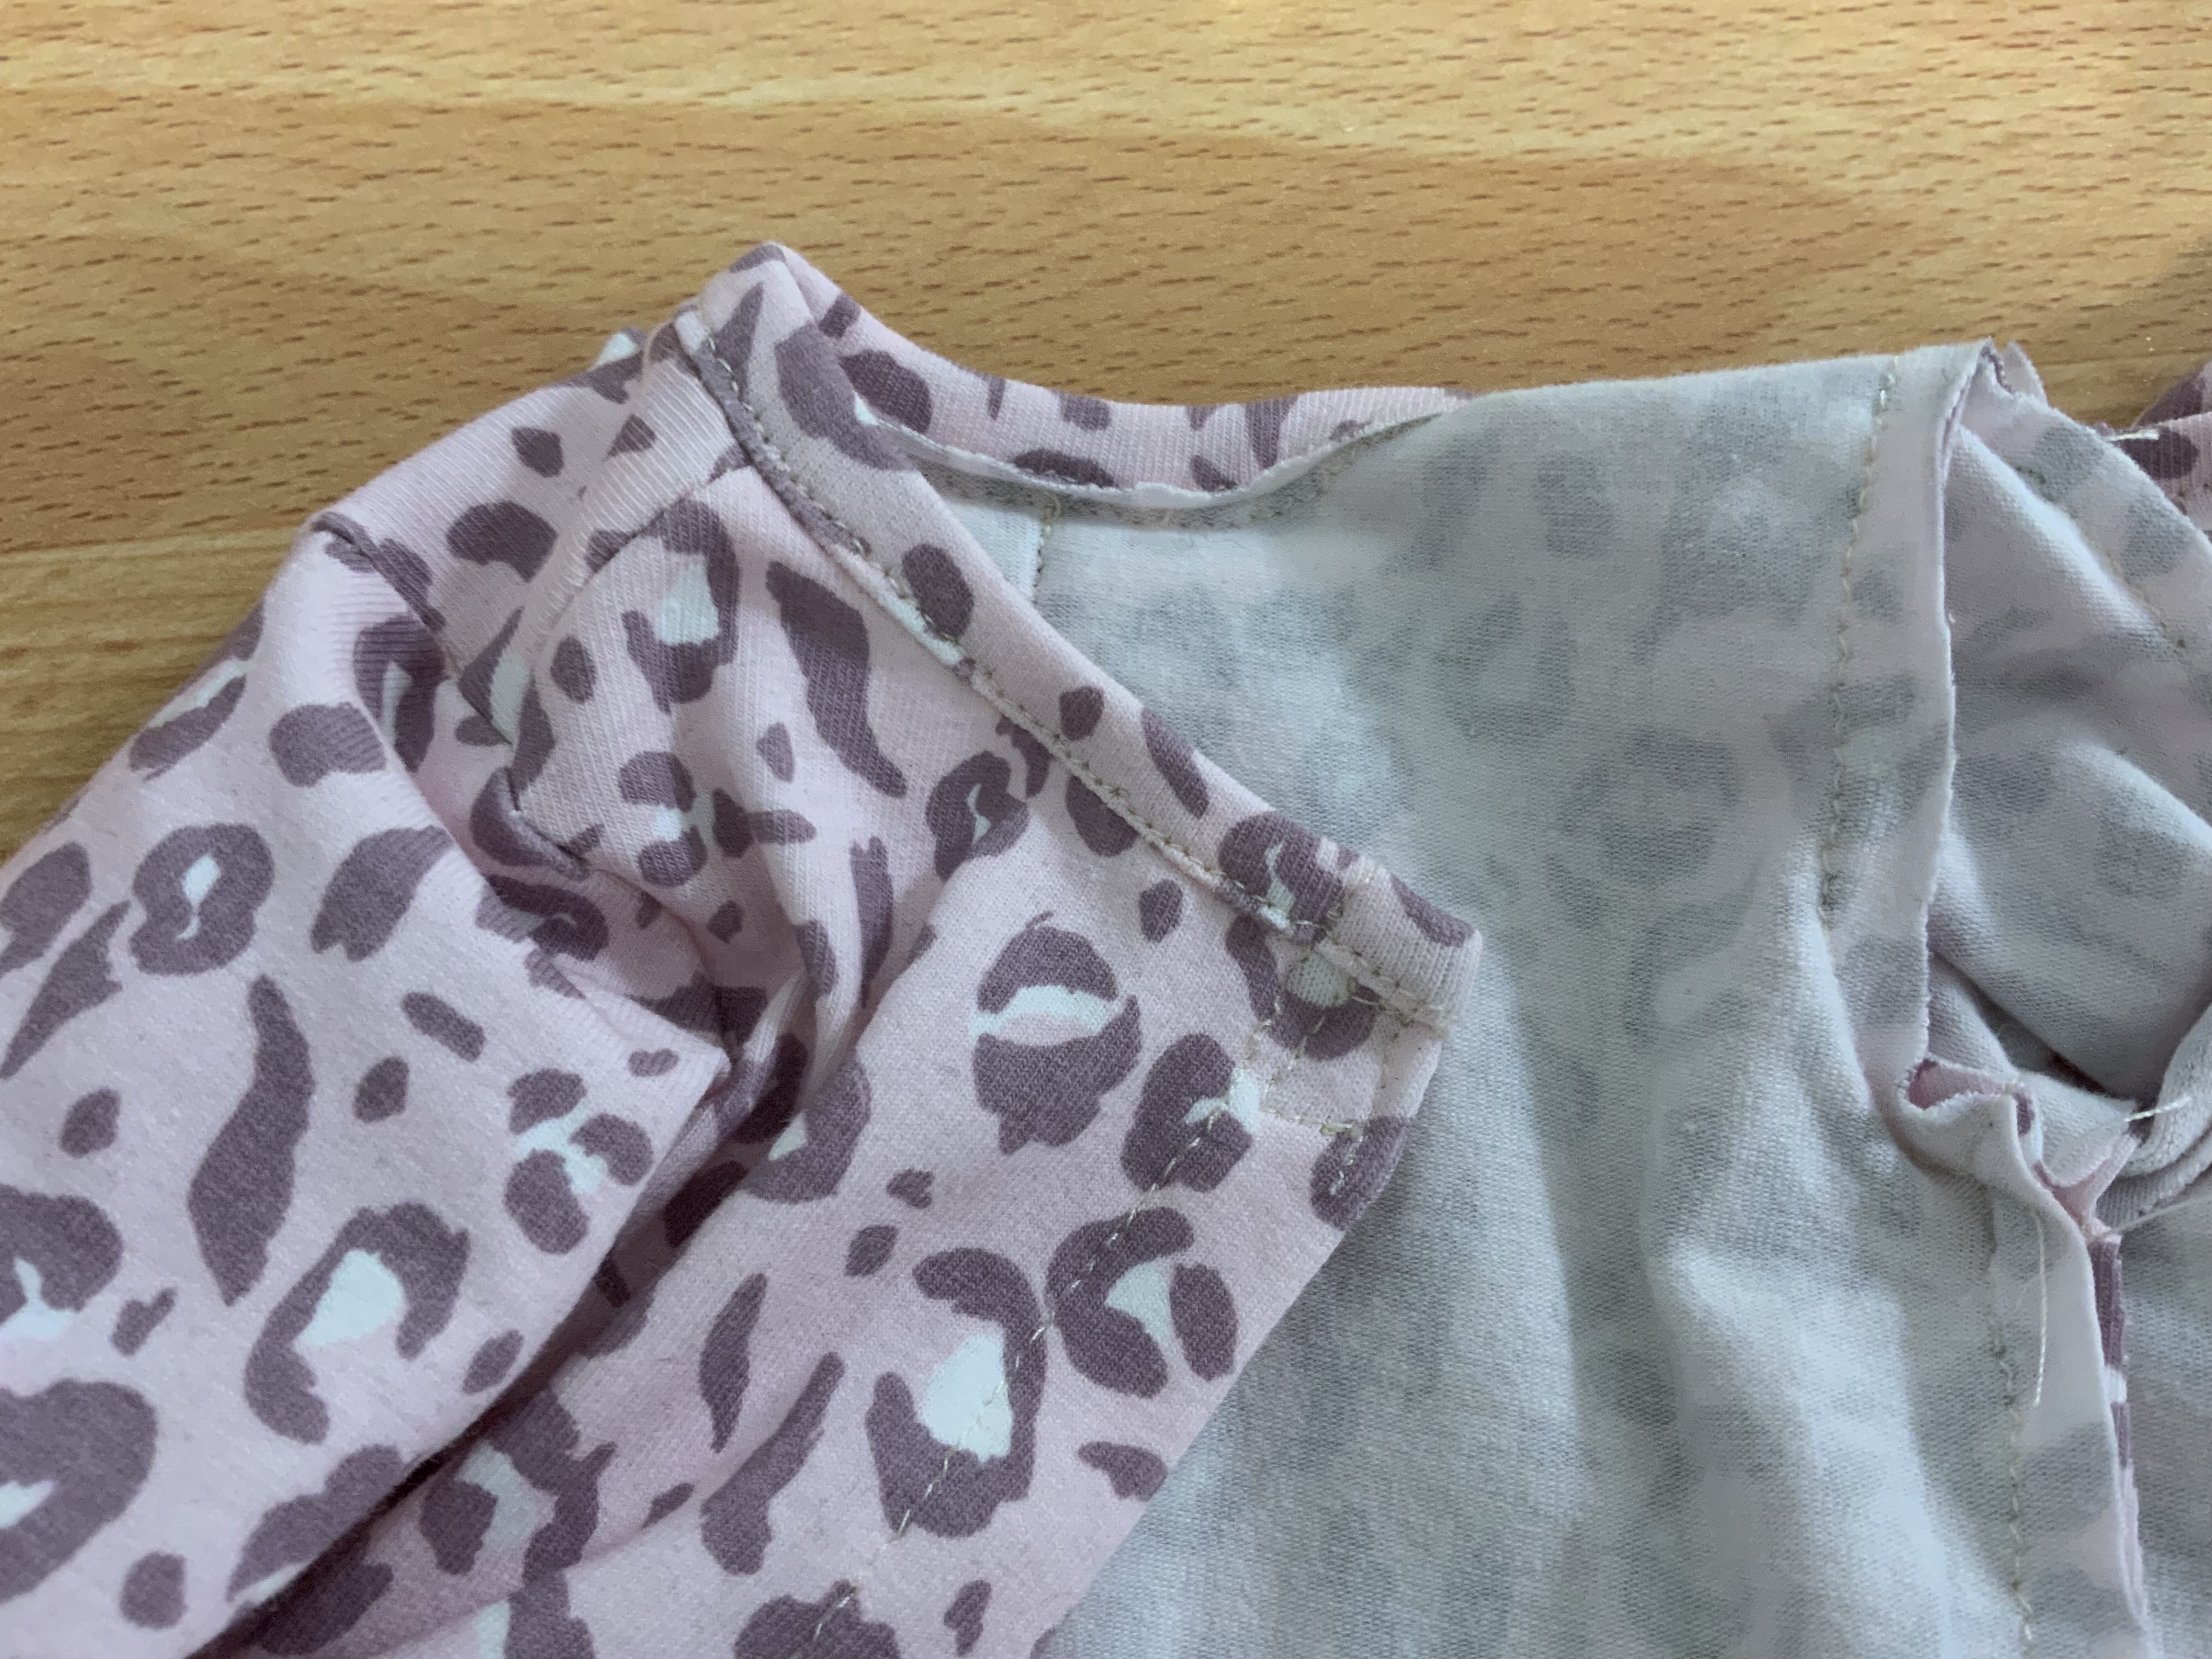
With right sides together match the main bodice to the lining and pin it around the edges so it won't move as you sew the armholes.
You will be stitching around the armhole edges only.
Trim the seam allowances and snip the curved sections.
Turn the bodice right sides out. Finger press the armhole seams.
Carefully press the bodice along the armhole edges,
making sure all the bodice and lining edges match up.
Stay stitch close to the neck edge and the front edges to hold the bodice and lining together.
Edge stitch the armholes.
Start and finish 1/4" from the side edges so the edge stitching doesn't
interfere with stitching the side seams.
Bring the main bodice and lining together at the side edges,
matching main to main and lining to lining.
Stitch the seam.
Press the seam open then bring the seams together and press.
Stitch both side seams.
Bottom Ruffle
Stitch the centre back seam of the waist ruffle.
Trim it with pinking shears and press it open.
Ruffle Hem
Press up 1/4" along the hem edge.
I used Steam-a-Seam to secure the second fold of my 1/4" double fold hem.
You can also just turn the second fold and stitch the hem.
Ruffle pleat
Fold the ruffle in half and stitch 3/8" from the folded edge.
Press the pleat towards the hem edge.
Stitch 2 rows of gathering stitch along the raw edge.
One on the seam line and one inside the seam line 1/8" from the first row.
Leave long thread tails at both ends.
Put a pin in the bodice to mark the centre back in the waist edge.
Gather from each end of the ruffle towards the centre back until each half matches half the bodice.
With right sides together pin the ruffle to the bodice, matching the centre backs.
Hold the ruffle to the bodice to work out the exact length for matching.
Tie the gathering threads with 4 knots. Even out the gathers on that half of the bodice.
Do both sides.
Stitch the ruffle to the waist of the bodice.
Pin the seam allowance close to the edge.
Press the seam up towards the bodice.
Top stitch 1/8" from the seam to secure the seam allowance in place.
NOTE: You can sew the ruffle to the lining first then stitch the main bodice on top to enclose the seam allowance. See the 1804 18" Dress instructions for this method.
Neck Ruffle
I turned up my double fold hem using steam-a-seam.
Mark the centre back of the neck ruffle with a pin.
Place it out of the way of the gathering threads.
Sew the first gathering thread 1/2" from the raw edge.
Leave long thread tails at both ends.
Sew the second gathering thread 1/4" from the raw edge.
Pull up the threads from one end to the middle.
Pull up the threads form the other end to the middle.
Sew Neck Ruffle to Bodice
Mark the centre back of the bodice with pin.
Pin the right side of the ruffle to the wrong side of the bodice
at the centre back.
Pin the end of the ruffle level with the front.
Adjust the gathering threads.
Tie off the threads with 4 knots.
Even out the gathers and add more pins.
Repeat on the other side.
Stitch the ruffle to the neck, sewing over the gathering thread
along the 1/4" seam line.
Trim the neck seam to 1/8".
Baste the end of the ruffle to the front on each side.
Press the ruffle away from the neck.
Pin it over to the right side along the seam line.
Stitch it down, sewing over the top of the 1/2" gathering thread.
I didn't do a good job of it so I had to pick out the gathering
thread just in the front.
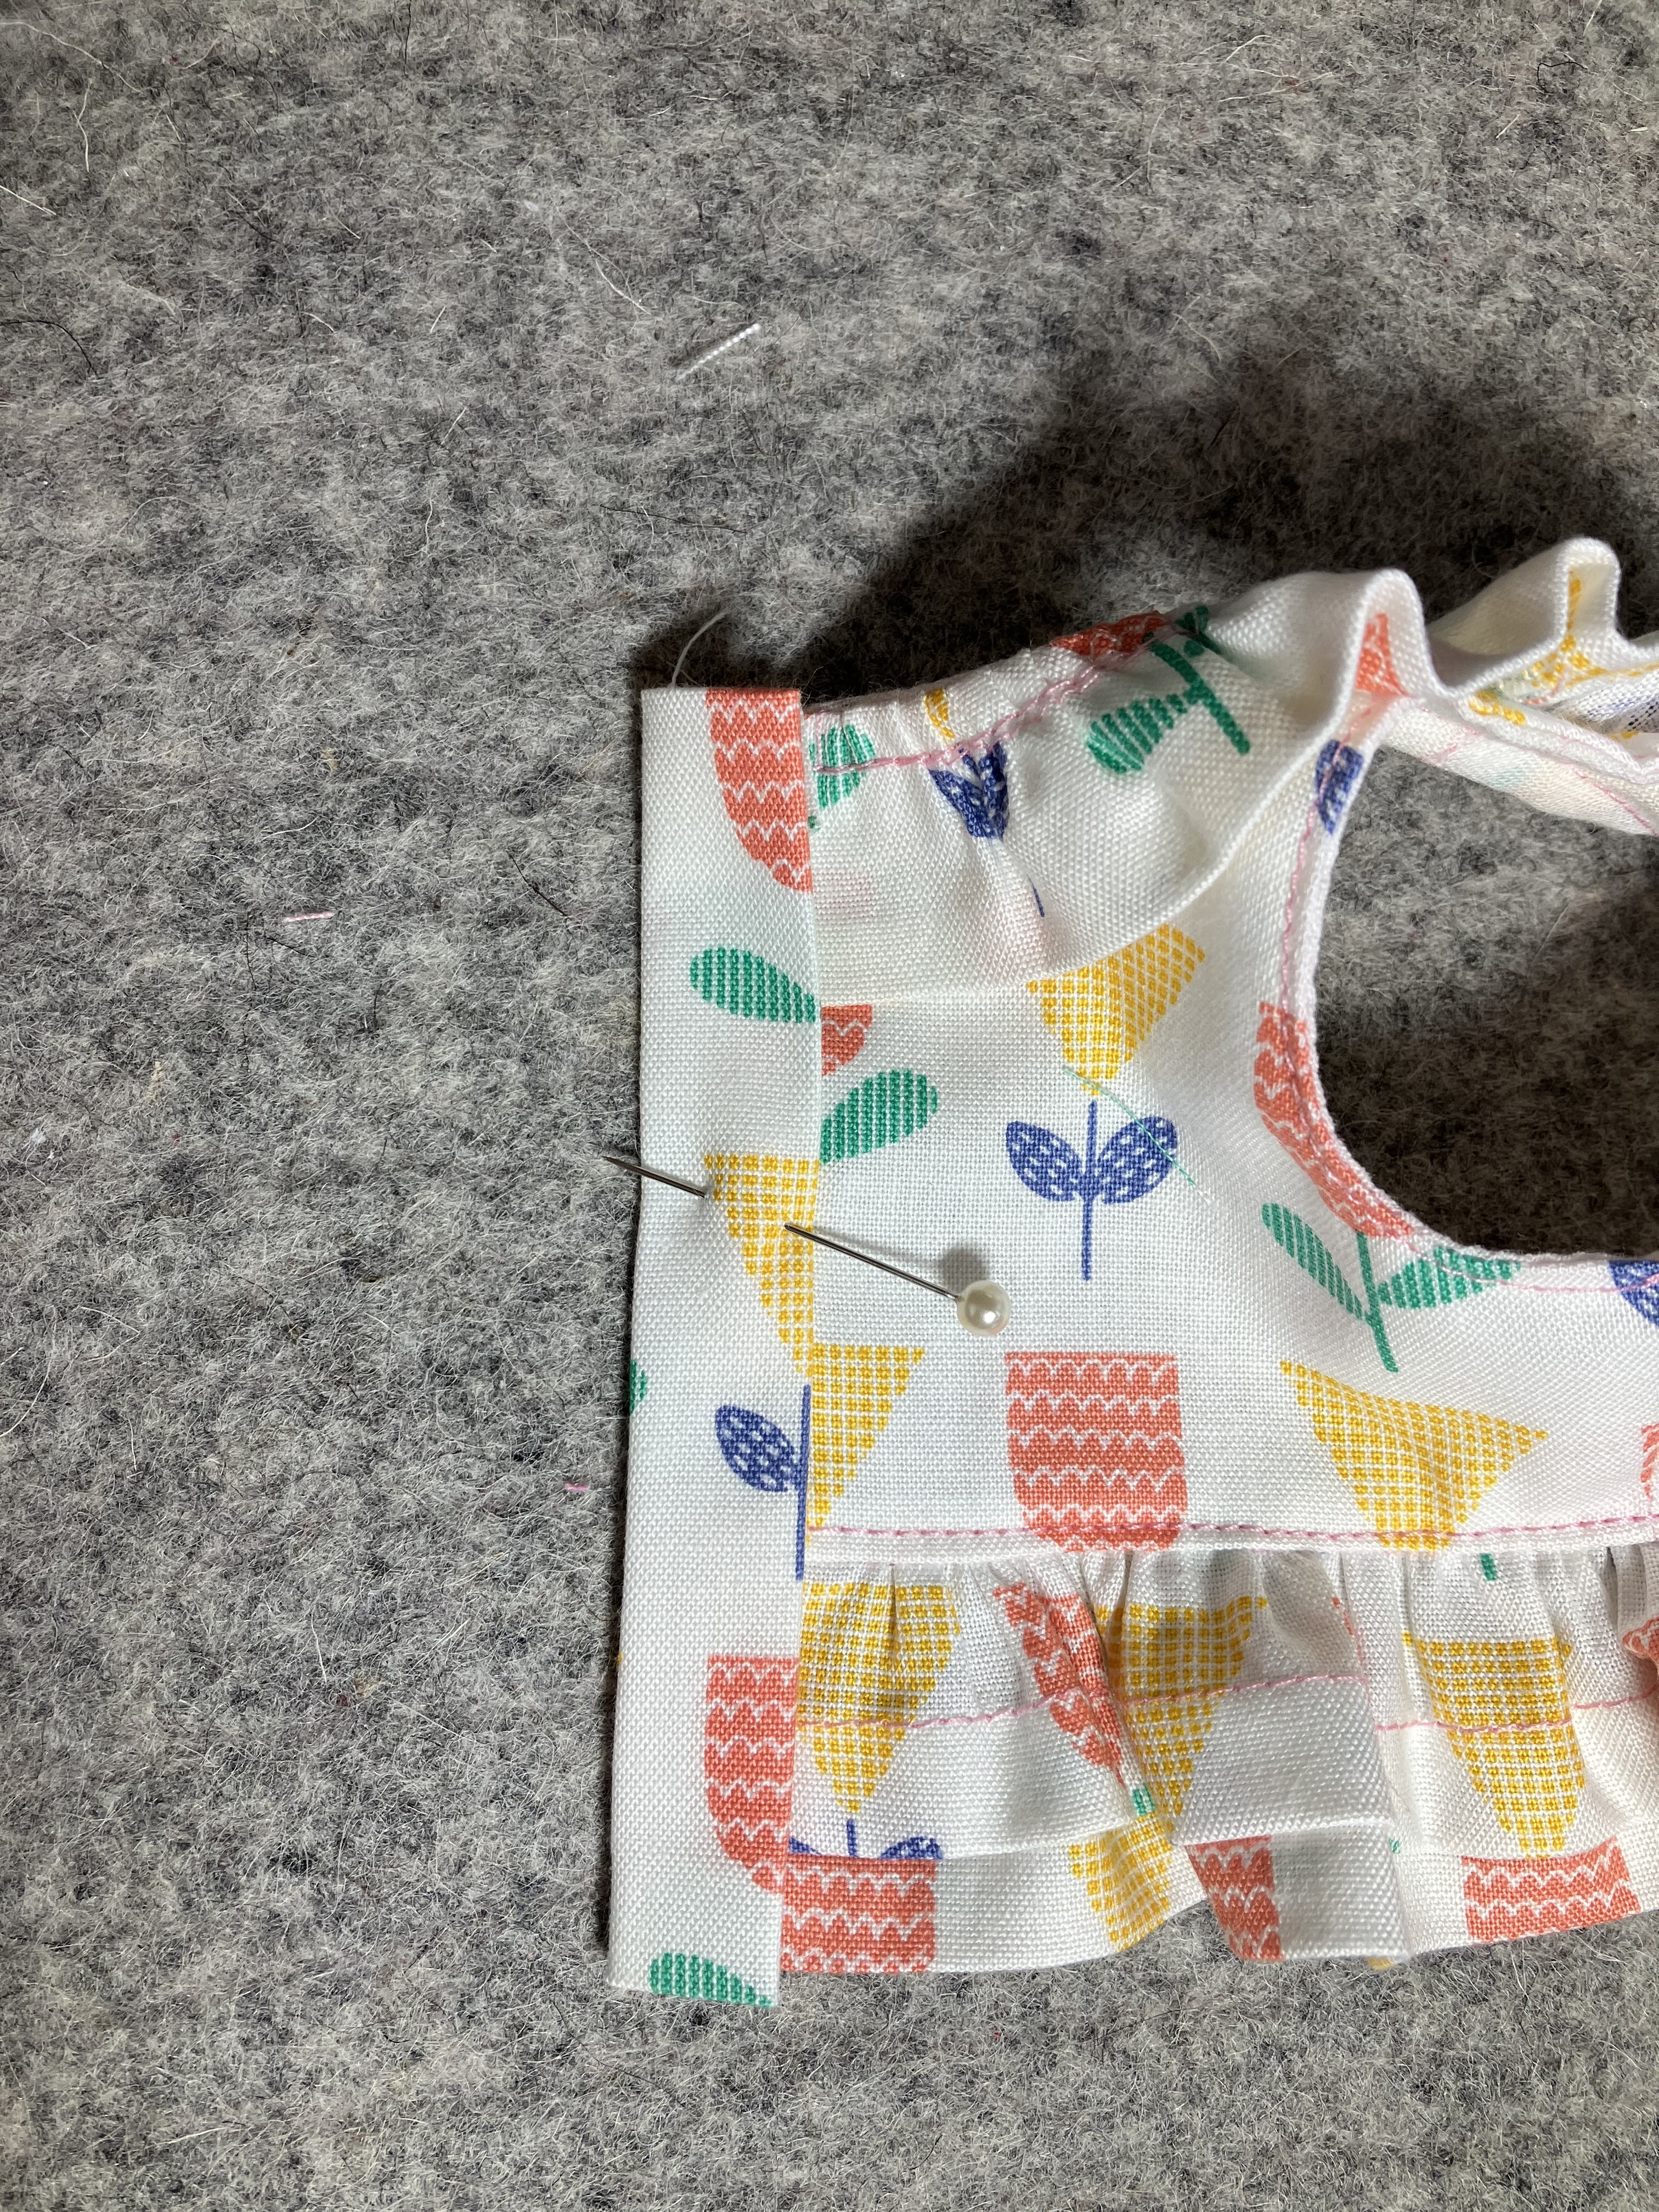
Front Band
Slip the front band under the front right side up.
Centre it between the top and bottom and pin it in place.
Stitch. Be careful the ruffle edge lines up with the front.
Fold it towards the seam and press.
Fold in the top and bottom edges and press.
Turn in 1/2" and press.
Turn it in again so it just covers the stitching line.
Stitch all around the band. Start on one of the open edges.
Stitch all around.
Do both bands the same.
Velcro
I like to use velcro patches rather than one long strip. However you do it, it is time to sew on the velcro.
Buttons
Lay out 5 small buttons (These are 1/4" buttons)
Carefully place a strip of sticky tape over the buttons to hold them down.
Use a button foot or a satin stitch foot and zig zag the buttons in place.