Saturday, October 24, 2020

Doll dress with a perfect collar and hidden side seams

I am always learning to sew better. Some things I see on other blogs or in Threads magazine. Sometimes I just work it out myself after trying lots of ways.

Doll clothes sewing is not quite the same as people sewing though many things are similar.

Sewing the collar together for the doll dress is only part of the process.


You can download a PDF ebook of this tutorial by clicking below:


Pressing and under stitching are really important steps to make the collar fit perfectly and sit nicely.

Below is a list of the steps involved

  • Make sure you trim the seams back to 1/8".
  • Make sure you clip into the seam allowance around the curves of the neck and armholes - my dress has no sleeves.
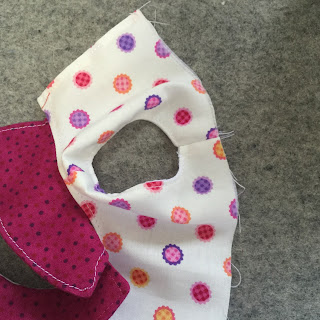
  • Turn the bodice and press around all the seam edges with the bodice facing up. Gently pull the collar up and get the point of the iron right up to the seam line.
  • Flip it over and press it again with the lining facing up.
  • Press the collar in place at the centre front.
  • Slightly roll the collar and press it in place at the backs. Not all collars roll like this but I think it looks nice on the doll.
  • Under stitch the collar.


Pressing the Collar after Turning the Bodice

Press with the bodice facing up


Press with the lining facing up


Press the centre front in place


Roll the back a little bit and press each back in place


When it is all pressed the front sits flat and you can see that the back sits ups just a bit as it rolls slightly.


Under Stitching the Collar

Lift the collar out of the way and stitch 1/8" from the neck edge on the right side.


Arm Holes and Side Seams

Below is a list of the steps

  • Top stitch the armholes starting and finishing 1/4" from the under arm edges.
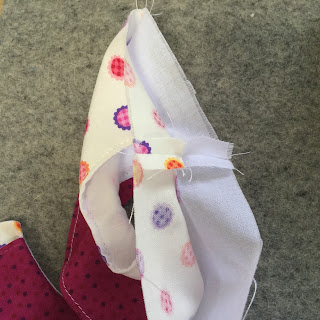
  • Separate the bodice and the lining and print the lining side edges together and the bodice side edges together so they form a continuous seam with right sides together.
  • Stitch the seam and press it open.
  • Fold the bodice and lining back together.

Top stitch the arm holes


Separate the bodice and lining and bring the lining side edges together and the bodice side edges together


Pin to form a continuous seam


Stitch it and press the seam open


Fold the bodice and lining back together and press


Happy Doll Dressmaking,
Val

Friday, October 23, 2020

Halloween applique tips

Have I said it before? I love doing appliqué!

It is easy to make some basic shapes to put on doll t-shirts for quick and easy Halloween outfits.

I like the jack-o-lanterns the best.

The best shapes are ones that can be cut out as one piece, whether they are pumpkins, cats, bats or ghosts.

Here is one of my jack-o-lanterns on a black t-shirt.


Black is great on my AGD Lea Clark®

Lea is a bright spring or maybe a true spring. She looks good in clothes that have a high contrast with each other and with her face and hair. being a Spring a yellow or orange pumpkin looks better than a white ghost. She looks good in warm colours.

Because this element is fairly large the outline around the inside of the pumpkin and the outside of the face features fits in and looks OK. 
This particular sample has the outline drawn on with a pen but I have now tried free motion stitching on the knit fabric and find that it goes quite smoothly with a stretch needle and a straight stitch.


I wanted to do something for my blonde girl. She is a truly me combination with deep blue eyes, light blonde hair and pink tinge skin. Because she is a light spring, outfits with a lot of black don't look pretty on her. I made a white t-shirt and put a pale yellow pumpkin on and used dark orange stitching.


You can see on the close up of this appliqué that the stitching around the outside of the features tends to run together so I had to redraw the face features a bit smaller so stitching around the outside of them would make them look the right size.

When you draw up a design that has an open feature on the inside you need to draw the feature a bit smaller than you would normally.
Such as the eyes on a ghost shape. Of course the same principles apply for any appliqué shape not just halloween appliqué.


This is the smaller shape I used on the white t-shirt. I made the features smaller so next time my stitching will look better.


This second one is the shape before I made the features smaller. You would use this one if you want to stick the features on top and stitch inside them.


Here is another jack-o-lantern with a less evil face. It is the one I used on the black t-shirt.


Don't forget to reverse your drawing when you want to trace it onto the appliqué paper.


Tuesday, October 20, 2020

A party dress for your doll

I have a habit of looking back at what I have done, and supposedly completed, in order to change and refine it.

Valspierssews doll clothes patterns

The 18" doll party dress (1811 in my shop) was a topic of discussion with one of my customers. She found  the fit a bit too tight for her doll. This dress is meant to be a snug fit but I didn't want it so tight that variations in doll stuffing made it hard to wear.

After sewing up the original design I decided to add a tiny bit to each side of the skirt and bodice so it had more ease. If you like the original fit then by all means stick with the original pattern pieces. However, I have also done a lot to the instructions. You will find the new steps easier to follow as well as easier to sew. For example, you sew the flat skirt on the bodice and then you sew the other side seam. Sounds obvious to me now but years ago I didn't have the experience I have now to see easier ways to do things.


A couple of other things I am doing to make your life easier are to work through all my patterns over time and make sure they open at 100% for easy printing from a phone or tablet. The other thing is that I am also renaming my files with Val Spiers at the front of the name so it is easy for you to search your computer for patterns by me. 

Any patterns that have a number will retain the same number in the file name but all my new patterns will have the month and year that I created them along with a few words of description rather than a number.

The party dress has a side opening at the skirt waist and at the shoulder. This makes the back nice and smooth to show off the shaping. 


I made up a dress in halloween fabric and found one of my plastic spiders from last year to adorn the deep curved back. It looks kind of creepy since I am not a fan of spiders but it goes with the theme.


If you bought this pattern a while ago you should find a message in your Etsy account with a link to the updated file.

You can purchase this cute dress in my Etsy Shop.

I couldn't decide whether I liked the pleats or the gathering more. I think making the 4 pleats is easier than doing rows of gathering threads and fitting the gathered skirt to the bodice but the gathers are a nice soft finish. I suppose you could also do pleats in the front and gathers in the back to fit nicely over her bottom.

Happy Doll Dressmaking,

Val

Friday, October 16, 2020

Downloading files from Etsy

 There are a few things you need to know to find your newly purchased digital files from Etsy.

First of all, you need to log into your Etsy account from a web browser not the app.

Those of you who only use a phone will have to make a few more clicks to get into the web browser.

When I buy a digital file from Etsy I get an email like the one below:

(I have blanked out personal details)


When I click on the View your files button it takes me to a special Etsy page:


If you miss the email you can log in and go to your account area in a web browser:

Click on the "You" in the top right and choose "Purchases and reviews"


When you click on the purchases and reviews menu item you are taken to your purchases page:

On the right hand side you will see a black "Download files" button 


Just remember that you need to be logged into a web browser.

Hope this helps.
Happy Doll Dressmaking,
Val


Tuesday, October 13, 2020

The perfect Fall doll clothes outfit

There are lots of ways this is the perfect outfit.

  • Always free infinity scarf at doll dressmaking.teachable.com
  • Bonus leggings in knit or woven
  • Perfectly proportioned tunic dress

The infinity scarf is a free pattern from my Free Resources Library on doll dressmaking.teachable.com

The leggings are a narrower version of pull-on trousers that come as a bonus pattern in this outfit file.

The t-shirt tunic uses a t-shirt cut off above the waist. Just add a gathered skirt.

Good news for you is that you don't have to just think what a great outfit it is you can use this little collection of patterns to create your own doll outfits. 

One thing I love to do is think about how the garments I collect pictures of might be adjusted to look great as doll clothes. Mostly I use pictures of toddler clothes as inspiration but little girl clothes and even adult designs can be the perfect jumping off point to design a doll outfit. 

This simple collection of scarf, leggings and tunic provide a huge opportunity to be creative when you make your own doll outfits.

The outfit is a fun way to use holiday themes. Different printed and plain fabrics along with trims and motifs can be used to create a unique look for each outfit you make. 

Each item is quick and easy to make. If you make a plain tunic you can make several sets of leggings and scarves to dress it up.

  • Easy to make the tunic with t-shirt knit
  • Use your regular machine needle
  • Use a narrow zig zag stitch 

Don't be put off by the fact that the tunic has to be made from knit fabric. If you choose a t-shirt knit rather than a lycra stretch knit you can easily sew all the seams with your regular machine needle and a narrow zig zag stitch. If you want to use a multi way stretch knit you will need a stretch machine needle and still use a narrow zig zag stitch.

The stretchy scarf is a great head band too.

You can get the pattern collection for this outfit from my Etsy shop now.

Here are a couple of the outfits I put together.

The nordic print is from a cheap pair of child leggings that I got from Target.


This scarf and trousers are made from woven fabric


A cute motive can really dress it up. The heart is included in the pattern.


You can get the pattern collection for this outfit from my Etsy shop now.

Happy Doll Dressmaking,

Val

Monday, October 12, 2020

18" Doll skirt with cute layered ruffles

Wow! This skirt is so cute. 


When I made the first test skirt it looked terrible.

The top ruffle was too short and not gathered enough so it pulled oddly at the side.

The curved feature sat at the side seam and was hardly visible and the yoke was too long.

So, back to the drawing board.

I made all the adjustments and crossed my fingers.

I was so excited to see it come together more like I had imagined in the first place.


I love the challenge as much as I like making cute doll clothes.

The blue skirt I made for Kit Kittridge. She is a Summer colour type so cool colours suit her best. There is some contrast between her eyes and skin and hair so she can handle some contrast in her wardrobe.

This off-white top and mid blue skirt with off-white flowers complements her complexion perfectly and makes her look very together.


On my prototype I did a narrow double fold hem but on the two good ones I did a quick overlocked single fold hem. I like to try things without the overlocker (serger) because not everyone has one.

I especially made the curve of the top ruffle on the top edge to be gathered so the bottom hem edge would be straight and easy to turn up.

I just knew this skirt would look fabulous with some trim around one or both of the ruffles. I spotted the bobbly trim left out on a shelf and thought it would look cute. I didn't take into account how narrow the edging was. I had to use my zipper foot to get the needle onto the edge very close to the bobbles and had to restitch a few inches where I didn't realise the bobbles had pushed the needle off the edge.


When I first started making skirts with the yoke I realised that not enclosing the yoke and skirt seam made it hard to get the skirt on and off the doll and have it sit neatly. The neatest way to line the yoke is to fold a strip in half lengthwise and stitch the folded edge to make a casing for the elastic.

I am quite happy with the exposed back seam. Being in the back it doesn't get noticed when the skirt is on the doll.

The skirt with the bobbly trim is in warm deep colours that suit Lea Clark and her True Spring complexion. She can handle deep colours and lots of contrast so the white tops look good on her with the dark skirt.


You can get the pattern for this skirt in my Etsy Shop now.

Happy Doll Dressmaking,

Val