Tuesday, December 27, 2016

Latest New Doll Clothes Pattern 1851 and 2051 Off the Shoulder

My latest published pattern in my shops is the long awaited Off the Shoulder top that I used when I did the photo shoot for the Skater Skirt. It looks great on the 18" American Girl doll and the 20" Australian Girl doll.

valspierssews doll clothes pattern

valspierssews doll clothes pattern


I think this one was inspired by some fashion photos I saw on the web. I am always looking at ideas I can convert into doll clothes.

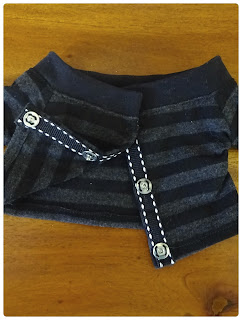
This top is beautiful done in a soft jumper knit. The collar falls nicely. I used velcro on the back of mine but on second thoughts I should have used snaps. Much better for being thrown in the toy box.


I tried out the snaps on the T-shirt fabric top. I reinforced the back edges with 3/8" ribbon then stitched on the medium size snaps using my button foot. It was a bit of a trick to swivel around the bump on the top part but anything to avoid hand sewing.


I tried the T-shirt neck with a narrow neck band but I think that this one with a wider neck band looks just right. You get measurements for the neck band in the pattern.


I also made it in 4 way stretch slinky jersey. I gives the top a whole new look. It stretches down over the shoulders for a more daring look as well.


There are two sleeve lengths. The long sleeve and the 3/4 sleeve. I like the long sleeves pushed up to the elbow too.

As with all my patterns you get the title page with links to my blog and Facebook page. You get a file page to use as a divider in your ring binder. You get the Pictorial Tutorial for printing out. This has diagrams. You get a pattern envelope that you can construct to keep your pieces safe.


I have started putting my patterns back on Craftsy so you can get 1851/2051 from both Crafsty and Etsy.

Craftsy


Etsy


Happy Sewing,
Val


Sunday, December 25, 2016

Prototype for New Pyjamas Pattern

Pretty quiet here today. Just us two this year.
I had a need to fill the time with designing and sewing.
This one is part of a pyjamas collection.


It needs some buttons down the front. I will probably instruct you to put those on before sewing on the skirt. I wasn't sure if I wanted to have it open or not at this point.

The flounce needs to be 3/4" longer.

I have also adjusted the overall ease for the pattern and added a bit more depth to the armhole.

I will be checking the new changes out on a front opening top and my cute yoga cats flannel.
I can see all sorts of possibilities for variations with this one.

It will come with boxer style long and short pants and nighty length flounce and maybe short gathered sleeves. Of course you can add to the ideas by using my 1801 Classic knit tops pattern. The only change I have made to the neckline is to enlarge it to 102% so it would also be possible to add collars from 1804 Round Neck Dress if they are enlarged to 102% as well. You can also have no front opening and put some trim down the centre front. I used my pom pom trim for the cuffs on this one.

Lots going round in my head and some ideas for free things made out of rectangles.

Happy Sewing,
Val

Monday, October 24, 2016

A New Design: 1850 / 2050 Godette Skirt

valspierssews doll clothes


This new doll clothes pattern is for an elastic waist godette skirt that will fit both the American Girl dolls and the Australian Girl dolls.
This very cute skirt pattern also includes a very cute headband pattern as a bonus.


Once you have cut out the fabric use one of the pattern pieces to mark the dots on each godette inset. I found this was easy if I cut a little hole where the dot is on one of the pattern pieces.
Do the same for each panel piece.


I set my machine to do the merest hint of a zig zag. I even keep my 1/4" foot on. The stitch is not quite 1mm or 1 on my dial. I find this seems to feed the knit better than using straight stitch and I don't have to use the zig zag foot.


Stitch one side of the godette insert to one panel. Stitch the other side of the godette insert to the next panel.


Finally stitch the top part of the two panels together.


Press the seams open. Continue around the skirt to make a complete circle.

The knit fabric doesn't need the seams finished in any way. I didn't do anything with the woven fabric seams either but I would think pinking the edges after stitching would be fine.


Don't be afraid of knits. I got a little pleat because the top layer stretches a bit as you sew.


Who's going to see it once the dress is on the doll?


You can make the skirt a bit shorter by cutting off the seam allowance from the waist edge of the panel pattern piece before cutting out your fabric. The green skirt is the original length. The pink skirt is a 1/4" shorter.

Believe it or not this waistband is some patchwork woven cotton that almost perfectly matches my knit fabric. You can't use the knit fabric for the waistband. Trust me I have tried, more than once, and it just makes a globby stretchy mess.


Happy Sewing,
Val

Friday, October 14, 2016

Putting a Box Pleat in the Free A-line Doll Clothes Skirt

Here is another easy variation for the A-line skirt.

Valspierssews Doll Clothes

If you don't have your Basic A-line Pattern for 18" dolls then all you need to do is join my tribe. 

Click the link and add your email to get the link to download the skirt pattern as well as getting an access link to the Newsletter Patterns and Tutorials folder and my monthly newsletter.


Box Pleat
Just take your front pattern piece and place it 1 inch from the fold instead of on the fold. This gives you 2" to make the pleat.


Fold the front in half with right sides together. Measure down the fold 2" and add a pin. Place the folded edge 1" from the needle and stitch down to the pin. 


To make it a bit easier to fold your box pleat just right you can stitch the last 2" at the hem edge with a long stitch and no back stitching just to hold the pleat in place.


Form the box pleat and press it to crease it well. You should stitch across the top of the pleat to hold it together.


Unpick the basting at the bottom f the pleat.


Sew some top stitching down the CF.


Finish making the skirt.


20" Doll Basic A-Line Skirt Pattern
You can get the basic A-Line Skirt for your Australian Girl doll with my compliments when you join my doll dressmaking tribe. I like the sound of having a tribe. It seems just a little bit uninhibited. Just the right atmosphere for feeling creative. The pattern is No.28 in the Newsletter Patterns and Tutorials folder.


20" Skirt Pattern Fits Pleasant Company 18" Dolls
I tried the 18" size on my old Kit Kittredge doll and found it just a bit too tight. So then I tried the 20" size on her and it fit pretty well. It overlaps at the back a bit more so you have to make your velcro patch a bit bigger to close properly.


Thank you for joining me on my doll dressmaking journey. I am thankful for my cute Kit Kittridge doll. She has that nice aged look about her. 
I hope you are inspired to take action and carve out your own doll dressmaking journey.


Happy Doll Dressmaking,
Val

Wednesday, October 12, 2016

Flat Felled Centre Front Seam for 18" Doll Clothes A-Line Skirt

That title is a mouthful! It could be longer because I also use my braiding foot.

Many of you downloaded my free A-line Skirt for 18" dolls from Facebook. My Facebook Page is the only place you will find this pattern. You will have to scroll down to September 10 2016.

There is so much you can do with an A-line skirt. This first variation is a simple one. I have made a seam down the centre front.

Valspierssews doll clothes


I recently purchased a set of machine feet as well as 2 flat felling feet so I have done a flat felled seam on the front of this denim weight design. My biggest flat felled foot is only 6mm so it only just worked with my light denim fabric. The trick is getting the second step fold into the foot.

Even though my denim is light weight it is still quite a bit thicker than shirt cotton so I am using the denim fabric pattern pieces for this skirt.

To make a flat felled seam you need to cut a 1/4" seam allowance on the left side front. The pattern piece is face up.


You then cut a 1/2" seam allowance for the right hand front. The pattern piece is face down.


If you just want a regular seam cut two front pieces with the extra 1/4" seam allowance.

Make sure you keep track of which edge is the centre front and which piece is left or right.


Using the 6mm flat felling foot line up the centre fronts, make a few stitches, then put the first fold into the foot. Stitch to the end.


Press the fold flat. Stitch it in place for a few stitches then fit the fold into the foot. I struggled a bit because the fabric was thickish. I had to pull pretty hard to the get the fold lying flat.


Keep going as for the regular skirt. However, because the fabric is quite thick I overlocked the waist band edge instead of turning it under. I stitched the waist band and skirt right sides together so my overlocked edge turned towards the inside.


I did the hem. THEN.... I used my braiding foot.
This is one of the feet that came in my box of 32 feet.

I had to adjust the screw to make the slot as wide as possible. I could just fit in my 3/8" ribbon.


I drew a line 1" from the hem as a guide.


It wasn't as straight forward as I would have liked. After sewing half way I saw the skirt was puckering and had to unpick it. It may have been a function of my extra wide and extra long stitch.
To fix it I loosened the tension to 1. The lowest I can go apart from 0. With a firm hand on the the skirt as it sewed it seemed to work OK. 
The perfect alignment of the stitching on the ribbon was a dream. I will be using this foot more often.


I used the wavy running stitch with top thread to match the ribbon. I didn't want the stitching to be a feature. You can see it on the inside.


I am drafting the skirt for the Australian Girl Doll at the same time I am writing this up. I love working on more than one thing at a time. I will sew it soon and post it on my Facebook Page.

I love how this skirt turned out. I also love the top she has on. It might be time to publish the pattern for it. I just want to add some applique ideas on some plain fleece first.


Happy Sewing,
Val