Showing posts with label A-line Skirt. Show all posts

Wednesday, January 5, 2022

How to check the fit of your doll's A-line skirt pattern

How to sew an A-line skirt valspierssews

This is the first step in the Basic A-line Skirt Pattern Hack Series.

Your pattern is printed out and you have cut it out ready to sew lots of skirts for your doll....

But wait a minute. Will the skirts fit your doll?

I know the skirt fits my American Girl Dolls.

It doesn't fit my Our Generation Dolls. They're a bit thicker in the waist. 

My American Girl Dolls have a waist about 11" and my Our Generation Dolls are about 11 1/2".

If you don't have your Basic A-line Pattern for 18" dolls then all you need to do is join my tribe. 

Click the link and add your email to get the link to download the skirt pattern as well as getting an access link to the Newsletter Patterns and Tutorials folder and my monthly newsletter.

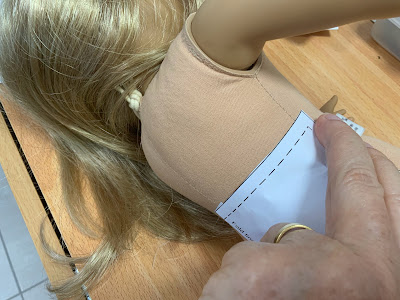
A quick way to tell if the skirt will fit is to use the pattern pieces against the doll. I am all for quick and easy and it is such a pain to get out my tape measure then have to roll it up and put it away. I'm not really lazy. I just find that having the pattern and the doll right there makes it logical to put the pattern on the doll.

Checking the back is easy. You have a side seam on the doll and a centre back seam. The centre back of the skirt pattern is 1/4" in from the facing fold line. I just check by eye. 

I folded over the back facing to make it easier to judge the 1/4".


I lined up the side seam line on the doll's side seam then smoothed it around to the centre back.


The centre back seam of the doll falls pretty close to the centre back of the skirt piece.
For my Our Generation Doll the centre back seam of the doll and the fold line of the back facing line up. So my OGD needs the back piece to be 1/4" wider. You need to add the extra width at the straight edge of the back facing not at the side.


For the front you need to line up the centre front edge of the pattern piece with the centre front of the doll. I looked from directly above the doll to see that it lined up with the bit of the centre back seam that I could see. I stuck a pin through the pattern and the doll up near the waist just to stop the pattern piece moving as I checked the side seam.


Make sure the side seam line of the front pattern piece matches to the side seam of the doll.

The seam line of the pattern piece was 1/8" away from the side seam of my OGD so I will have to move the pattern pieces fold edge 1/8" away from the fabric fold when I pin it on and cut out. There is a bit less difference for the front with my OGD because I have designed the pattern to fit well around the dolls' bottoms.


Once you've worked out the fit you are good to go. 

If your doll needs the pattern altered you should print out a new pattern sheet and cut it out with the adjustments to the centre front and the back edge of the back.

Don't forget to alter the waist band too. For my OGD I will have to add 1/4" + 1/8" (3/8") to the fold edge of my waist band pattern piece.

Sometimes fitting can be a pain. We all just want to get sewing and playing. However, the small amount of time it takes to check the fit can save sadness and trauma which is how I feel when things don't fit just because I didn't check first.

Now you can get to the fun parts of choosing fabrics, sewing and feeling great when you put your skirt on your doll.

Thank you for joining me on my doll dressmaking journey. I hope you are inspired to take action and carve out your own doll dressmaking journey.

Happy Doll Dressmaking,
Val


Tuesday, January 4, 2022

How to sew the basic A-line skirt for 18" dolls

The basic A-line skirt is the pattern that comes with your newsletter subscription. When you sign up you get a direct link to the pattern for download and you also get the access link for the Newsletter Patterns and Tutorials folder.

When I think about this skirt I tend to stop what I am doing and have all sorts of ideas for pattern hacks running around my brain. Even as I am writing this I have to keep pulling myself back to the screen so I don't keep making typos.

So let's start at the beginning with the original pattern pieces.

The skirt doesn't take up much fabric. I laid this one out on the odd shaped side of some cut fabric. I managed to squeeze the skirt pieces really close together.


I refolded and cut out the waist band.


If your fabric has an all over pattern that doesn't have a particular direction you can lay out the pattern pieces head to toe so the side seam edges fit into each other.


Once you have your pieces cut out you need to make sure you can easily identify the back facing edges from the side edges of the backs. I put a pin at each side seam edge, on the right side of the fabric. If your fabric is the same on right and wrong sides it helps to keep track of the right side for the backs. I put it at the side seam edges so it doesn't get in the way of me finishing the back facing edges.


The old version of the instructions is different. You can get the latest version from the Newsletter Patterns and Tutorials folder.

The back facings

The first step is to press over the 1/2" back facing. I do this first because the overlocking skims off a fraction no matter how careful you are and if you then press over the 1/2" your back skirt may end up a fraction narrower.

If you add an extra 1/4" to the facing edge when you cut out the fabric you can press over 3/4" then turn under your 1/4" fold and stitch it to neaten the edge.

The side seams are next.

Match up the side seam edges of front and backs with right sides together and stitch. My go to seam neatening is pinking so I've pinked the seam edges and pressed the seams open.


I'm going to do the waist band next.

Mark the centre of the skirt and the centre of the waistband with a pin.
  • Press in 1/4" along the other long side of the waist band then 
  • lay the band right side down on the wrong side of the skirt waist edge so the unfolded edge matches the skirt waist edge.
  • Match the pins at the centres and pin the pieces together at the centre.
Working your way out from the centre, pin the band to the skirt. At each back edge you will need to fold in the back facings then pin on the waist band.
I've written a bit on the waist band pattern piece explaining that the band is a bit longer than needed just in case your seams are not exactly like mine. It's better to have too much waist band.


Stitch the seam and press the band up away from the skirt. Try not to flatten your pressed in edge too much. Repress the turned up edge of the waist band anyway, just to make it a crisp crease.

Fold the waist band back on itself so it is right sides together. Stitch across each end.


Clip the end off so it is angled towards the fold.


Turn the waist band right side out and gently poke out the corners. I like to use a knitting needle because it has a nice blunt end but is pointy enough to get the corner right.
Now you may be wondering why I didn't trim the waist seam allowance. I used to, but I have found that for the small doll clothes it's easier to keep it at 1/4". So there is no seam trimming here.

You will find, however, that there is a little corner that wants to stick out. It doesn't seem to matter how careful I am sewing the ends, the overlap just doesn't hide that corner. My solution to most things is to just trim it off. It doesn't always work but in this case it does.


Once the corner is trimmed off it is much less noticeable.


Pin down the band so it just covers the stitching line and stitch it in place close to the edge.


You don't have to do the waist band before the hem but I think is is better to get the waist edge of the skirt stabilised as quickly as possible. It is on a slight curve so it can stretch if you pull it carelessly.

The hem

So the hem can be done in either of 2 ways that are both quick and easy. You can follow the instructions in the file or you can do it how I have here. It is a fraction quicker I suppose.

First you overlock all along the hem edge. Leave thread tails when you cut the overlocker thread.


Press up the 1/4" hem tucking in the thread tails and stitch the hem. I usually do it from the wrong side so I can see the edge. Press the hem then press the back facings again. 
Stitch the facing down.


Now it's just the velcro to go. 

You could use snaps or press studs. Buttons and buttonholes would work too but good old velcro is just fine.
Right from the beginning I decided that I hated long strips of velcro on my doll clothes. I had trouble getting it to close smoothly so I had the bright idea of cutting small patches and using them like press studs. Even though there is a smaller surface area of hooks and loops I find that the patches hold strongly enough. 
You can see my tutorial about sewing on the velcro patches here


I hope you find this photo tutorial useful. 
If you have access to the Newsletter Patterns and Tutorials folder you can get a nice PDF of this blog post to download.

This tutorial is part one of the Basic A-Line Skirt Pattern Hack Series. It's part 1 because there is no hacking. The later parts have pockets and yokes and seams and pleats.


Happy Doll Dressmaking,
Val


Wednesday, September 30, 2020

18" Doll Skirt - Classic A-line Style

I wanted to do some appliqué so after a bit of thought I printed out my basic A-line skirt pattern.
I used my computer to create this cute lion appliqué but it is just as easy to draw onto your skirt pattern.
Just remember that you have to reverse your appliqué design before tracing it onto the fusible appliqué paper.
If you have your design drawn on the skirt paper pattern you can hold it up to a window and trace over the design on the back of the paper.

The lion skirt is just one of the patterns available in the Newsletter Pattern and Tutorial folder. When you subscribe to the newsletter you get an access link to the Newsletter folder and a direct link to the Basic A-line skirt with a waistband so you can get sewing fast.

If you don't like newsletters you can get this pattern from my shop 

Doll clothes patterns by valspierssews

The lion applique skirt doesn't have a waist band. The waist edge is finished with a wide facing on the inside. I was experimenting with just leaving off the waist band of the basic A-line skirt and cut identical shorter pieces for the facing.
There are no darts or any tricky bits. So quick and easy to make.

When you subscribe to the newsletter you get a direct link to download the basic A-line skirt. This one has a waistband. Just a little more construction required compared to the one with the yoke but still quick and easy to make.


doll clothes by valspierssews

There are lots of pattern hack ideas for this basic design. Box pleats and front pockets are just two hacks I am working on adding to the newsletter folder so you can download and print out.

Below I have outlined some ideas for customising you skirt design. I hope you get inspired to get sewing.

  • Thick fabrics need an adjusted pattern
  • Add 1/8" to the centre front and centre back
  • Lengthen the waist band by at least 1/2"

This latest skirt is close fitting. This is a problem when you use different fabrics. I love solving such problems. With a little bit of adjustment to the pattern pieces it becomes suitable to make in denim or corduroy. 


If you already have an A-line skirt pattern for your doll and you want to make it in a thicker fabric you will need to add 1/8" to the centre front when you cut out the front and add 1/8" to the back facing on the backs. 

If it has a waist band you will have to add at least 1/2" to the length of the waist band but possibly even more since there are folds at each end that take up quite a lot of fabric around the fold in thicker fabrics.


  • Use fancy facing fabric 
  • Decorate the skirt with appliqué motifs

I love having the facing on this skirt because it looks so cute with the facing in a fancy fabric. My Micky Mouse facing fabric is very course and stiff and not really suitable for a nice doll dress so I used it for the skirt facing where the Micky pattern is what stands out not the feel or drape of the fabric.


There is lots of potential to decorate the skirt in little appliqué hearts or flowers using the same facing fabric.

If you like appliqué you may even find some items from your pattern stash of appliqué items that will fit perfectly on the skirt. Things like birds or animal heads or bugs and butterflies would be perfect.

I designed a lion face and body to fit onto the side and be stitched into the side seam. I really love the disembodied tail coming in from the side. Appliqué is such a perfect artistic outlet that combines well with my love sewing.


      • Use patterns you already have to come up with new designs
      • Use second hand or bargain clothes to get small amounts of fashion fabrics for doll clothes

When I set out to design this skirt I found that the free sign up skirt was a good fit if I just left off the waist band. I then created pattern pieces for the facing and played with the appliqué idea. Rearranging things and coming up with new ways to put them together is what I love about doll clothes designs. It doesn't take all day and metres of fabric to alter and test a new design.

To make my denim skirts I used old jeans. I find that using men's jeans is better because the denim is not stretchy like most of the women's denim clothes. The stretchy denim does not age well and looks wrinkly like old elastic. Especially when you have small pieces representing a whole doll skirt. It seems to amplify any imperfections in the fabric.

Don't just get stuck on denim or quilting cotton. I used cotton sateen for the lion skirt. It is a bit stretchy and has a nice sheen to it.

The pink skirt with the box pleat is more of a canvas weight fabric that looks good pressed into a pleat. I must have picked it up in the curtain department of Spotlight.


No matter what skirt pattern you have you can have some fun with it using different fabrics, different trims and appliqué and special features like the box pleat.


Happy Doll Dressmaking,

Val

Friday, June 9, 2017

How to Sew Doll Clothes: Adding Slant Front Pockets


I can't stop myself from doing something else with the patterns that I design. This skirt is the Basic A-line Skirt pattern that you get to download when you join my mailing list. 
Once you sign up you get a link to download the skirt pattern as well as an access link to the Newsletter Patterns and Tutorials folder.
If this sounds good then click the button below to add your email to the list.


Doll clothes look so cute with front slant pockets. They are easy to add to garments that have a waist seam. This skirt has a waist band. You will need the Basic A-line Skirt pattern and the pocket pattern pieces to make this skirt with pockets.

The method works for any low gather skirt or trousers with a waist band as well as a dress with a narrow skirt attached at the waist.


First you have to realise that adding extra bulk to the front as pockets will affect the fit. You need to add more ease to the skirt front or the front of any pattern not sized for front pockets.

Place the centre front of the skirt pattern 1/8" from the fold and cut it out. This doesn't have to be exact. Cut the backs the same as the pattern. 


Cut out the pocket pieces using the same fabric for each or you can use a lighter or cheaper fabric for the pocket lining.

If you want to do piping trim you will need to stitch the piping to the right side of the lining top edge first.
Place the pocket linings on the skirt front, right sides together and matching the side and waist edges.
Stitch along the top edge of the lining 1/4" from the raw edge.


Trim the seam. Clip the curve every 1/4".


Turn the pocket linings to the inside and press. Do top stitching or fancy stitching or add trim at this point.


Place the pocket bag right side down so it matches the edges of the lining and the waist and side edges of the skirt. At this point you can stitch around the curved edge of the pocket to join the lining and bag. Then you pink the seam.


If you are going to use the French seam finish you will need to sew the seam twice.
Flip the pocket bag over and pin the pocket bag to the lining, inside out.


Match and pin the inside edges. They come together easily but you have to distort the skirt to get them together.


Stitch around the inside of the pocket with a 1/8" seam allowance. I didn't find it necessary to clip the curve.


Turn the pocket. The neat edge is on the outside and the raw edge is on the inside.


Stitch around the outside of the pocket so you just enclose the raw edge on the inside.


Finish the skirt as directed in the pattern.


You can get the pocket pattern pieces in the Newsletter Patterns and Tutorial folder. I have created a new Pattern Hack Series folder where you will find folders for different patterns. The first one is the basic A-line Skirt. Future series will be for the patterns in my shop.

If you don't already have access to the patterns you can sign up to my newsletter below.


Happy Sewing,
Val