The basic A-line skirt is the pattern that comes with your newsletter subscription. When you sign up you get a direct link to the pattern for download and you also get the access link for the Newsletter Patterns and Tutorials folder.
When I think about this skirt I tend to stop what I am doing and have all sorts of ideas for pattern hacks running around my brain. Even as I am writing this I have to keep pulling myself back to the screen so I don't keep making typos.
So let's start at the beginning with the original pattern pieces.
The skirt doesn't take up much fabric. I laid this one out on the odd shaped side of some cut fabric. I managed to squeeze the skirt pieces really close together.

I refolded and cut out the waist band.

If your fabric has an all over pattern that doesn't have a particular direction you can lay out the pattern pieces head to toe so the side seam edges fit into each other.

Once you have your pieces cut out you need to make sure you can easily identify the back facing edges from the side edges of the backs. I put a pin at each side seam edge, on the right side of the fabric. If your fabric is the same on right and wrong sides it helps to keep track of the right side for the backs. I put it at the side seam edges so it doesn't get in the way of me finishing the back facing edges.

The old version of the instructions is different. You can get the latest version from the Newsletter Patterns and Tutorials folder.
The back facings
The first step is to press over the 1/2" back facing. I do this first because the overlocking skims off a fraction no matter how careful you are and if you then press over the 1/2" your back skirt may end up a fraction narrower.
If you add an extra 1/4" to the facing edge when you cut out the fabric you can press over 3/4" then turn under your 1/4" fold and stitch it to neaten the edge.
The side seams are next.
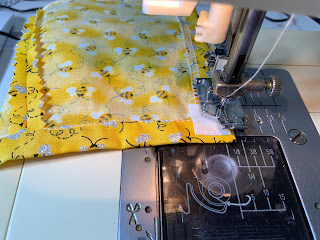
Match up the side seam edges of front and backs with right sides together and stitch. My go to seam neatening is pinking so I've pinked the seam edges and pressed the seams open.

I'm going to do the waist band next.
Mark the centre of the skirt and the centre of the waistband with a pin.
- Press in 1/4" along the other long side of the waist band then
- lay the band right side down on the wrong side of the skirt waist edge so the unfolded edge matches the skirt waist edge.
- Match the pins at the centres and pin the pieces together at the centre.
Working your way out from the centre, pin the band to the skirt. At each back edge you will need to fold in the back facings then pin on the waist band.
I've written a bit on the waist band pattern piece explaining that the band is a bit longer than needed just in case your seams are not exactly like mine. It's better to have too much waist band.

Stitch the seam and press the band up away from the skirt. Try not to flatten your pressed in edge too much. Repress the turned up edge of the waist band anyway, just to make it a crisp crease.
Fold the waist band back on itself so it is right sides together. Stitch across each end.

Clip the end off so it is angled towards the fold.

Turn the waist band right side out and gently poke out the corners. I like to use a knitting needle because it has a nice blunt end but is pointy enough to get the corner right.
Now you may be wondering why I didn't trim the waist seam allowance. I used to, but I have found that for the small doll clothes it's easier to keep it at 1/4". So there is no seam trimming here.
You will find, however, that there is a little corner that wants to stick out. It doesn't seem to matter how careful I am sewing the ends, the overlap just doesn't hide that corner. My solution to most things is to just trim it off. It doesn't always work but in this case it does.

Once the corner is trimmed off it is much less noticeable.

Pin down the band so it just covers the stitching line and stitch it in place close to the edge.

You don't have to do the waist band before the hem but I think is is better to get the waist edge of the skirt stabilised as quickly as possible. It is on a slight curve so it can stretch if you pull it carelessly.
The hem
So the hem can be done in either of 2 ways that are both quick and easy. You can follow the instructions in the file or you can do it how I have here. It is a fraction quicker I suppose.
First you overlock all along the hem edge. Leave thread tails when you cut the overlocker thread.

Stitch the facing down.

Now it's just the velcro to go.
You could use snaps or press studs. Buttons and buttonholes would work too but good old velcro is just fine.
Right from the beginning I decided that I hated long strips of velcro on my doll clothes. I had trouble getting it to close smoothly so I had the bright idea of cutting small patches and using them like press studs. Even though there is a smaller surface area of hooks and loops I find that the patches hold strongly enough.
You can see my tutorial about sewing on the velcro patches here

I hope you find this photo tutorial useful.
If you have access to the Newsletter Patterns and Tutorials folder you can get a nice PDF of this blog post to download.
This tutorial is part one of the Basic A-Line Skirt Pattern Hack Series. It's part 1 because there is no hacking. The later parts have pockets and yokes and seams and pleats.

Happy Doll Dressmaking,
Val


