I love sewing 18" doll clothes. It seemed a natural progression to start designing them too. You can read all about my life journey on valspiers.substack.com
I can see which patterns I will be doing pattern hacks for.
The knit dress lends itself to lots of sleeve designs.
Scarves are a great accessory with lots of variations if not strictly pattern hacks.
There are a few things yet to be explored with the leggings.
My favourite pattern from these 10 is the Gathered Pull-ons.
While looking for the image to add in this post I went down memory lane looking at all the different designs I made form this one pattern. This is one of my first patterns from around 2015.
The title for each one links to that item in the shop if you want to have a better look.
Do you wish you could design your own doll clothes but don't have hours and hours of drafting skills up your sleeve.
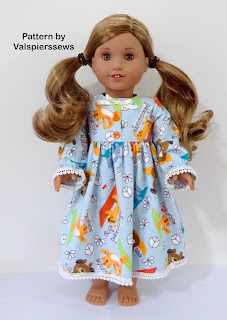
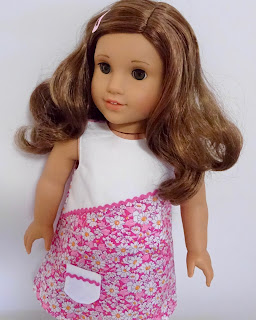
I'm always looking for more efficient ways to accomplish things. I made this pink dress from the pieces from 2 different patterns. No drafting required.
Step 1
One thing I love to do is scroll through all my Pinterest fashion images and select a design that I think will look good on the doll.
Step 2
Next I stare at the different pieces that make up the design and think about what patterns can I get those pieces from? Things like sleeves, collars, skirts, bodice shapes pockets and ruffles.
Step 3
Pull out the patterns and pick out the pieces I need. You can also bring up the files on your computer and print out the pages that you need.
Step 4
Work out what's missing and hope it is just some rectangles. Things like button bands or waist band features are just rectangles. Cut them a bit wider than you think you want because it is easy to try them out and trim them down.
Step 5
Make up your masterpiece using the instructions from the various patterns you cannibalised.
My latest masterpiece is this gingham dress with features that look great on the doll.
Step 1: I looked through Pinterest and found a little girls' dress that I liked.
Step 2: I analysed the features that made up the design.
Step 3: The features came from one 2 of my existing patterns. The 18" Dress and the 18" Gingham Midi Dress.
Step 4: The pieces I didn't have exactly were the waist band and the button band. Luckily these pieces are just rectangles cut to size.
I judged the width of the waist band by eye and measured out a rectangle 2 1/4" x 7".
I placed it on the bias and cut 1.
I folded it in half lengthwise and pressed it.
The waist band goes on the bodice after the collar sleeves and button band have been sewn into the bodice and before you sew the side seams.
Stitch it to the waist edge of the main bodice front.
Stitch it again close to the fold.
I've done a button band on other designs so I know what looks good.
It needs to end up 5/8" wide.
Cut the rectangle 2 1/2" x 6"
Place it on the bias and cut 1.
Fold it in half and press.
Open it out and fold each side to the centre.
Fold it again to make 4 layers with the raw edges enclosed.
Open out one end and turn up 1/4" and press.
Fold it back together again and press.
Stitch down the open side, across the bottom and up the other side.
Step 5
The button band is the first item to be basted to the neck of the main front bodice.
I then added the collar as per the instructions of the 18" dress pattern.
Then I added the sleeves as per the instructions of the Gingham Midi Dress. I transferred the sleeve placement dots to my 18" Dress bodice pattern pieces.
You may have some preferences for what edges you sew first. I sewed the armhole edges first then checked that the sleeves were rolled enough not to get in the way of the neck edge.
Use either the 18"Dress or the Gingham Midi dress instructions to do the lined bodice and side seams.
You can just see that I have understitched the collar and across the top of the button band.
That's why the button band is pinned down. I had to keep it straight.
I edge stitched the arm holes. So the stitching doesn't get in the way of sewing the side seams I start and finish about 1/4" from the side edge. Curve your line of stitching off the arm hole edge.
Leave the button band free of the bodice and out of the way while you sew the waist seam.
The skirt
I did the hem before the pockets.
Follow the pocket instructions for the Gingham Midi Dress.
I folded the flap just a little bit further to make the pocket a fractions shorter to fit on the shorter skirt.
I used the same placement measurements and placed the pockets 1 1/2" from the hem edge and 2" from the side edges.
Because my rick rack was very narrow I didn't enclose it in the seams. I stitched it on top and tucked the ends behind the flap. They got stitched in place when I sewed on the pocket.
Some of my past fashion Files have been made into full pattern files and put in the shop. I won't be doing that anymore. I am spending my time creating the pattern hacks and writing them up for the shop.
I hope your next action will be to look in Pinterest for some cute design ideas and see what you can use from the patterns you already own.
Make sure you are signed up to the newsletter for access to lots of patterns and tutorials. There is another cute pocket in the Newsletter Patterns and Tutorials folder that would go well with this dress.
I'm sitting at my computer wondering if I will ever get used to the customer journey detail that Mailchimp has added.
I feel a little stressed about my ignorance around getting it set up.
Out of the corner of my eye I can see my cutting table and little table overflowing with fabric and dolls.
I think this is the real source of my unease.
I'll be tidying up as soon as I finish this blog post.
So why is the Customer Journey item so difficult you might ask? (Well, I guess if you don't do computers much you don't care.)
The visual on the screen is like a black box. I can't see which email is which and having to scroll down to see the whole thing means I lose count of where each email is supposed to be.
I just went back and worked out how to label the rectangles with the emails!
The sequence has gone out all skewiff for the first few subscribers. It is quite a steep learning curve for me but who doesn't like a challenge. I will prevail!
At least all the information is saved in the Newsletter Patterns and Tutorials folder so any subscriber can get it from there.
I still have a bit of tweaking to do with the new Basic A-line Skirt folder inside the main folder.
I have to accept that everything is at least 80% functional. I have come a long way with my mindset and my confidence and I feel sure that I am not as stressed or worried as I would have been about something similar a few years ago.
The newsletter folder seems to be working well. It's not perfect but it gets my work out there.
This is what it looks like.
Subscribers get the link to access the folder and download any of the files.
I apologise to the few who got the 50% working email sequence. It should be all fixed now.
I'm just about to put all my fabrics in the cupboard and get onto some more sewing.
Happy Doll Dressmaking,
Val
P.S.
Much better.
It's a bit tricky to keep it tidy. I am waiting on book shelves to go along that whole wall. The bookshelf that is there will go in another room.
I thought it would be fun to simplify the 2 piece sleeve that comes with 1837. It's not much of a pattern hack.
I have used 2 little pleats at the wrist to fit the wrist edge of the sleeve onto the cuff.
I just put mine either side of centre. If you put them both at the back then you have to concentrate on making a left and right sleeve which makes it just as hard as the original 2 piece sleeve.
I also tried doing a bit of gather across the wrist edge but I don't think it looked nearly as good as the little pleats.
When you make up the shirt the sleeves are a fraction long but you need a bit of extra length so the doll can raise her arms.
Simple sleeve seam placket
Make the two piece sleeve into one piece by overlapping the seam line on the two pieces and pinning them together. I had to use my pen to stop the fan blowing it away.
Preparing the sleeve seam allowance
Pink the seam allowances for each sleeve.
Press in along the seam line halfway up the sleeve.
Mark the centre of the wrist with a pin.
Pin on the cuff
Mark the centre of the cuff with a pin.
Press up one long side of the cuff and lay it right side down on the wrong side of the sleeve
Pin it in the centre.
Keep the seam allowances of the sleeve folded in.
Fit the sleeve to the cuff
Pin the ends to the cuff so it extends 1/4" past the sleeve.
Make tiny pleats at the wrist edge of the sleeve to make it fit the cuff and pin the pleats.
Stitch the cuff
Press the seam towards the cuff
Fold in the ends of the cuff.
Fold the cuff in half and pin the turned under edge so it just covers the stitching line on the right side.
To make life a bit easier I decided to stitch from the centre of the cuff to each end. The folds create several layers of fabric on the ends and my machine tends to get stuck.
Centre to one end.
Turn it around and sew the other way to the other end.
Side seam
With right sides together, match the back and front sides.
Measure up 2" from the wrist edge, including the cuff, and mark it by pinning the sides together here. Keep pinning, matching the underarm seams and the hem edges.
Stitch the seam, remembering to stop 2" from the wrist.
Pink the seam allowance up the shirt sides.
Turn right side out and press the seams flat.
Lap the front of the cuff over the back of the cuff. Use Velcro patches or snaps to secure it.
I love this shirt even more with the back yoke. I think the little hook loop gives it a "real shirt" look.
I finished the hem with the shirt tails. You get a template and instructions to make these in the pattern file.
I'm always happy to try new things with the patterns. Is there something in particular that would make a good pattern for the shirt hit reply in the newsletter or try me at valspierssews at gmail dot com.
The first hack for the Everyday Shirt is a back yoke, a pleat in the back, a hook loop and making the 2 piece sleeve a 1 piece sleeve.
You need a shirt pattern to start with.
Create the back yoke and lower back
You can follow my video tutorial on how to create the yoke and lower back from the 1837 shirt back pattern piece
If time and/or skill make this difficult for you to do yourself there is a Hack Pack for the shirt. You will also get a pattern piece for the hook loop.
It is an add-on because you need a shirt pattern to start with. The hack pack pieces are only the hacked pieces. They don't make up a whole shirt. You need some pieces from the original shirt pattern.
It doesn't have to be my 1837 pattern. You can use another brand pattern along as it has a business collar with a collar and stand style. You do get 3 new designs you can try.
When I cut out my shirt I used an old shirt of mine that I didn't want anymore.
I cut two back yokes on the bias grain.
I also cut the two cuffs on the bias grain.
To construct the back
Back Pleat
Fold the lower back in half, right sides together, and pin it together along the fold.
Stitch 3/4" from the fold using a basting stitch from the top to the hem edge.
With the wrong side up arrange the pleat so it forms a box pleat and press.
Baste across the top edge to hold the pleat in place.
Hook Loop
To make the hook loop you will need 1 rectangle 4" x 1 1/4".
Fold the hook loop strip in half and press. Open it out then fold the raw edges to the centre fold and press. Fold it in half again to enclose the raw edges.
Stitch along the open edge to secure it.
Fold the ends up to make a loop and centre it on the lower back.
Baste it in place.
Back Yoke
Lay one back yoke in place and stitch.
Lay the other yoke right side down on the wrong side of the lower back and stitch through all layers.
Press up the yokes to enclose the seam.
Tops stitch across the yoke.
My green shirt has a single yoke. That's why I pinked the seam allowance before pressing up the yoke.
My blue check shirt has two back yokes.
This encloses the seam and gives a neat finish on the inside.
You continue from here with the shirt instructions.
When you come to doing the hem don't forget to unpick the back pleat first. I nearly forgot on my blue check shirt and had to unpick it on the fly while I was doing the overlocking.
The next blog post will describe how I made the sleeves with the placket in the side seam of the sleeve.