Are you looking for ways to save time and effort?
Do you wish you could design your own doll clothes but don't have hours and hours of drafting skills up your sleeve.
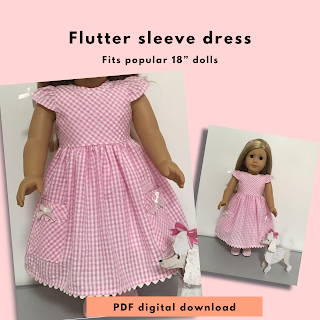
I'm always looking for more efficient ways to accomplish things. I made this pink dress from the pieces from 2 different patterns. No drafting required.
Step 1
One thing I love to do is scroll through all my Pinterest fashion images and select a design that I think will look good on the doll.
Step 2
Next I stare at the different pieces that make up the design and think about what patterns can I get those pieces from? Things like sleeves, collars, skirts, bodice shapes pockets and ruffles.
Step 3
Pull out the patterns and pick out the pieces I need. You can also bring up the files on your computer and print out the pages that you need.
Step 4
Work out what's missing and hope it is just some rectangles. Things like button bands or waist band features are just rectangles. Cut them a bit wider than you think you want because it is easy to try them out and trim them down.
Step 5
Make up your masterpiece using the instructions from the various patterns you cannibalised.
- I judged the width of the waist band by eye and measured out a rectangle 2 1/4" x 7".
- I placed it on the bias and cut 1.
- I folded it in half lengthwise and pressed it.
- The waist band goes on the bodice after the collar sleeves and button band have been sewn into the bodice and before you sew the side seams.
- Stitch it to the waist edge of the main bodice front.
- Stitch it again close to the fold.
- It needs to end up 5/8" wide.
- Cut the rectangle 2 1/2" x 6"
- Place it on the bias and cut 1.
- Fold it in half and press.
- Open it out and fold each side to the centre.
- Fold it again to make 4 layers with the raw edges enclosed.
- Open out one end and turn up 1/4" and press.
- Fold it back together again and press.
- Stitch down the open side, across the bottom and up the other side.
- The button band is the first item to be basted to the neck of the main front bodice.
- I then added the collar as per the instructions of the 18" dress pattern.
- Then I added the sleeves as per the instructions of the Gingham Midi Dress. I transferred the sleeve placement dots to my 18" Dress bodice pattern pieces.
- You may have some preferences for what edges you sew first. I sewed the armhole edges first then checked that the sleeves were rolled enough not to get in the way of the neck edge.
- Use either the 18"Dress or the Gingham Midi dress instructions to do the lined bodice and side seams.
- I folded the flap just a little bit further to make the pocket a fractions shorter to fit on the shorter skirt.
- I used the same placement measurements and placed the pockets 1 1/2" from the hem edge and 2" from the side edges.
- Because my rick rack was very narrow I didn't enclose it in the seams. I stitched it on top and tucked the ends behind the flap. They got stitched in place when I sewed on the pocket.


No comments:
Post a Comment
Note: Only a member of this blog may post a comment.