This is the first step in the Basic A-line Skirt Pattern Hack Series.
Your pattern is printed out and you have cut it out ready to sew lots of skirts for your doll....
But wait a minute. Will the skirts fit your doll?
I know the skirt fits my American Girl Dolls.
It doesn't fit my Our Generation Dolls. They're a bit thicker in the waist.
My American Girl Dolls have a waist about 11" and my Our Generation Dolls are about 11 1/2".
If you don't have your Basic A-line Pattern for 18" dolls then all you need to do is join my tribe.
Click the link and add your email to get the link to download the skirt pattern as well as getting an access link to the Newsletter Patterns and Tutorials folder and my monthly newsletter.
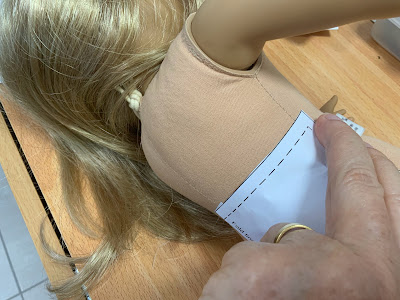
A quick way to tell if the skirt will fit is to use the pattern pieces against the doll. I am all for quick and easy and it is such a pain to get out my tape measure then have to roll it up and put it away. I'm not really lazy. I just find that having the pattern and the doll right there makes it logical to put the pattern on the doll.
Checking the back is easy. You have a side seam on the doll and a centre back seam. The centre back of the skirt pattern is 1/4" in from the facing fold line. I just check by eye.
I folded over the back facing to make it easier to judge the 1/4".
For the front you need to line up the centre front edge of the pattern piece with the centre front of the doll. I looked from directly above the doll to see that it lined up with the bit of the centre back seam that I could see. I stuck a pin through the pattern and the doll up near the waist just to stop the pattern piece moving as I checked the side seam.
Make sure the side seam line of the front pattern piece matches to the side seam of the doll.
The seam line of the pattern piece was 1/8" away from the side seam of my OGD so I will have to move the pattern pieces fold edge 1/8" away from the fabric fold when I pin it on and cut out. There is a bit less difference for the front with my OGD because I have designed the pattern to fit well around the dolls' bottoms.
Once you've worked out the fit you are good to go.
If your doll needs the pattern altered you should print out a new pattern sheet and cut it out with the adjustments to the centre front and the back edge of the back.
Don't forget to alter the waist band too. For my OGD I will have to add 1/4" + 1/8" (3/8") to the fold edge of my waist band pattern piece.
Sometimes fitting can be a pain. We all just want to get sewing and playing. However, the small amount of time it takes to check the fit can save sadness and trauma which is how I feel when things don't fit just because I didn't check first.
Now you can get to the fun parts of choosing fabrics, sewing and feeling great when you put your skirt on your doll.
Thank you for joining me on my doll dressmaking journey. I hope you are inspired to take action and carve out your own doll dressmaking journey.


No comments:
Post a Comment
Note: Only a member of this blog may post a comment.