Showing posts with label How to sew doll clothes. Show all posts

Wednesday, January 5, 2022

How to check the fit of your doll's A-line skirt pattern

How to sew an A-line skirt valspierssews

This is the first step in the Basic A-line Skirt Pattern Hack Series.

Your pattern is printed out and you have cut it out ready to sew lots of skirts for your doll....

But wait a minute. Will the skirts fit your doll?

I know the skirt fits my American Girl Dolls.

It doesn't fit my Our Generation Dolls. They're a bit thicker in the waist. 

My American Girl Dolls have a waist about 11" and my Our Generation Dolls are about 11 1/2".

If you don't have your Basic A-line Pattern for 18" dolls then all you need to do is join my tribe. 

Click the link and add your email to get the link to download the skirt pattern as well as getting an access link to the Newsletter Patterns and Tutorials folder and my monthly newsletter.

A quick way to tell if the skirt will fit is to use the pattern pieces against the doll. I am all for quick and easy and it is such a pain to get out my tape measure then have to roll it up and put it away. I'm not really lazy. I just find that having the pattern and the doll right there makes it logical to put the pattern on the doll.

Checking the back is easy. You have a side seam on the doll and a centre back seam. The centre back of the skirt pattern is 1/4" in from the facing fold line. I just check by eye. 

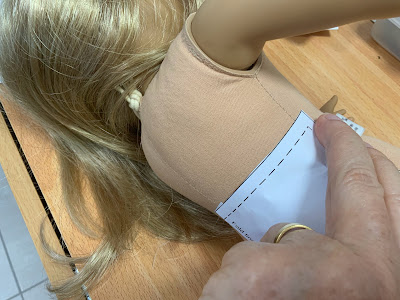
I folded over the back facing to make it easier to judge the 1/4".


I lined up the side seam line on the doll's side seam then smoothed it around to the centre back.


The centre back seam of the doll falls pretty close to the centre back of the skirt piece.
For my Our Generation Doll the centre back seam of the doll and the fold line of the back facing line up. So my OGD needs the back piece to be 1/4" wider. You need to add the extra width at the straight edge of the back facing not at the side.


For the front you need to line up the centre front edge of the pattern piece with the centre front of the doll. I looked from directly above the doll to see that it lined up with the bit of the centre back seam that I could see. I stuck a pin through the pattern and the doll up near the waist just to stop the pattern piece moving as I checked the side seam.


Make sure the side seam line of the front pattern piece matches to the side seam of the doll.

The seam line of the pattern piece was 1/8" away from the side seam of my OGD so I will have to move the pattern pieces fold edge 1/8" away from the fabric fold when I pin it on and cut out. There is a bit less difference for the front with my OGD because I have designed the pattern to fit well around the dolls' bottoms.


Once you've worked out the fit you are good to go. 

If your doll needs the pattern altered you should print out a new pattern sheet and cut it out with the adjustments to the centre front and the back edge of the back.

Don't forget to alter the waist band too. For my OGD I will have to add 1/4" + 1/8" (3/8") to the fold edge of my waist band pattern piece.

Sometimes fitting can be a pain. We all just want to get sewing and playing. However, the small amount of time it takes to check the fit can save sadness and trauma which is how I feel when things don't fit just because I didn't check first.

Now you can get to the fun parts of choosing fabrics, sewing and feeling great when you put your skirt on your doll.

Thank you for joining me on my doll dressmaking journey. I hope you are inspired to take action and carve out your own doll dressmaking journey.

Happy Doll Dressmaking,
Val


Saturday, October 24, 2020

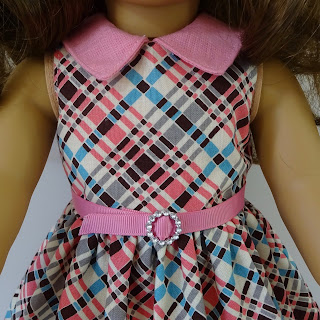
Doll dress with a perfect collar and hidden side seams

I am always learning to sew better. Some things I see on other blogs or in Threads magazine. Sometimes I just work it out myself after trying lots of ways.

Doll clothes sewing is not quite the same as people sewing though many things are similar.

Sewing the collar together for the doll dress is only part of the process.


You can download a PDF ebook of this tutorial by clicking below:


Pressing and under stitching are really important steps to make the collar fit perfectly and sit nicely.

Below is a list of the steps involved

  • Make sure you trim the seams back to 1/8".
  • Make sure you clip into the seam allowance around the curves of the neck and armholes - my dress has no sleeves.
  • Turn the bodice and press around all the seam edges with the bodice facing up. Gently pull the collar up and get the point of the iron right up to the seam line.
  • Flip it over and press it again with the lining facing up.
  • Press the collar in place at the centre front.
  • Slightly roll the collar and press it in place at the backs. Not all collars roll like this but I think it looks nice on the doll.
  • Under stitch the collar.


Pressing the Collar after Turning the Bodice

Press with the bodice facing up


Press with the lining facing up


Press the centre front in place


Roll the back a little bit and press each back in place


When it is all pressed the front sits flat and you can see that the back sits ups just a bit as it rolls slightly.


Under Stitching the Collar

Lift the collar out of the way and stitch 1/8" from the neck edge on the right side.


Arm Holes and Side Seams

Below is a list of the steps

  • Top stitch the armholes starting and finishing 1/4" from the under arm edges.
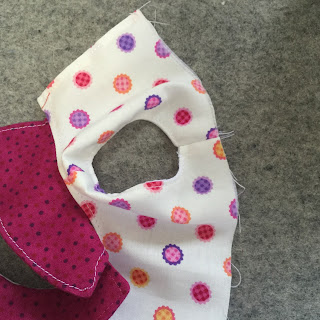
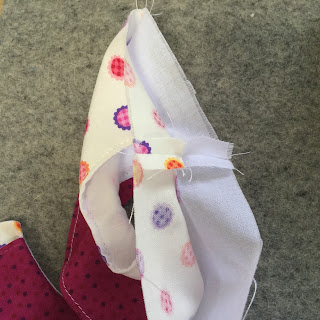
  • Separate the bodice and the lining and print the lining side edges together and the bodice side edges together so they form a continuous seam with right sides together.
  • Stitch the seam and press it open.
  • Fold the bodice and lining back together.

Top stitch the arm holes


Separate the bodice and lining and bring the lining side edges together and the bodice side edges together


Pin to form a continuous seam


Stitch it and press the seam open


Fold the bodice and lining back together and press


Happy Doll Dressmaking,
Val

Friday, October 23, 2020

Halloween applique tips

Have I said it before? I love doing appliqué!

It is easy to make some basic shapes to put on doll t-shirts for quick and easy Halloween outfits.

I like the jack-o-lanterns the best.

The best shapes are ones that can be cut out as one piece, whether they are pumpkins, cats, bats or ghosts.

Here is one of my jack-o-lanterns on a black t-shirt.


Black is great on my AGD Lea Clark®

Lea is a bright spring or maybe a true spring. She looks good in clothes that have a high contrast with each other and with her face and hair. being a Spring a yellow or orange pumpkin looks better than a white ghost. She looks good in warm colours.

Because this element is fairly large the outline around the inside of the pumpkin and the outside of the face features fits in and looks OK. 
This particular sample has the outline drawn on with a pen but I have now tried free motion stitching on the knit fabric and find that it goes quite smoothly with a stretch needle and a straight stitch.


I wanted to do something for my blonde girl. She is a truly me combination with deep blue eyes, light blonde hair and pink tinge skin. Because she is a light spring, outfits with a lot of black don't look pretty on her. I made a white t-shirt and put a pale yellow pumpkin on and used dark orange stitching.


You can see on the close up of this appliqué that the stitching around the outside of the features tends to run together so I had to redraw the face features a bit smaller so stitching around the outside of them would make them look the right size.

When you draw up a design that has an open feature on the inside you need to draw the feature a bit smaller than you would normally.
Such as the eyes on a ghost shape. Of course the same principles apply for any appliqué shape not just halloween appliqué.


This is the smaller shape I used on the white t-shirt. I made the features smaller so next time my stitching will look better.


This second one is the shape before I made the features smaller. You would use this one if you want to stick the features on top and stitch inside them.


Here is another jack-o-lantern with a less evil face. It is the one I used on the black t-shirt.


Don't forget to reverse your drawing when you want to trace it onto the appliqué paper.


Sunday, January 5, 2020

Do you wash your doll clothes?

Newly washed nightie. Good or bad? See below.

Every now and then a discussion on washing doll clothes and the fabrics used to make them starts up.

If you are not sure about washing your doll clothes or the fabrics that you use to make them then you should read on. I have included articles, tips and tests and my conclusions about:

  • Ways to wash
  • Colour fasting
  • Pre-washing
  • Shrinking
  • My recommendations

Ways to wash

Efferdent denture cleaner in a litre or so of cold water will clean most doll clothes and keeps them looking as new.

Dishwashing liquid in cold water is good for getting greasy marks out of doll clothes. This probably would work for my clothes too. I am always getting greasy spots on my tee shirts.

You can read more about these methods on this website - https://www.quora.com/How-do-you-clean-doll-clothing

Colour Fasting


Reds and deep dark colours can run and ruin white collars or cuffs or trims so it is best to try colour fasting such items before washing. This is done with salt and vinegar in cold water. You can get the details on this website - https://www.popsugar.com/smart-living/How-Set-Fabric-Dye-Clothes-35015330

I thought my dark velvet fabrics might run but surprisingly the swatches I tried seemed very good. What I thought might be colour was mainly reflection. I would never consider washing a doll dress that I made of velvet but it is good to know that I could spot wash it without creating a big faded spot.
The dress I made also has a detachable collar. A good idea if you think a white collar might get stained.

There maybe a slight colour in this water. This was my expensive velvet.

The colour fasting directions are for people clothes and says you can safely put then in the wash after the process. I would never wash doll clothes in a washing machine. I would stick to hand washing even if I new the item was colour fast.

I have only occasionally had the need to wash doll clothes and I have always done it in cold water with a bit of washing powder or liquid. I swish them around then lay them on a towel in the shade to dry.
The instructions on this website - https://bjdguide.tumblr.com/post/138786061705/how-to-hand-wash-doll-clothes - are pretty comprehensive and I imagine that if I had lots of second hand clothes I would want to give them a good wash.

Prewashing fabrics

When it comes to prewashing I am of the opinion that prewashing makes fabrics look used.
Also, if I know that a fabric is not colour fast then I probably wouldn't buy it. No one wants their doll body to get stained. If I want bright colours I will buy polycotton.
These days cotton fabric used for quilts doesn't need prewashing. I have made several quilts and washed them when they needed it. They washed perfectly. So quilting cotton is great for doll clothes.

I love rayon fabric for doll clothes because it has a nice soft feel and it falls well for a small garment. It is probably the only fabric that I would consider prewashing because it shrinks a lot.

You can find details for prewashing a variety of fabrics in this article

Flannelette

I decided to wash the flannelette nightie I made for the doll. I know that flannelette shrinks a bit but I thought I should check how much.
I used cold water and some dish washing liquid. Maybe a wool wash would be less harsh if I tried this again or perhaps a fabric softener after washing.

I swished it around in the kitchen sink.


I squeezed it as dry as possible then shook it out to reduce creasing.


I just hung it on the line but laying it on a towel and pushing it into shape would be a good idea for more delicate items.


I was surprised how stiff it went after washing. I didn't like how it felt and looked. I wouldn't wash flannelette for the dolls unless the doll clothes were second hand. You would need a fabric softener to  stop it gong stiff. I would try to spot wash and only if it was absolutely necessary.

What about shrinking? 

This is before and after. I guessed that it had shrunk just a bit.

After: it is a bit shorter and doesn't fall
as softly.
Before: it looks fluffier and it feels softer

When I put the pattern pieces next to the sleeves and skirt I could see that the sleeves were 1/4" shorter and the main skirt was 1/4" shorter. The nightie didn't seem to be any tighter in fit so it doesn't shrink on the cross grain, mainly the lengthwise grain parallel to the selvedge.
So, I am not going to wash or prewash my flannelette.

Just a note about flannelette. I think the same fabric is called flannel in the US. It is highly flammable and should not be used for nighties or flowing clothes on children. I think it is illegal to manufacture nighties in flannelette for children. Children's pyjamas should be close fitting to reduce fire danger from heaters, fires or candles.
Original flannel is made from wool. So historical flannel nighties are made from wool flannel not cotton flannelette.

My Conclusions

  • Don't wash doll clothes unless they are second hand and you want to clean them.
  • Musty smelling clothes from storage can be aired
  • Stains should be spot washed
  • Rayon needs prewashing by hand. It frays a lot if machine washed.
  • Basically no other fabrics need prewashing
  • Avoid fabrics that run but this is not necessary if you don't wash your doll clothes.
  • The harmful affects of chemicals used in fabric manufacture are a problem for people who work in the factory and are exposed to lots of chemicals often.
  • Formaldehyde can cause a rash when new clothes are worn without washing. This is because large areas of your skin are exposed and formaldehyde dissolves in moisture and sweat so it can penetrate the skin.
  • I thought this fact sheet on formaldehyde was informative. I don't seem to have a sensitivity to it but I always wash new clothes for people, sheets and towels.
    https://www.sahealth.sa.gov.au/wps/wcm/connect/public+content/sa+health+internet/health+topics/health+conditions+prevention+and+treatment/chemicals+and+contaminants/formaldehyde

Your Comments

  • All fabric must be pre-washed to remove chemicals used in fabric making. It is not good for children to play with unwashed fabrics
  • All fabrics should be pre-washed to remove dirt and grime accumulated after manufacture from handling in transport and being on shop shelves.
  • Fabrics from shops that look clean don't need to be pre-washed
  • The small amount of fabric in doll clothes doesn't seem to cause a problem when handled so pre-washing is not needed.
  • A personal sensitivity to the chemicals in fabrics means they have to be pre-washed before being handled for sewing.

Leave your comments on either my Facebook page or my Facebook Group


Monday, May 13, 2019

How to sew the side seams on a sleeveless lined doll dress

How to line a sleeveless doll dress bodice by valspierssews


If you love making doll dresses from pretty cotton fabrics that quilters use then lining the bodice with a similar fabric gives a lovely smooth neat finish.
  • Don't get carried away with trying to fully line a bodice so you can't see any exposed seams.
  • These days clothes rarely have a separate lining. 
  • Historically outfits were lined to stop perspiration spoiling the fabric. 
  • You should be lining doll clothes to create the best look. 
  • Just line the bodice but leave the sleeve seams and side seams exposed.


You can enclose the side seams on a sleeveless bodice

Here's how I use lining to create neat a very neat finish both inside and out for a sleeveless dress.
You leave the side seams for last so they are hidden between the main bodice and the lining.
This method eliminates the need for neck and armhole facings or fiddly 1/4" hems.

Start by sewing the shoulder seams for the main and the lining. Baste the collar in place on the right side of the main bodice.

Place the main and lining right sides together and stitch the back and neck and around each armhole.

Turn the bodice right side out and press it.

The hardest part is working out how to do the side seams.


It is a matter of pinning the main sides together and the lining sides together.


Download a PDF with a photo tutorial of how to sew the side seams. 
You can get access to a variety of instructions and doll clothes patterns when you join my monthly Newsletter

I love this little dress. You could make a whole summer wardrobe for your doll with this one design. Just use different fabrics and add some different trims. This is my 1804 The 18" Dress.  There are lots of variations with sleeves and collars and skirt lengths included in the pattern. Read more about the 1804 dress pattern here. or just Buy it NOW


Happy Doll Dressmaking
Val


Monday, April 8, 2019

How to sew a doll skirt for 18" American Girl dolls

valspierssews

While researching and sewing for the doll skirts blog posts I came across this old post. I have updated the post. I thought it would also be a good time to revisit the free apron I included in the newsletter last year. You can find it in the Doll Accessories Section in the Free Resource Library

Skirt Length

The skirt looks best with the waistband a bit above the waistline. You need to add 1/2" to each of the skirt lengths listed. 1/4" for the waist seam and 1/4" for the hem. Finished skirt lengths that I like are:

4" for a cute dolly look. (high gather for a Betsy McCall look)


5" for a nice party dress or day dress and a more demure look.


7" for midi skirts and a casual look. (at least mid gather)

9" + shoe height for ankle length just above the floor. (at least mid to high gather)

9 1/2" + shoe height just skims the floor. (at least mid to high gather)

Remember, you need to add 1/4" or 1/2" for the waist seam and 1/4", 3/8" or 1/2" for a hem.

Skirt Width

There are 3 widths of skirt that work well depending
on how much gather you want. I have also found that 
the longer the skirt the more width you need to get 
the right look.

Short skirt/low gather 24" wide

The 4" skirt and the 5" skirt are as long as I would go when using a 24" width for gathering. This little blue skirt is cut in 2 6 1/2" wide pieces that i stitched at the side seams. You can see how to make this skirt HERE


Knee and just below/mid gather 30" wide

This is my usual skirt length and skirt width. I find that 36" for a knee length skirt is just a bit too flouncy. My 1804 pattern has the skirt pattern pieces for the front and the back so you can fit it onto a fat quarter. A 30" gather means you save 6"on trims too. 

*************

Doll clothes patterns by valspierssews
Just one of the many variations for 1804 dress pattern

Long floor length/high gather 36" to 40" wide

The longer the skirt the wider you want it to be at the hem. Floor length skirts are OK at 30" wide but 36" is better.

This dress pattern along with the princess dress are not published.
I took them down to rewrite the instructions. They will go back up one day.

Long floor length/super high gather 50" wide (Not for the faint hearted. You have to pull up the fabric as much as it goes to get the right width.)

I have only tried 50"once. I used satin fabric for a princess dress and had so much trouble trying to pull it up enough. The gathers also create a lot of thickness so I had to make my waist band about 13" to get it all to fit on the doll. I ended up not liking the skirt as much as the one on the witch.


If you want to make an economical, easy to sew, great looking skirt go for a 24" x 5 1/2" rectangle with a 12" to 12 1/2" Waistband. If you want the skirt and waist band to overlap by a 1/2" you need to fold your fabric to mimic the waist band then wrap it around the doll and any shirt you want to tuck in. The overlap needs to be 1". You can see how I check the waist band length HERE

Waist Band Ease

The wider the skirt (more gathers) or the thicker your fabric the more ease you need in the waistband.

A cut length between 12" and 12 1/2" fits on a 30" gathered skirt so the skirt can be worn over a shirt or t-shirt. Check that the cut length fits around your doll and any tops to tuck in, with a 1" overlap. The super high gather waistband is 1" longer at 13".

The thickness the fabric you are tucking into the skirt also has to be considered. A T-shirt needs more ease than a lawn blouse.
An all purpose 12 1/2" waistband will be my "go to" waistband for my skirts now because I like to mix and match and never know which tops I want to tuck in or how much underwear she will have on. The width is a matter of taste but 3/8" to 1/2" finished width is a good look.
Remember that thicker fabric requires a longer and a wider waist band.

Free Patterns

You can add to your skirt experience by downloading a free apron accessory pattern from the Valspierssews Resource Library


An apron is a perfect accessory because you can create cute, whimsical, romantic, vintage, cooking or themed outfits by just adding an apron in the right fabric.

(The link is to a bundle. I am still testing out the Teachable site. If you have enrolled in the separate sections I am not sure that enrolling in the bundle is necessary. Get onto me at valspiers@dolldressmaking.com if there is any problem or confusion.)

Find your free apron pattern to download in the Doll Size Accessories section of my Free Resource Library.


Happy Doll Dressmaking,
Val