Showing posts with label Free tutorials. Show all posts

Monday, May 13, 2019

How to sew the side seams on a sleeveless lined doll dress

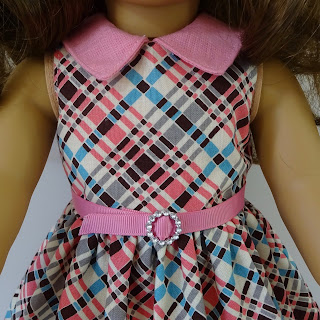
How to line a sleeveless doll dress bodice by valspierssews


If you love making doll dresses from pretty cotton fabrics that quilters use then lining the bodice with a similar fabric gives a lovely smooth neat finish.
  • Don't get carried away with trying to fully line a bodice so you can't see any exposed seams.
  • These days clothes rarely have a separate lining. 
  • Historically outfits were lined to stop perspiration spoiling the fabric. 
  • You should be lining doll clothes to create the best look. 
  • Just line the bodice but leave the sleeve seams and side seams exposed.


You can enclose the side seams on a sleeveless bodice

Here's how I use lining to create neat a very neat finish both inside and out for a sleeveless dress.
You leave the side seams for last so they are hidden between the main bodice and the lining.
This method eliminates the need for neck and armhole facings or fiddly 1/4" hems.

Start by sewing the shoulder seams for the main and the lining. Baste the collar in place on the right side of the main bodice.

Place the main and lining right sides together and stitch the back and neck and around each armhole.

Turn the bodice right side out and press it.

The hardest part is working out how to do the side seams.


It is a matter of pinning the main sides together and the lining sides together.


Download a PDF with a photo tutorial of how to sew the side seams. 
You can get access to a variety of instructions and doll clothes patterns when you join my monthly Newsletter

I love this little dress. You could make a whole summer wardrobe for your doll with this one design. Just use different fabrics and add some different trims. This is my 1804 The 18" Dress.  There are lots of variations with sleeves and collars and skirt lengths included in the pattern. Read more about the 1804 dress pattern here. or just Buy it NOW


Happy Doll Dressmaking
Val


Friday, April 26, 2019

How to sew a doll skirt with a waist band

How to sew a skirt for doll clothes


How to sew a doll skirt

A friend of mine asked me if I would make an outfit for her vintage doll to replace the original clothes the doll came dressed in. You know how it is. The clothes were just gone.

If you think you are ready to move onto making a gathered skirt with a waist band I am slotting this blog post ahead of more elastic waist variations because I promised to dress the vintage doll.

I have quite a few skirt patterns in my Etsy shop. I have yet to publish them in my Aussie shop. Just let me know if there is something you want me to upload.

I love these vintage suspender skirts


Make sure you check out this tutorial for the Glitter Girl gathered skirt HERE.

And you can find lots more about designing a gathered skirt in this blog post HERE
Also you can join my free resources library.

How to sew a gathered skirt for your doll

The skirt part

This doll is about 14" tall so I am going to use the same size skirt that I made for the Glitter Girl because that amount of width at the hem looks good on this doll too.
I am cutting the skirt strip 4 1/2" x 24". I ended up using the same pattern piece that I used for the netting in this skirt HERE

valspierssews doll clothes patterns


If I was making the skirt for my:

  • 18" dolls I would cut the skirt strip 6" x 30"
  • 19" Gotz Hannah doll I would cut 6" x 30"
  • 20" Australian Girl Doll I would cut 6 1/2" x 30"

This allows for a waist seam of a good 1/4" and a hem of a good 1/4".
I say 'good' because I find that you always need a bit more to cover the gathering threads and you always cut a fraction off when you overlock the hem edge.
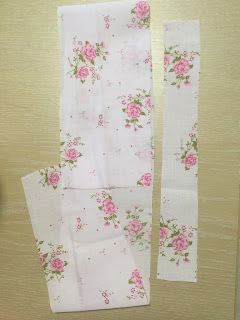
Skirt Pieces
Overlock the back facing edges.
Overlock the hem edge and turn up a 1/4" hem.
Press in the back facing about a 1/2".


The waist band

Just remember that the thicker your fabric the longer the waist band needs to be.
My waist band will enclose the waist seam and overlap by 1/2" at the centre back.
This means I need to measure the doll's waist then add 1/2" for the overlap as well as another 3/4" for the seams on each end. I say 3/4" because it always seems to work out as a bit more than a 1/4" overhang at the backs when you pin on the waist band. If you want the skirt to go over a blouse or T-shirt you should measure the doll's waist over the blouse or shirt or add an extra 1/8" on a small doll and closer to 1/4" for big dolls.

The vintage doll waist is a bit less than 8 1/2" so I am going to use 8 1/2" + 1/2" +3/4" = 9 3/4 for my waist band strip.


Because the doll is small I will use a 3/8" finished width for my waist band. For bigger dolls I would use 1/2" finished width. If your fabric is thicker than light cotton or polycotton you should allow an extra 1/4" for folding the seams into the waist band.

Press in a 1/4" on one long side of the waist band.
Pin the right side of the waist band to the wrong side of the skirt.
Keep the back facings folded in and extend the ends of the waist band 1/4" past the skirt backs.

valspierssews doll clothes patterns


Stitch then trim the seam a bit. Press the waist band up towards the seam.
Fold in the ends of the waist band then....
Fold the turned under edge to the front and stitch it down. I use a small patch of hook and loop at the waist in the back.
I now have a skirt pattern I like for this doll. I will be making the outfit skirt next.


If you are looking for patterns for various skirts for various sized dolls you should look out for my Pattern Club opening soon.

New Pattern Club Coming Soon

I am starting up a membership site in the next few months. I already have a few patterns in place and I have 3 great new patterns lined up for the first month's instalment. I will be opening the enrolment for 10 days only. Founding members will have the lowest price of $10USD/month. Every six months over a couple of years I will be opening membership with an increased price. The final subscription fee for a huge pattern resource and continuing new additions will be around $20USD


If you don't want to miss out on the sign up period click the link below and leave your email address. (This is a separate list from my newsletter)

Sign up to be notified when the Valspierssews Pattern Club is open to join

I will still be adding free resources to my Resource Library at dolldressmaking.teachable.com 
If you are not already signed up you should check it out.


Happy Doll Dressmaking,
Val


Sunday, March 24, 2019

Gathered skirts are perfect for dolls: Part 2 - How to make your own pattern and Free 14" skirt pattern


Please share this great pattern by Pinning the image above or sharing on FB.

Gathered skirts are a quick and simple garment for any doll.

If you have a skirt or dress that fits your doll you can make a pattern for a gathered skirt.

  • Measure the circumference of the skirt hem
  • Measure from the place you want the finished skirt to start and end. Just above the true waist (narrowest part of the torso) down to just above the knee.
  • Add what is needed for the type of casing you want. 
  • Add what is needed for the hem you want.
  • Measure the elastic around the waist of the doll dressed in a top that will tuck in. The ends of the elastic should just meet.
I have been experimenting with the skirt for the 14" Glitter Girl Doll. I trust it will fit the 14" Wellie Wisher Doll.
Even knowing the 5 steps above there is some trial and error involved. 
  • I tried several different ways to gather the waist
  • I tried several different types of elastic
  • I had to adjust the length a couple of times to get it looking just right.
  • I also found that for the smaller doll the hems and trim made the skirt stick out too much because they made the hem edge to stiff for the length of the skirt
Because I am a designer I like to experiment and see what affect different variables have on the finished garment.

I want to share the latest project with you.


It is a gathered skirt with an underskirt and a top skirt. It has two layers of netting for the underskirt that stick out below the top skirt by about a 1/2". The top skirt has a 1/4" hem and is made from light weight woven fabric that is not too stiff. Patchwork cotton works well.

I stitched the two layers of netting right side up on top of the right side of the top skirt using a 1/4' seam. I didn't trim the seam allowance.

I folded the layers so the seam was enclosed then stitched the casing rows.


It is easy to thread the elastic from CB to CB across the waist edge then you just stitch the CB seam.

If you would like to have a go making this skirt for your 14" doll I have created a new item in the Fashion File and Patterns section of my Free Resources on Teachable. You will have to sign up or sign in if you are returning. 

You get the pattern and a photo tutorial.


If you are new to Teachable, when you sign up I will transfer your email to my mailing list. If you decide you don't want my newsletter it is easy to unsubscribe. However, you will stay signed up to access the Free Resources.

Over the next few months I will be tooting my horn about the amazing sterling silver earrings that I design and my husband hand crafts by cutting out the shapes from silver sheets.
I have just set up another Etsy shop called AussieHandmade.


Even if you don't want to buy earrings I hope you will go and have a look and favourite the shop or a few items. They are really well made but I think he is a bit nervous about putting them out there.

Don't forget: 


and


Friday, January 18, 2019

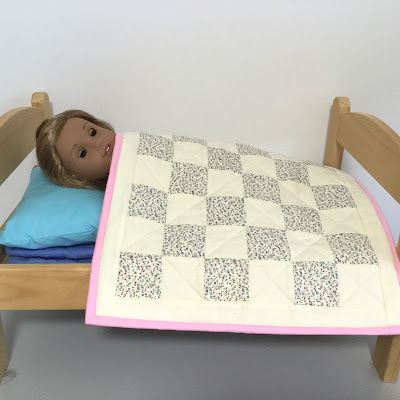
How to Make a Doll Quilts Part 3: Step by Step Free Tutorial by valspierssews

How to make a doll quilt step by step by valspierssews


I work using the Pomodoro method. It took me about 3 hours or six time blocks to make this quilt in several sittings.

If you are a quilter you will have a pretty good idea of how to put the quilt together. You will just need the measurements and layout.

If you are a doll dressmaker/quilter you will understand that when you are making quilts for your dolls you don't have to rigorously follow the method for a human quilt. Also when I am making small mats I will do what I can to make it fast and easy but make it look good on the table. If it gets a tea stain on it the first time I use it I'm not devastated. Same with your children's doll quilts.


Little quilts are not just for dolls.

So keep in mind I am not teaching you how to make a quilt. I am showing you how to make a perfectly respectable doll quilt using some quilting techniques.

As I mentioned in part 2, you don't have to use wadding or even backing fabric. You can use a bath towel that you can cut up. You can put backing fabric on if you want pretty fabric on the back or you can leave it just as a towel back.

For this particular quilt I have used wadding. I have however, used poly cotton for the backing because that is what I had. These quilts don't have to last a lifetime. Personally I would rather make a few new quilts each year and give any spares to the thrift shop.
I made the quilt then I submerged it in cold water and squeezed it a few times. I rolled it up and rung it out firmly. I then pegged it on the line in the sun. When it was dry I pressed it firmly with steam. It looks great. You wouldn't know I had washed it.


So don't be concerned that you have to make your doll quilt a certain way. Just have fun making it. You have nothing to lose if you use quilters fabric and take care with sewing your 1/4" seams.

I am outlining the main steps here.

If you would like to download a complete photo tutorial  see my doll quilt resources at dolldressmaking.teachable.com.

I have called this one "small small squares" because it is as small as I would make to fit nicely over a doll and the squares are as small as I can be bothered fitting together. As I mentioned, I expect that a quilt I make for my child to play with doesn't need to take 3 months to make. It just needs to look good.


Cutting out the doll quilt
  • Cut out strips of fabric. 3 from one fabric and 3 from another fabric. It is easier to cut them width of fabric (WOF) but for this quilt you need 9 x 2/12" or 22 1/2". 
  • Cut the strips 23" long.
Sewing the strips and making squares for the doll quilt
  • Sew the strips together alternating the colours
  • Don't worry about pressing the seams yet
  • Fold the panel in half lengthwise and cut sections 2 1/2" wide. You should get 9.
  • Starting form the same colour on each section, press the seams all in one direction.


Making the doll quilt top
  • Reverse each second strip. Nest the seams as you join the strips together.
  • Cut border strips 1/1/2" wide. Cut two short strips the same length as the patchwork short side.
  • Sew them on
  • Cut two long strips the same length as the long side of the quilt.
  • Sew them on.


Finishing the doll quilt
  • Layer the top, the wadding and the backing and pin them together or use basting spray.
  • Do some simple quilting
  • Cut 2" strips and join them together so they fit around the quilt with about 6" extra.
  • Press it double. Pin it to the back of the quilt and sew it around stopping at each corner and turning.
  • Fold it to the front and stitch it down to cover the seam line


More interesting reading

Read this article about the Pomodoro Method. I find it is a technique that really helps me get things done.

I so enjoy making small mats. I made a little bed for my quilting companion (1996-2017). You can se it here.

Sign into dolldressmaking.teachable.com for free resources including a photo tutorial on how to make this doll quilt.

Happy Doll Dressmaking,
Val


Thursday, February 15, 2018

How to Sew Doll Clothes: Fully lined bolero jacket in fur

valspierssews doll clothes patterns


doll clothes by valspierssews


I have been practicing with lining a lot lately. If you want to get better at lining then you just have to  give it a go. This little jacket is part of a design I am working on that has a jacket with a collar and long sleeves. It will also have a curved front bolero.
If you follow what I make you will probably recognise this pink jacket from a while back.


I just wanted to experiment with fur before publishing it.

I have added photos to show what I did. If you haven't done lining before you will need to get used to turning things odd ways and making funny shapes.

I put 2 back pieces together to make one piece so I could
cut the fur in one layer rather than trying to fold it.

Make sure you cut it so the fur lays in the right direction.
This one smooths downwards.

Stitch the shoulder seams and trim the fuzz a bit.

Fold one centre back seam allowance of the lining to the
inside and press.

Place the folded seam on top of the other seam and stitch
at the top and bottom to hold it in place.

Line up the main and lining at the neck and the sleeve hem edges.
Stitch it. rim the corners a bit and clip the curve of the neck.

Turn it right sides out.

Bring the side seams together at the lining...

... and the main. Stitch both side seams. It is a bit tricky
to get past the underarm with all that fur. Just make sure you go
far enough in then with the needle down, lift the foot and turn
to angle down the rest of the seam.

Both side seams done. Now I am going to finish the hem edge.

Bring the hem edges together by pulling them away from each
other and rolling them around the rest of the jacket. Push the sleeve
parts out of the way as best you can so you have room to stitch
without catching the inside bits.

Pin it along the hem edges. Stitch it all the way across.
If you are not using fur you can cut the back lining on the fold and leave a gap in the hem edge
for turning that you can finish as you top stitch around the jacket. This method doesn't work for fur because you can't just turn in the seam allowance with all the fur pile in the way. 

Use the gap in the centre back of the lining to pull it rights sides out.
First one side then the other.

Hand stitch the centre back seam of the lining.

It looks great just edge to edge.
I had a beautiful coat clasp that I thinks looks great.

You can get the Bolero Collection in my Etsy shop. It has 4 styles that include different shaped boleros and a jacket with sleeves.


Happy Doll Dressmaking,
Val