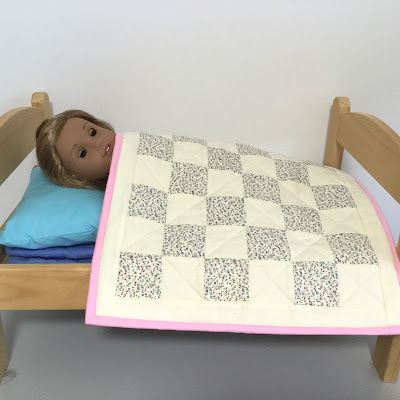
I work using the Pomodoro method. It took me about 3 hours or six time blocks to make this quilt in several sittings.
If you are a quilter you will have a pretty good idea of how to put the quilt together. You will just need the measurements and layout.
If you are a doll dressmaker/quilter you will understand that when you are making quilts for your dolls you don't have to rigorously follow the method for a human quilt. Also when I am making small mats I will do what I can to make it fast and easy but make it look good on the table. If it gets a tea stain on it the first time I use it I'm not devastated. Same with your children's doll quilts.
Little quilts are not just for dolls.
So keep in mind I am not teaching you how to make a quilt. I am showing you how to make a perfectly respectable doll quilt using some quilting techniques.
As I mentioned in part 2, you don't have to use wadding or even backing fabric. You can use a bath towel that you can cut up. You can put backing fabric on if you want pretty fabric on the back or you can leave it just as a towel back.
For this particular quilt I have used wadding. I have however, used poly cotton for the backing because that is what I had. These quilts don't have to last a lifetime. Personally I would rather make a few new quilts each year and give any spares to the thrift shop.
I made the quilt then I submerged it in cold water and squeezed it a few times. I rolled it up and rung it out firmly. I then pegged it on the line in the sun. When it was dry I pressed it firmly with steam. It looks great. You wouldn't know I had washed it.
So don't be concerned that you have to make your doll quilt a certain way. Just have fun making it. You have nothing to lose if you use quilters fabric and take care with sewing your 1/4" seams.
I am outlining the main steps here.
If you would like to download a complete photo tutorial see my doll quilt resources at dolldressmaking.teachable.com.
I have called this one "small small squares" because it is as small as I would make to fit nicely over a doll and the squares are as small as I can be bothered fitting together. As I mentioned, I expect that a quilt I make for my child to play with doesn't need to take 3 months to make. It just needs to look good.
Cutting out the doll quilt
- Cut out strips of fabric. 3 from one fabric and 3 from another fabric. It is easier to cut them width of fabric (WOF) but for this quilt you need 9 x 2/12" or 22 1/2".
- Cut the strips 23" long.
Sewing the strips and making squares for the doll quilt
- Sew the strips together alternating the colours
- Don't worry about pressing the seams yet
- Fold the panel in half lengthwise and cut sections 2 1/2" wide. You should get 9.
- Starting form the same colour on each section, press the seams all in one direction.
Making the doll quilt top
- Reverse each second strip. Nest the seams as you join the strips together.
- Cut border strips 1/1/2" wide. Cut two short strips the same length as the patchwork short side.
- Sew them on
- Cut two long strips the same length as the long side of the quilt.
- Sew them on.
Finishing the doll quilt
- Layer the top, the wadding and the backing and pin them together or use basting spray.
- Do some simple quilting
- Cut 2" strips and join them together so they fit around the quilt with about 6" extra.
- Press it double. Pin it to the back of the quilt and sew it around stopping at each corner and turning.
- Fold it to the front and stitch it down to cover the seam line
More interesting reading
Read this article about the Pomodoro Method. I find it is a technique that really helps me get things done.
I so enjoy making small mats. I made a little bed for my quilting companion (1996-2017). You can se it here.
Sign into dolldressmaking.teachable.com for free resources including a photo tutorial on how to make this doll quilt.
Happy Doll Dressmaking,
Val


No comments:
Post a Comment
Note: Only a member of this blog may post a comment.