Showing posts with label 18" Doll Design. Show all posts

Saturday, April 20, 2024

A new design for the 18" Doll

My latest design is well under way. 


I was thinking about retiring my doll designs blog but I have realised it will be a good place to journal about my doll clothes designs and at the same time record my progress.

I have set a goal to create 5 designs in 3 months or each quarter. I have worked out that I can fit in 20hrs a month to work on designing doll clothes. That is 1hr in the evening for 20 days and the other 10 days is part of my rest and rejuvinate time around the last quarter and new moon. I will only design if I particularly feel like it.

If you would like to read more about how I fit everything that I want to do in my life you should subscribe to my weekly substack newsletter. The content is free with the downloads for paid subscribers. This dress pattern will be offered in the last newsletter of April 2024. When you pay to subscribe you get access to all previous downloads in the newsletter archive.

Subscribe now

Happy Doll Dressmaking,

Val


Sunday, January 12, 2020

What to do with your 18" doll dress pattern

Doll clothes Patterns by valspierssews
Pin me

Have you ever been looking at doll clothes or people clothes pictures on Pinterest and seen the perfect dress for your doll?

Don't you wish you could recreate the design using patterns that you already have?

What you need is a great fitting doll clothes pattern or two that allows you to easily draft new designs.
Doll clothes patterns by valspierssews

My latest spring design that will be published in March was inspired by a dress I found when I did a Google search for Spring dresses.


I took a screenshot and thought about what patterns I had that had pieces I could use without any fancy drafting.

The 3/4 fitted sleeve I took from a dress in my 60s Vol.1 collection but the sleeve piece 7 from 1806 Blouse should do the job. You will just have to cut it off at the elbow.

I didn't want to have to experiment with ruffle depth so I used the skirt from 1804a Scallop bib dress.
It has a hem band that I like the width of. This design also had the front and back bodice pieces.

I know from experience that a normal gathered skirt looks silly with a 3 x gathered ruffle. It is just too out there for the size of the doll.
So I folded under the pattern pieces for the skirt strips so the front strip was 6 3/4" to be cut on the fold and the back pieces were 7 1/2". This gives me a 24" skirt.
I then took the hem band pieces and cut each 1 3/4" wide. I taped them together then adjusted the length to be twice the skirt front pattern piece. You could do this with plain paper too. You don't need the hem band pattern piece.

The hem ruffle is twice the skirt hem.

When you cut the ruffle you need to cut 2 on the fold. I stitched them together at the side seams then I turned up a 1/4" hem. I gathered using a single row of long stitches.

For the sleeve ruffle you need to cut 2 ruffles twice as wide as the sleeve hem edge. Fold under what you don't need on the hem ruffle pattern piece then cut 2.

The ruffle needs to be twice the width of the sleeve hem edge

I folded over the excess from my hem ruffle pattern piece to cut the sleeve ruffle


You can see my whole range of doll clothes patterns on Etsy

Doll clothes patterns by valspierssews
Just one of the add-on bib designs in this pattern

Happy Doll Dressmaking,
Val


Sunday, January 5, 2020

Do you wash your doll clothes?

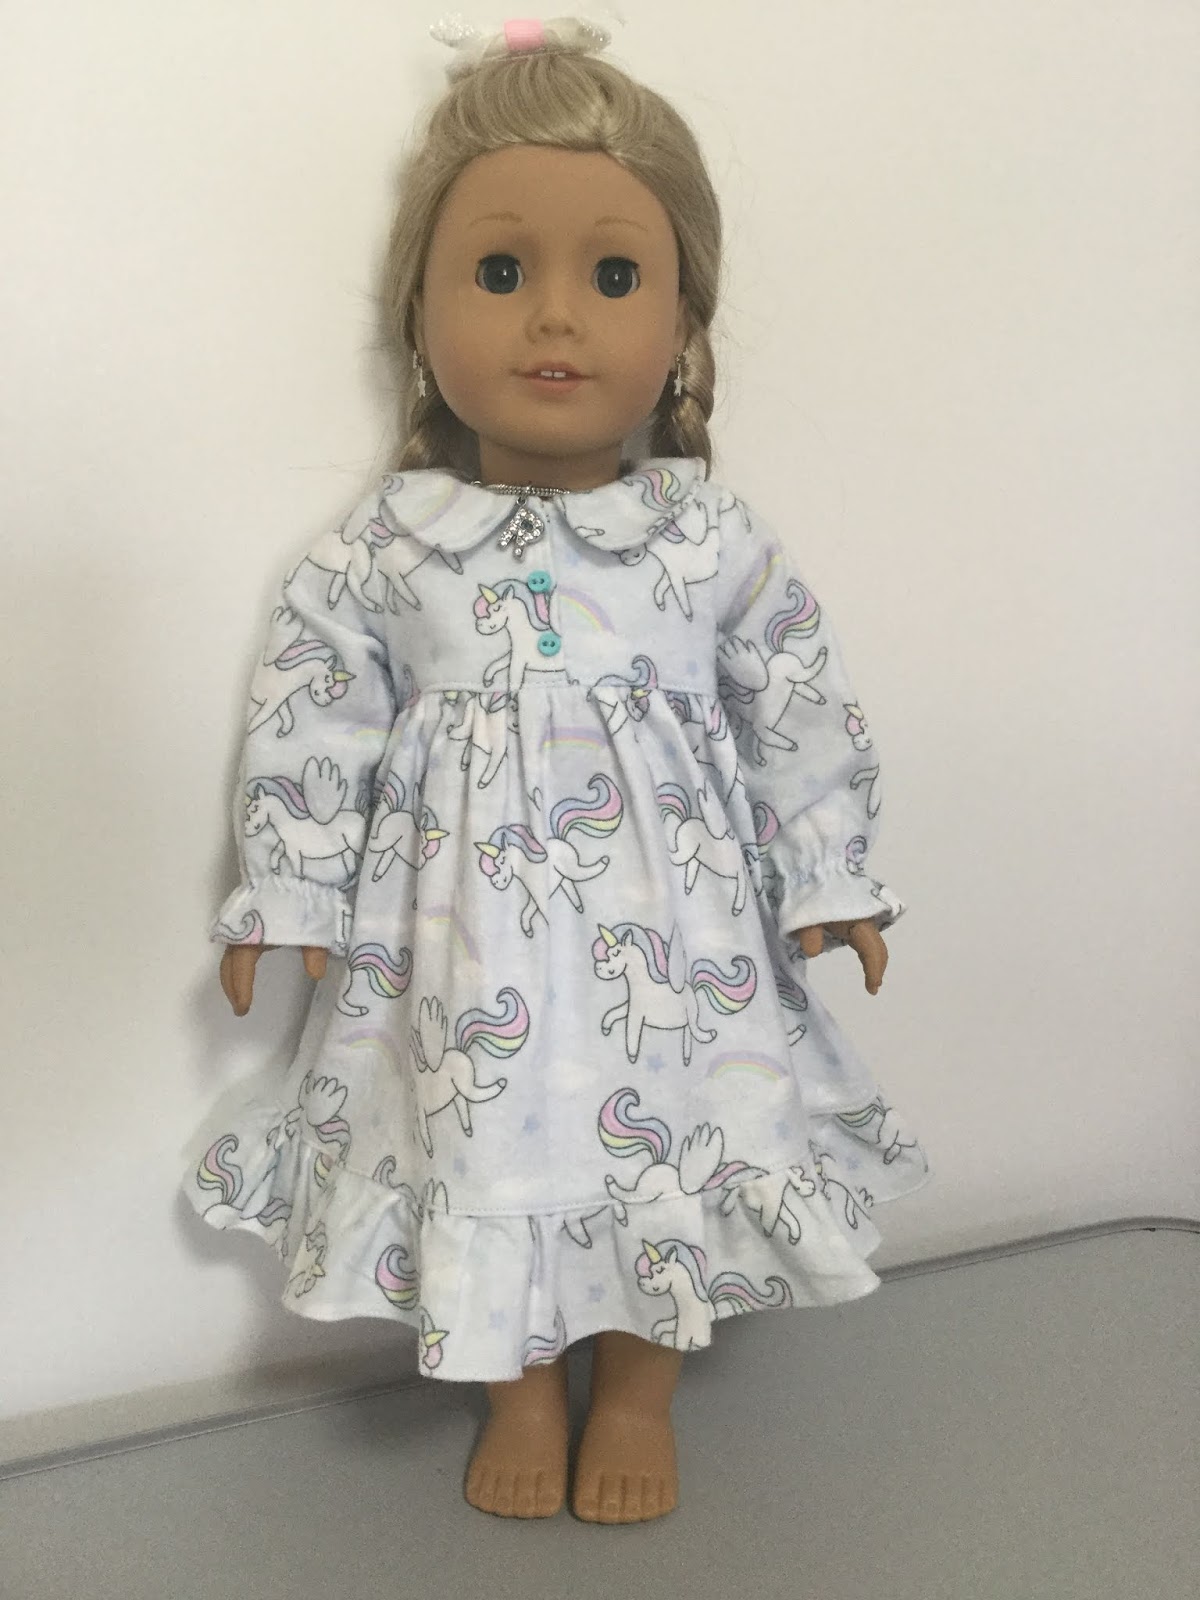
Newly washed nightie. Good or bad? See below.

Every now and then a discussion on washing doll clothes and the fabrics used to make them starts up.

If you are not sure about washing your doll clothes or the fabrics that you use to make them then you should read on. I have included articles, tips and tests and my conclusions about:

  • Ways to wash
  • Colour fasting
  • Pre-washing
  • Shrinking
  • My recommendations

Ways to wash

Efferdent denture cleaner in a litre or so of cold water will clean most doll clothes and keeps them looking as new.

Dishwashing liquid in cold water is good for getting greasy marks out of doll clothes. This probably would work for my clothes too. I am always getting greasy spots on my tee shirts.

You can read more about these methods on this website - https://www.quora.com/How-do-you-clean-doll-clothing

Colour Fasting


Reds and deep dark colours can run and ruin white collars or cuffs or trims so it is best to try colour fasting such items before washing. This is done with salt and vinegar in cold water. You can get the details on this website - https://www.popsugar.com/smart-living/How-Set-Fabric-Dye-Clothes-35015330

I thought my dark velvet fabrics might run but surprisingly the swatches I tried seemed very good. What I thought might be colour was mainly reflection. I would never consider washing a doll dress that I made of velvet but it is good to know that I could spot wash it without creating a big faded spot.
The dress I made also has a detachable collar. A good idea if you think a white collar might get stained.

There maybe a slight colour in this water. This was my expensive velvet.

The colour fasting directions are for people clothes and says you can safely put then in the wash after the process. I would never wash doll clothes in a washing machine. I would stick to hand washing even if I new the item was colour fast.

I have only occasionally had the need to wash doll clothes and I have always done it in cold water with a bit of washing powder or liquid. I swish them around then lay them on a towel in the shade to dry.
The instructions on this website - https://bjdguide.tumblr.com/post/138786061705/how-to-hand-wash-doll-clothes - are pretty comprehensive and I imagine that if I had lots of second hand clothes I would want to give them a good wash.

Prewashing fabrics

When it comes to prewashing I am of the opinion that prewashing makes fabrics look used.
Also, if I know that a fabric is not colour fast then I probably wouldn't buy it. No one wants their doll body to get stained. If I want bright colours I will buy polycotton.
These days cotton fabric used for quilts doesn't need prewashing. I have made several quilts and washed them when they needed it. They washed perfectly. So quilting cotton is great for doll clothes.

I love rayon fabric for doll clothes because it has a nice soft feel and it falls well for a small garment. It is probably the only fabric that I would consider prewashing because it shrinks a lot.

You can find details for prewashing a variety of fabrics in this article

Flannelette

I decided to wash the flannelette nightie I made for the doll. I know that flannelette shrinks a bit but I thought I should check how much.
I used cold water and some dish washing liquid. Maybe a wool wash would be less harsh if I tried this again or perhaps a fabric softener after washing.

I swished it around in the kitchen sink.


I squeezed it as dry as possible then shook it out to reduce creasing.


I just hung it on the line but laying it on a towel and pushing it into shape would be a good idea for more delicate items.


I was surprised how stiff it went after washing. I didn't like how it felt and looked. I wouldn't wash flannelette for the dolls unless the doll clothes were second hand. You would need a fabric softener to  stop it gong stiff. I would try to spot wash and only if it was absolutely necessary.

What about shrinking? 

This is before and after. I guessed that it had shrunk just a bit.

After: it is a bit shorter and doesn't fall
as softly.
Before: it looks fluffier and it feels softer

When I put the pattern pieces next to the sleeves and skirt I could see that the sleeves were 1/4" shorter and the main skirt was 1/4" shorter. The nightie didn't seem to be any tighter in fit so it doesn't shrink on the cross grain, mainly the lengthwise grain parallel to the selvedge.
So, I am not going to wash or prewash my flannelette.

Just a note about flannelette. I think the same fabric is called flannel in the US. It is highly flammable and should not be used for nighties or flowing clothes on children. I think it is illegal to manufacture nighties in flannelette for children. Children's pyjamas should be close fitting to reduce fire danger from heaters, fires or candles.
Original flannel is made from wool. So historical flannel nighties are made from wool flannel not cotton flannelette.

My Conclusions

  • Don't wash doll clothes unless they are second hand and you want to clean them.
  • Musty smelling clothes from storage can be aired
  • Stains should be spot washed
  • Rayon needs prewashing by hand. It frays a lot if machine washed.
  • Basically no other fabrics need prewashing
  • Avoid fabrics that run but this is not necessary if you don't wash your doll clothes.
  • The harmful affects of chemicals used in fabric manufacture are a problem for people who work in the factory and are exposed to lots of chemicals often.
  • Formaldehyde can cause a rash when new clothes are worn without washing. This is because large areas of your skin are exposed and formaldehyde dissolves in moisture and sweat so it can penetrate the skin.
  • I thought this fact sheet on formaldehyde was informative. I don't seem to have a sensitivity to it but I always wash new clothes for people, sheets and towels.
    https://www.sahealth.sa.gov.au/wps/wcm/connect/public+content/sa+health+internet/health+topics/health+conditions+prevention+and+treatment/chemicals+and+contaminants/formaldehyde

Your Comments

  • All fabric must be pre-washed to remove chemicals used in fabric making. It is not good for children to play with unwashed fabrics
  • All fabrics should be pre-washed to remove dirt and grime accumulated after manufacture from handling in transport and being on shop shelves.
  • Fabrics from shops that look clean don't need to be pre-washed
  • The small amount of fabric in doll clothes doesn't seem to cause a problem when handled so pre-washing is not needed.
  • A personal sensitivity to the chemicals in fabrics means they have to be pre-washed before being handled for sewing.

Leave your comments on either my Facebook page or my Facebook Group


Monday, April 8, 2019

How to sew a doll skirt for 18" American Girl dolls

valspierssews

While researching and sewing for the doll skirts blog posts I came across this old post. I have updated the post. I thought it would also be a good time to revisit the free apron I included in the newsletter last year. You can find it in the Doll Accessories Section in the Free Resource Library

Skirt Length

The skirt looks best with the waistband a bit above the waistline. You need to add 1/2" to each of the skirt lengths listed. 1/4" for the waist seam and 1/4" for the hem. Finished skirt lengths that I like are:

4" for a cute dolly look. (high gather for a Betsy McCall look)


5" for a nice party dress or day dress and a more demure look.


7" for midi skirts and a casual look. (at least mid gather)

9" + shoe height for ankle length just above the floor. (at least mid to high gather)

9 1/2" + shoe height just skims the floor. (at least mid to high gather)

Remember, you need to add 1/4" or 1/2" for the waist seam and 1/4", 3/8" or 1/2" for a hem.

Skirt Width

There are 3 widths of skirt that work well depending
on how much gather you want. I have also found that 
the longer the skirt the more width you need to get 
the right look.

Short skirt/low gather 24" wide

The 4" skirt and the 5" skirt are as long as I would go when using a 24" width for gathering. This little blue skirt is cut in 2 6 1/2" wide pieces that i stitched at the side seams. You can see how to make this skirt HERE


Knee and just below/mid gather 30" wide

This is my usual skirt length and skirt width. I find that 36" for a knee length skirt is just a bit too flouncy. My 1804 pattern has the skirt pattern pieces for the front and the back so you can fit it onto a fat quarter. A 30" gather means you save 6"on trims too. 

*************

Doll clothes patterns by valspierssews
Just one of the many variations for 1804 dress pattern

Long floor length/high gather 36" to 40" wide

The longer the skirt the wider you want it to be at the hem. Floor length skirts are OK at 30" wide but 36" is better.

This dress pattern along with the princess dress are not published.
I took them down to rewrite the instructions. They will go back up one day.

Long floor length/super high gather 50" wide (Not for the faint hearted. You have to pull up the fabric as much as it goes to get the right width.)

I have only tried 50"once. I used satin fabric for a princess dress and had so much trouble trying to pull it up enough. The gathers also create a lot of thickness so I had to make my waist band about 13" to get it all to fit on the doll. I ended up not liking the skirt as much as the one on the witch.


If you want to make an economical, easy to sew, great looking skirt go for a 24" x 5 1/2" rectangle with a 12" to 12 1/2" Waistband. If you want the skirt and waist band to overlap by a 1/2" you need to fold your fabric to mimic the waist band then wrap it around the doll and any shirt you want to tuck in. The overlap needs to be 1". You can see how I check the waist band length HERE

Waist Band Ease

The wider the skirt (more gathers) or the thicker your fabric the more ease you need in the waistband.

A cut length between 12" and 12 1/2" fits on a 30" gathered skirt so the skirt can be worn over a shirt or t-shirt. Check that the cut length fits around your doll and any tops to tuck in, with a 1" overlap. The super high gather waistband is 1" longer at 13".

The thickness the fabric you are tucking into the skirt also has to be considered. A T-shirt needs more ease than a lawn blouse.
An all purpose 12 1/2" waistband will be my "go to" waistband for my skirts now because I like to mix and match and never know which tops I want to tuck in or how much underwear she will have on. The width is a matter of taste but 3/8" to 1/2" finished width is a good look.
Remember that thicker fabric requires a longer and a wider waist band.

Free Patterns

You can add to your skirt experience by downloading a free apron accessory pattern from the Valspierssews Resource Library


An apron is a perfect accessory because you can create cute, whimsical, romantic, vintage, cooking or themed outfits by just adding an apron in the right fabric.

(The link is to a bundle. I am still testing out the Teachable site. If you have enrolled in the separate sections I am not sure that enrolling in the bundle is necessary. Get onto me at valspiers@dolldressmaking.com if there is any problem or confusion.)

Find your free apron pattern to download in the Doll Size Accessories section of my Free Resource Library.


Happy Doll Dressmaking,
Val


Friday, March 8, 2019

New T-shirt Doll Clothes pattern for the 18" Boy Doll

Boy Doll clothes T-shirt doll clothes pattern for 18" dolls by valspierssews. Fits popular 18" dolls like American Girl Doll

Since discontinuing 1801 knit pattern to do a revamp of how it was presented, I have been doing bit on and off. I sat down finally and finished the t-shirt pattern for the boy.

It has a slightly wider neck than the girl t-shirt so it looks a bit more manly.
It has a slightly wider neck band so it looks bigger in general.
I made the armscye straighter as well as a bit lower in the underarm. This gives a more relaxed masculine look.
I made the side seams straight and the sleeves longer.


All these small changes go together to make the boy look like a boy rather than just a boy with a girl's shirt on.

Strangely the boy shirt looks great on the girl. It gives her a more little girl look because it doesn't have all the female fashion features.

I had to make lots of samples to get the look just right.


Get the pattern in my Etsy shop or my Australian shop (GST free for Australian and NZ Customers for 2019).

I intend to offer at least 2 more designs using the same front and back pieces. They will have long sleeves, a faux turtleneck, a v-neck, shorter bodice and longer bottom band to create a sweater vest, also bands and a lower neck line for a tank top.

I wanted to make this 1874 classic knits collection for the boys as affordable and comprehensive as possible and I will do the same with the revamped 1801 for the girls.
Once the basics are published I will have great fun making up lots of ways to create new designs from the classic shapes.
Some of these will be free and some will become retail fashion files.

If you have the old 1801 you will need to print out the back and front and cut out on the slim fit lines. Use the ribbing band pattern pieces and the short sleeve and you will have what you need to make the 1801 Module 1 Girl T-shirt

Here is a comparison between the girl and boy T-shirts.


You can find the 1801 Girl T-shirt with these links too.


If you love my patterns please pin the image at the top of the blog post.
If you love my patterns why not sign up for my newsletter. See the link at the top on the side bar.

Happy Doll Dressmaking,
Val


Friday, February 22, 2019

3 Suggestions to Vary the Princess Line Doll Clothes Dress 1843: Part 2


Don't you just love ruffles! All the Princess Line Dresses are perfect for adding ruffles or trims and ties. If you have an 8 panel dress pattern it shouldn't be a big leap to draft some of the designs below.
  1. You can make the two centre panels into one
  2. You can split your single front panel down the middle and and create a button down front by adding a front facing
  3. You can reduce the flare so it looks more A-line as well as add more seams, gathered sections, colour blocks. 
The 8 panel style offers great potential for many different looking designs. If you are interested in discussion on designing and drafting please come along to my Facebook group.

Dresses with 1 Central Panel

Some of the princess line designs only have three panels in the front. What I would do to make the two front panels into one is trim the seam allowance off the centre front seam line on the pattern pieces. Then lie them up together and work out what needs to be done with the centre flare. You don't want to just cut it out all together because it will change the shape of the dress front but not the back.

I suggest cutting some of the flare out of the centre front then increasing the flare on the sides of the centre panel as well as increasing the flare a fraction on the side panels. Fold the new centre panel in half and cut the neckline how you want. 

You can make some styles like this:

 1930's

 1940's

 1940's


Dresses with a Button Down Front

If you want to create one of the variations that has buttons all down the front. I suggest that you cut a front facing piece using the front piece as a guide. Just don't forget that you need to overlap the fronts this time so you need to add 1/4" to extend the centre front piece at the centre front seam only. Copy it then use the copy to create the facing.

I really like the ones with the scalloped fronts.

Here are some examples of button down versions:


1940's


1940's


1940's
You would need to keep the back opening for this one and
add extensions for the front placket.

Many of the A-line designs from the 60s use the princess line.

It is probably easier to use an A-line dress to create the panelled A-line designs. You can use the curved side seam of the princess line dress 1843 to shape the A-line in at the waist a bit if you like.
This one looks like it shapes in at the waist. You can do the top part of the bodice with an add-on yoke rather than sew it as a seam.


This one also shapes in at the waist just a bit.


This one is a simple A-line with straight panels. Not princess line because it doesn't shape in at the waist but the panels look great.


There are also variations that have an extra piece as a yoke at the top and gathers below. It wouldn't be too hard to cut the centre panel then add 3 or 4 inches to the centre front edge of the panel.

From what I have read, you draw the grain lines of the panel perpendicular to the Centre front and centre back lines. In the next instalment I will be showing you step by step how I create one of these designs from dress pattern 1843.

See Part 1introducing the Princess Line, and

Part 3 a tutorial on how to vary pattern 1843

Happy Doll Dressmaking,
Val

Friday, January 18, 2019

How to Make a Doll Quilts Part 3: Step by Step Free Tutorial by valspierssews

How to make a doll quilt step by step by valspierssews


I work using the Pomodoro method. It took me about 3 hours or six time blocks to make this quilt in several sittings.

If you are a quilter you will have a pretty good idea of how to put the quilt together. You will just need the measurements and layout.

If you are a doll dressmaker/quilter you will understand that when you are making quilts for your dolls you don't have to rigorously follow the method for a human quilt. Also when I am making small mats I will do what I can to make it fast and easy but make it look good on the table. If it gets a tea stain on it the first time I use it I'm not devastated. Same with your children's doll quilts.


Little quilts are not just for dolls.

So keep in mind I am not teaching you how to make a quilt. I am showing you how to make a perfectly respectable doll quilt using some quilting techniques.

As I mentioned in part 2, you don't have to use wadding or even backing fabric. You can use a bath towel that you can cut up. You can put backing fabric on if you want pretty fabric on the back or you can leave it just as a towel back.

For this particular quilt I have used wadding. I have however, used poly cotton for the backing because that is what I had. These quilts don't have to last a lifetime. Personally I would rather make a few new quilts each year and give any spares to the thrift shop.
I made the quilt then I submerged it in cold water and squeezed it a few times. I rolled it up and rung it out firmly. I then pegged it on the line in the sun. When it was dry I pressed it firmly with steam. It looks great. You wouldn't know I had washed it.


So don't be concerned that you have to make your doll quilt a certain way. Just have fun making it. You have nothing to lose if you use quilters fabric and take care with sewing your 1/4" seams.

I am outlining the main steps here.

If you would like to download a complete photo tutorial  see my doll quilt resources at dolldressmaking.teachable.com.

I have called this one "small small squares" because it is as small as I would make to fit nicely over a doll and the squares are as small as I can be bothered fitting together. As I mentioned, I expect that a quilt I make for my child to play with doesn't need to take 3 months to make. It just needs to look good.


Cutting out the doll quilt
  • Cut out strips of fabric. 3 from one fabric and 3 from another fabric. It is easier to cut them width of fabric (WOF) but for this quilt you need 9 x 2/12" or 22 1/2". 
  • Cut the strips 23" long.
Sewing the strips and making squares for the doll quilt
  • Sew the strips together alternating the colours
  • Don't worry about pressing the seams yet
  • Fold the panel in half lengthwise and cut sections 2 1/2" wide. You should get 9.
  • Starting form the same colour on each section, press the seams all in one direction.


Making the doll quilt top
  • Reverse each second strip. Nest the seams as you join the strips together.
  • Cut border strips 1/1/2" wide. Cut two short strips the same length as the patchwork short side.
  • Sew them on
  • Cut two long strips the same length as the long side of the quilt.
  • Sew them on.


Finishing the doll quilt
  • Layer the top, the wadding and the backing and pin them together or use basting spray.
  • Do some simple quilting
  • Cut 2" strips and join them together so they fit around the quilt with about 6" extra.
  • Press it double. Pin it to the back of the quilt and sew it around stopping at each corner and turning.
  • Fold it to the front and stitch it down to cover the seam line


More interesting reading

Read this article about the Pomodoro Method. I find it is a technique that really helps me get things done.

I so enjoy making small mats. I made a little bed for my quilting companion (1996-2017). You can se it here.

Sign into dolldressmaking.teachable.com for free resources including a photo tutorial on how to make this doll quilt.

Happy Doll Dressmaking,
Val