Showing posts with label 1843. Show all posts

Friday, February 22, 2019

3 Suggestions to Vary the Princess Line Doll Clothes Dress 1843: Part 2


Don't you just love ruffles! All the Princess Line Dresses are perfect for adding ruffles or trims and ties. If you have an 8 panel dress pattern it shouldn't be a big leap to draft some of the designs below.
  1. You can make the two centre panels into one
  2. You can split your single front panel down the middle and and create a button down front by adding a front facing
  3. You can reduce the flare so it looks more A-line as well as add more seams, gathered sections, colour blocks. 
The 8 panel style offers great potential for many different looking designs. If you are interested in discussion on designing and drafting please come along to my Facebook group.

Dresses with 1 Central Panel

Some of the princess line designs only have three panels in the front. What I would do to make the two front panels into one is trim the seam allowance off the centre front seam line on the pattern pieces. Then lie them up together and work out what needs to be done with the centre flare. You don't want to just cut it out all together because it will change the shape of the dress front but not the back.

I suggest cutting some of the flare out of the centre front then increasing the flare on the sides of the centre panel as well as increasing the flare a fraction on the side panels. Fold the new centre panel in half and cut the neckline how you want. 

You can make some styles like this:

 1930's

 1940's

 1940's


Dresses with a Button Down Front

If you want to create one of the variations that has buttons all down the front. I suggest that you cut a front facing piece using the front piece as a guide. Just don't forget that you need to overlap the fronts this time so you need to add 1/4" to extend the centre front piece at the centre front seam only. Copy it then use the copy to create the facing.

I really like the ones with the scalloped fronts.

Here are some examples of button down versions:


1940's


1940's


1940's
You would need to keep the back opening for this one and
add extensions for the front placket.

Many of the A-line designs from the 60s use the princess line.

It is probably easier to use an A-line dress to create the panelled A-line designs. You can use the curved side seam of the princess line dress 1843 to shape the A-line in at the waist a bit if you like.
This one looks like it shapes in at the waist. You can do the top part of the bodice with an add-on yoke rather than sew it as a seam.


This one also shapes in at the waist just a bit.


This one is a simple A-line with straight panels. Not princess line because it doesn't shape in at the waist but the panels look great.


There are also variations that have an extra piece as a yoke at the top and gathers below. It wouldn't be too hard to cut the centre panel then add 3 or 4 inches to the centre front edge of the panel.

From what I have read, you draw the grain lines of the panel perpendicular to the Centre front and centre back lines. In the next instalment I will be showing you step by step how I create one of these designs from dress pattern 1843.

See Part 1introducing the Princess Line, and

Part 3 a tutorial on how to vary pattern 1843

Happy Doll Dressmaking,
Val

Friday, February 8, 2019

Princess Line Doll Clothes: Part 1


18" doll clothes pattern by valspierssews. Variation on 1843 to fit American Girl Doll

  • Mixing up gores and panels and princess line
  • Fabulous vintage panels
  • Using 1843 to create these designs


Mixing up Gores, Gussets, Godettes and Princess line panels

I rediscovered the panelled dress that I made some time ago. I went looking for the pattern. It's title is 8 gore dress so I thought I would do a bit of research on what gores were because I had a feeling that I was not naming it correctly.

First I looked up the meaning of gore. It seems it is synonymous with gusset. The dress making version comes from a word meaning arrow.
The following comes from Wikipedia:
The word is derived from Old English gār, meaning spear. In the course of time the word came to be used for a piece of cloth used in making clothes. In dressmaking and hat making, it refers to triangular or rhomboid pieces of fabric which are combined to create a fuller three dimensional effect.

I also came upon this fabulous website called The Renaissance Tailor that I have book marked for some later reading. There looks to be lots of great information on historical outfits, drafting, sewing techniques and more. I have put the link to the site map because the menus seem a bit haphazard.
There was a great section on gores and gussets that helped clear up some misconceptions I had.

So a skirt can be made from trapezoidal gores. My 8 gore skirt pattern is correctly named. I also made a godette skirt pattern. It seems that gore and godette are the same but I tend to lean towards a godette being the triangular insert in a gored skirt.

So what is the princess line? 
Well, this is a relatively new fashion term thought to be introduce by Charles Frederick Wentworth in the 1870s. he named it after the elegant Princess Alexandra of Denmark.

A princess line is cut in long panels without any waist seam. the curve of the panels shapes the waist.

In 1951 Christian Dior presented a collection called the Line Longue that was based on the princess line.
I found a useful A to Z of sewing and fashion terms at the Business of fashion website

So I am going to rename my 8 gore dress to the 8 panel princess line dress.


Fabulous Vintage Panels

I looked up some examples of princess line dresses and some variations. The princess line is common in vintage designs.


You can find all these and more in my Pinterest board


Using 1843 to Create These Designs

My Princess line dress pattern is a great starting pint for recreating all these vintage designs. I love the pockets set between the panels.
I'm thinking I will have to include a round neck version in the pattern. At present it is a sweet heart neckline but if you cut straight across from the shoulder point then sew the panels together you can use any bodice pattern piece to shape the neckline.

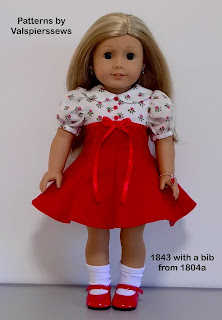
This is pattern 1843...


... and this is a variation I made using the add-on bibs collection 1804a and the collar from 1804.


If you want to join the discussion on designing doll clothes then you need to join my Facebook Group


See Part 2 on how to vary the princess line design, and

Part 3 a tutorial detailing how to use 1843 to make a new design.

Happy Doll Dressmaking,
Val

Sunday, October 9, 2016

1843 Publishing a new doll clothes pattern

valspierssews doll clothes


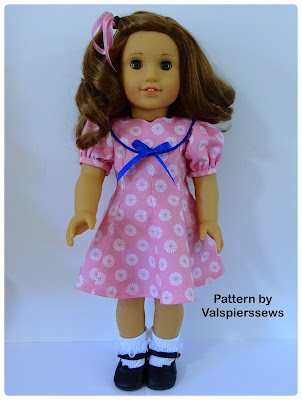
I have really enjoyed creating this pattern from such a cute design. It was a request from one of my followers and it has stretched me but also made me more aware of how much I am capable of.

I had to work out the best way to do the yoke and settled on cutting the curve in the front and back dress and stitching on the curved yoke. I was surprised at how easily the two curves fit together for sewing.


I had to reshape my existing sleeves to make the cream puff rounded shape and was thrilled that it worked first go.


I suppose the greatest challenge was drawing the flared and curved diagrams for the instructions. I had to copy from the actual fabric stages to get the perspective right. I imagine that those of you making this dress will look at your fabric item and use it to make the diagrams more clear if you need to.


My other big news is the arrival of a new doll. Well, actually she is an old doll. I bought an original Kit Kittredge so I could make sure my designs fit the older American Girl dolls as well as the modern dolls. I know Kit is circa 2000 but I am not exactly a collector and wasn't prepared to pay the high prices being asked for the pre-Mattel dolls. I will post a bit more about Kit later.


Here are some photos of the dress and how it goes together. They are the same as the ones in my Facebook album for 1843.


The pink dress has more flare than the yellow dress which makes it look longer as well. I think I like the fuller flare more than the original flare that I designed.
I also tried piping around the yoke. I think the lace ruffle or any ruffle looks better than the piping mainly because it is much easier to do than the piping. I had to use my piping foot for the first time too. I think ruffled broderie anglaise would look good too.


You can find this pattern 1843 in my Etsy Shop. I have several 50's designs.

Happy Sewing,
Val

Sunday, September 11, 2016

Progress on the Marian Martin Pattern conversion to a doll clothes pattern

I have had a request to convert an old Marian Martin girls' design to a doll size pattern. It is a cute little flared dress with 8 panels.


I started a note book for this one because I found there was quite a lot of story behind the design when I did the sailor suits and the same is true of this Marian Martin pattern.

Marian Martin was just one of several lady's names that were used as trade names by one mail order company.
You can read about the mail order patterns on Witness2Fashion Blog. I found it quite interesting.

There was also a link to a fascinating interview of one of the ladies who worked in the craft pattern section of the mail order company in the 70's
It was posted on Kestrel Makes Blog in two parts.  It is well worth a read.
Part 1
Part 2

So I have filed away the sailor suit.

Page 2 of the pattern file marks the place in the folder

Page 1 of the file becomes the title page for the
instructions and the pattern pieces go in the envelope.
I have filed away the A-line skirt.

Just the title page this time as a file divider.
I didn't print the instructions this time so it is just the pattern pieces.
No envelope with this free pattern.
I have started up the notebook for this pattern request. I have an image of the pattern envelope but I like to draw the design myself to get a good idea of the design features.


The first draft.


The toile.


turning up the hem will adjust the bodice / skirt proportion.

I am really happy with the fit and the amount of flare. I could put in more flare if requested. Now it is time to play with the faux round yoke. I will stitch it to the neck then turn it out over the bodice and stitch it down to create the illusion of a yoke. I hope this works because I can't see myself trying to sew on a separate curved yoke.

There is lots on offer in my Etsy Shop. Look out for this flared dress soon.

Happy Sewing,
Val