I have always wanted to make a shirt with a contrasting button band.


I haven't bothered up until now because I thought it seemed a bit tricky to get it just right.
I was right. My first go had it completely in the wrong place and folding in the wrong place.
I didn't see this until I tried to sew it.
I struggle with 'seeing' things in 3D and even when I'm sure I have it right it turns out wrong!
The second half of the video shows how I created the new pattern pieces for this hack from the original pattern pieces. If you watch it in You Tube please hit the like button and subscribe. There will be lots more Pattern Hack videos.
I needed the centre of the button band to be the centre front of the shirt and this tricked me up a bit. I had to place and fold and try it out a few times to get everything in the right place.
This is all I had to do.
- Cut the front shirt along the centre front line.
- The new seam line for the front is 1/4" from the cut line
- Add 1/2" to the band edge furthest from the shirt front. Zag the top edge up to match the zig next to it.
- Your new seam line is 1/4" from the cut edge.
- To make the front yoke draw a horizontal line halfway down the armhole.
- Cut it and add 1/4" seam allowance to each cut edge.

It's really easy to sew up once the pattern pieces are right. Just one seam, two folds and a topstitching row.
I've decided to name the Hack Packs with numbers because I know I will do more than one pack for some of the patterns. But inside the pack I am including 3 hacks. So what will I label them as?
I am going with Pack 1 Hack A , Pack 1 Hack B and Pack 1 Hack C
On the pattern pieces I need the name of the original pattern as well. There is only so much room on a doll clothes pattern piece so I can't just keep adding to the name non stop. I now have 3 lines of title.
Lower back
Pack 1 Hack B

It seems trivial as I am writing about it but if you drop a pattern piece under the table and you find it again 3 days later you have to know where it goes.
If you missed Hack A you can see it here.
So let's get to the tutorial part for 1837 Everyday shirt Pack 1 Hack B
Cutting it out
I rarely have a piece of fabric that is uncut. I had just enough of this cute pink checked spot to make a shirt. Putting pattern pieces on the bias tends to take up a bit more space too.

I cut out these pieces then refolded the fabric to get the sleeves, cuffs and another 2 front yokes in.
I couldn't fit the collar so making the collar from a contrast fabric made this shirt possible. Adding contrast features is a good way to use up pieces of fabric that are too small for a whole garment.
Marking important points with pins


Back Pleats


Back Yoke

Lay the other yoke right side down on the wrong side of the back and stitch through all 3 layers.
Press each yoke up over the seam allowance.
Top stitch close to the seam along the yoke.
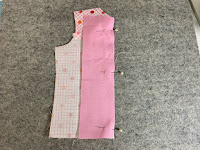
Front Yoke

All the yoke pieces have to go right side down.
Pin and stitch.

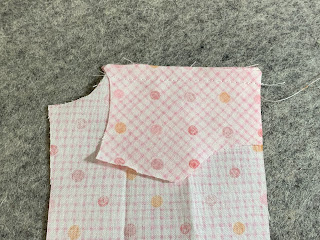
Pin and stitch through all layers.


Top stitch close to the seam along the yoke.
Button Bands

Pin it and stitch it in place.

Trim off a tiny bit of the front where the yoke seam is quite thick.

It should measure about 1/2".
Press.


Press.
Pin the band to the front so the fold just covers the stitching line.
Stitch it down close to the fold.

Shoulder Seams


Place a front and the back shirt wrong sides together at the shoulder edge and pin together the lining yokes only. The lining yokes will be right sides together.


Pin it.
Tops stitch across the shoulder close to the folded edge of the main front yoke.


No comments:
Post a Comment
Note: Only a member of this blog may post a comment.