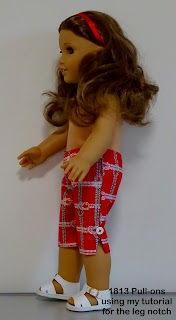
These look so cute and there is only a little bit of fiddling. They still only take less than 2 hours to make.
I used my 1813 Gathered Pull-Ons Pattern available in my Etsy Shop. This is one of my low priced basic patterns.
If you have the pattern all you have to do is take the front and back with the extensions taped on then measure down 2.5cm or 1" from the bottom edge of the capris cutoff line and draw a new cutoff line.
Cut out your pants.
Because I always overlock the waist edge I cut off the 1/4" turning allowance to start with. This meant my pattern fit nicely on the 18" width of a fat quarter. Don't forget to put a pin in the centre of each back piece so they don't get mixed up with the fronts.I will be updating a couple of small things in the published pattern to match what I say here but I will let you know when it is updated.
Instead of using the fold line on the pattern to mark the casing I sewed the side seams then overlocked the waist edge then I measured 7/8" from the top edge and drew a line with my marker pen on the right side of the fabric. I found this easier to do.
Pin a back and a front together at the side seam. Measure up 2 1/4" from the hem edge and put a dash. Stitch from the top edge to the dash. Back stitch at each end.
Cut a slit in the seam allowance 1/4" above the end of the stitching.
Carefully fold the bottom section out of the way and overlock the top section only.
Then overlock each separate hem edge.
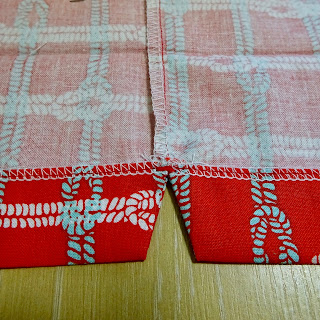
Fold the hem edge right sides together so bottom edge extends about 1/4" past the end of the side seam stitching. I used the inside edge of the overlocking as my mark. Pin it in place.
Use a ruler to mark 1/4" in at the end of the side seam stitching and 1/2" in from the side edge at the fold.
Stitch from dot to dot, back stitching at each end and keeping the other half a hem out of the way.
Do the same for the other half a hem.
Just snip a bit off the corners.
Turn the hems. Because the notch seam was at an angle a little corner of seam allowance sticks out on each side of the notch point. Just use a pin to tuck it in then pin it in place. You could have pressed the rest of the side seam towards the back before now but I saved up the pressing until now. Press, avoiding any plastic bits on the pins.
With matching thread in my needle and bobbin I stitched a bar tack to hold the seam corners in and prevent the notch from tearing. I used a satin stitch length and wide zig zag and stitched it from the wrong side so I caught all the bits accurately.
Now you can finish the hem by stitching along the overlocked edge or hand sewing if you like. You probably should put the button on now. If you wait until you have finished the pants you will need to sew the button on by hand.
Finish off the pants by stitching the inseam, stitching the crotch seam then doing the casing according to the pattern 1813.

You can buy the pull-ons pattern
Happy Sewing,
Val


No comments:
Post a Comment
Note: Only a member of this blog may post a comment.