I have just installed my cork board on the wall behind my machine table. I just love hard copy.
I have decided to create a mix and max capsule wardrobe for summer and make the samples for my Australian Girl Dolls first. I will design the American Girl Doll size pattern then make the adjustments for the Australian Girl Doll since I am more used to the 18" sizing.
I found a good site with lots of fashion capsules. She even had links to the items in a shop so I could see different views of each item. Have a look at Every Day Savvy.
To make the wardrobe I have to design the dress, the denim jacket and the shorts with a fly. The rest can pretty much be worked out with patterns I have already designed.
Here is how I worked on the dress. I drew it up to scale and made some notes. To get it to scale I used a croqui. To make my croqui I traced around a doll shaped template. You can just see the pencil outline on my pages.
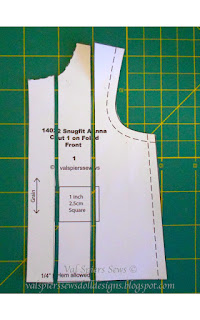
I then took my Snugfit Anna pattern and cut it to make the gathers. I now know that gathering on the shoulder is not necessary so just one cut on the neck would have sufficed.
I then place the cut pieces on a new sheet of loose leaf lined paper. I save the plain paper for the printer if possible. I added the length to make it a dress. The amount that I spread the pieces was governed by the fact that I wanted the skirt to be at least 24" around. So for this quarter section I needed the bottom edge to measure 6".
I drew up pieces for the back yoke and neck band and adjusted the cap sleeve from Knitfit Lucy. I know now that the curved neck band is too hard to sew. I have made it a bias band instead.
I cut the back bottom off the top section and added 1/4" seam allowances to the cut edges. I then expanded the bottom section for gathering onto the yoke. I did some measuring on the doll and drew in the line for the elastic waist. I made the waist a bit lower than normal so the top would blouse out a bit.
I used similar weight fabric to the 'good fabric' (They are both good fabrics really). This is the part where you find that some things just don't work, like the curved neck band and I made the placket band too wide to start with. Because I wanted to keep the dress I unpicked the neck band and placket. I used a straight bias strip for the neck band and learnt lots about plackets.
I wanted this dress to pull on over the feet but found that I had to add a second placket at the back to make it wide enough. The back placket tucks to the inside.
I thought I would do a double fold hem to get a neater look but the skirt ended up 1/4" too short and the hem was a bit stiff and didn't hang right. So I unpicked the hem and re-did it.
I made more notes as I went.
The Australian Girl Doll has different shoulders to the American Girl Doll so to finalise the pattern for my Australian Girl Doll I will cut the shoulder seam a bit narrower and fold a cuff on the cap sleeves.
I couldn't fix the shoulder seam gathering easily so this sample looks a bit puffy around the shoulders. That will be fixed for the final test. I think it also needs a skinny tie belt made from the same fabric, around the waist.
I love the design process from picture to dress. It is very satisfying to see it come together.
Why not pop on over to my Etsy shop . Favourite my shop and Like me on Facebook. That way you can keep up with all my new designs. Great value at $2.50 USD each. I also sell on Craftsy. If you follow me on Craftsy you will be notified when I put up new projects based on the new patterns.
This one is 1820 Knitfit Polly Sweatshirt for Bulky knits, on the design board. Only a few more computer hours to get this one published.
I go over my design in pen then erase the pencil croqui. When I am ready to do my pattern diagrams in Illustrator I have a croqui template that I draw my design on. Then I cut and paste in onto a new canvas.
Here are my four diagrams for 1820
I hope you have a go at making your own designs. Drawing on the croqui is really easy. When I started making my patterns for sale one of the features I wanted to include was interchangeable pattern pieces. This means that if you want a sleeve from the blouse pattern to go on the dress pattern, it fits perfectly. Like instant designing.
I am still working on my pattern collections. I figure another 2 years should produce a good range of basic pattern pieces that can be combined in many, many ways to create new designs.
If you would like to use my croqui just download it here and print it on thin card, cut it out and use it over and over. If you want it smaller just print it at a smaller % or maybe 2 or 4 to a page.
Happy Sewing,
Val


No comments:
Post a Comment
Note: Only a member of this blog may post a comment.