Showing posts with label 1417 Snugfit wanda. Show all posts

Tuesday, October 7, 2014

Not Just a Witch Pattern - This is a Valspierssews Doll Designs Witch

After Halloween I will rename Snugfit Witch to Snugfit Wanda. This is because the pattern is not just a witch costume. It is a part of the Doll Designs range and the pieces can be used in lots of different ways. As well, it is part of the Snugfit range so the pieces can be swapped around with other Snugfit patterns.

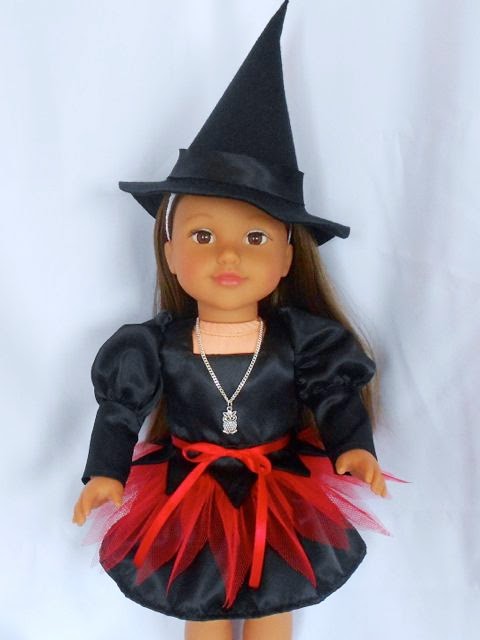
With just the 1417 Snugfit Wanda pattern pieces you can make these two beautiful dresses.


Here she is with the cute Tote Basket you can make using the Applique Tote pattern 1401.


Typical of my Doll Design patterns The Applique Tote 1401 has a free related Fashion File with lots of ideas for making up the pattern.
The Snugfit Witch (aka Wanda) will also have a free Fashion File with basic instructions on how to get the different looks. I even have a Christmas Elf costume idea with the pointed peplum. Coming soon.

If you have Snugfit Anna Blouse 1402 you can combine the blouse bodice with the witch sleeves and get double use out of the black skirt to create this gorgeous old fashioned look.


So it is a good idea to pick up the Snugfit Witch while it is on special for only $1.00 USD. Only until Halloween then it reverts to $1.50 USD.

If you haven't taken the plunge into internet shopping you can't get much safer than PayPal for the checkout and you don't have to have a PayPal account even.

Visit my Craftsy Store.

Visit valspierssews's Craftsy Pattern Store »

Cheers,
Val

Monday, October 6, 2014

Reaching for Perfection

1404 Snugfit Carol Dress - View 4 Peplum top
Look out for it soon.
I am a perfectionist. This doesn't mean that everything I do is perfect but it does mean that I can't let something alone until it meets my standards. This is how I feel about the doll clothes patterns I am making to sell.
When I decided to create them to sell, my aim was to make something that I wanted and couldn't find in the market place.
With a few patterns under my belt I realise that there are a few improvements I can make to make them more user friendly i.e. easier for me to use. My aim is to create something that if I was buying it I would say "Wow! This is great value for money, so nice to look at and easy to use and the garment I made fits perfectly. I will be making this again. I'll be happy to buy more patterns from this person."

So far I have only been able to say that about the doll knitting patterns I have bought and the applique quilt patterns I have bought.

What improvements am I making?


For starters I have come to realise that even though I don't particularly like photos in the instructions - I prefer diagrams - people younger than me who have grown up with photo and video tutorials seem to like photos better. Rather than make it all photos or all diagrams I have decided to make an extra gallery of photos that cover every step and include them in an iBooks book along with my regular instructions. iBooks can only be read in an iPad but that's OK with me. I love the iPad and wouldn't use any other tablet.

Since playing with iBooks Author I can see that all my pattern instruction pages need to be landscape so they look great on the iPad or any tablet.


My Ipad stand works best when the iPad is sideways. So now I am making my next pattern as a landscape PDF. It will still have all the great features that I do in portrait such as the pattern pieces and the envelope and the divider page for your file folder. Just the instruction pages are landscape.


There is not too much colour. Just enough to define the chapters and sections so it still looks great printed out.


Each page is identified so if you find a stray one on your cutting table you will know where it goes.


I can't do much about my photography until I can get out the good camera and tripod (after I move house) but I am going to enrol in a Craftsy online class on photography to help me improve my photos. I have put a link to the class in my sidebar. I haven't bought it yet but I will let you know what it is like soon.

Because I need to update my earlier patterns to the new format and tweek the instructions a bit I have decided to update them all around the end of November. If you have already bought one you automatically get the update to download in your Craftsy pattern library. If there are more improvements I will update again 3 months later. 

Have a look in my Craftsy shop. The Witch and Princess outfits pattern is only $1.00 USD for the month of October, then it goes up to $1.50.

Visit valspierssews's Craftsy Pattern Store »

If you like the iPad stand. See my blog post and a link to the tutorial.

Cheers,
Val

Tuesday, September 23, 2014

Snugfit Witch PDF doll pattern - a little witch, a big witch and a princess all in one.


This has been a big project mainly because I kept wanting to add to it as I went.
I have included lots of instructions for those who haven't sewn clothes before. I realise that gathering with a gathering thread or applying elastic are not normal things for patchworkers so there is a bit more detail than I would normally do.


I had to add some witch's britches because the short skirt was quite short. I only had navy stripe knit but I think they would look great in red and white stripe.


The hat was a bit of a challenge. I had to use my maths to get the circles and slopes right but it fits perfectly. I wish I had a pumpkin brooch to add to it.


The big witch has a much more grown up look and I wanted to try a skirt with lots of gather. The look is helped a bit with a long tulle petticoat.


I thought not everyone is into witches and I could see how I could make a great princess costume without much change. The hardest part was sewing on the roses by hand.


The little buckle here is a plastic scrapbooking embellishment. I bought a bag of them from the craft shop for $2.00. It looks great. The ribbon roses are also from the craft shop.


The pattern includes pattern pieces and instructions to make everything.

See lots more ideas for using your pattern and the bonus pieces I have included in this blog post.

You can see how to make the necklace here.

Visit valspierssews's Craftsy Pattern Store »

Cheers,
Val

Wednesday, September 17, 2014

Progress on the Snugfit Witch


I have been really enjoying playing with this design. The plan was to make a cute witch costume for Halloween but after I made the short skirt little witch version I thought it would look pretty awesome with a long black skirt.
Once I did the long black skirt I thought this design would look great as a princess dress in pink satin so I had to go and get some pink satin. I already had some pink chiffon that I thought would look nice as short sleeves.
The sleeve pattern curves on the bottom edge as well as the top edge and I discovered that curves are not good for the rolled hem foot. I had to re-do several sections in the centre of the sleeve hem.

I finished off the princess outfit and decided to play with the sleeves a bit more. I didn't really want to make another witch or princess outfit so I looked at my design and figured it would make a great Regency style dress if I just cut the bodice a bit shorter. To fix the sleeves I just cut the hem off straight and hoped it would still look OK. As you can see they still look great.


I have been learning so much about the fit of sleeves making doll clothes. I didn't like the way the sleeves sat in the princess dress because I gathered them nearly to the side seam edge. The sleeve above I only gathered to within 2" of the side seam making it really puffy in the top. It still looks alright but I am thinking I need to do another test garment and gather the sleeve to within 1" of the side seam.
The garment I have in mind is a shirt waist blouse using the Snugfit Anna bodice and the Snugfit Witch sleeve with some pin tucks in the front and the pointy collar. I think it will look perfect with the long black skirt. She will look like an old fashioned shop girl.

It is difficult to see in these photos but I made some ruffles for the front of the dress bodice using my ruffler foot. They didn't really ruffle enough so next time I will try tension 7 and stitch length 3 instead of stitch length 2. There will be lots more chances to put ruffles on things.


The ribbon is just tied around the bodice and has a bow at the back. I thought if I sewed it on it might look a bit rough and wrinkly.
I got this fabric for a good price at my Spotlight store. The pretty stripe has a slightly raised white floral design printed on it.


Yes. Believe it or not this dress can be made from the pieces in the Snugfit Witch pattern. I can't wait to get it published. Hopefully next week.

Cheers,
Val

Tuesday, September 9, 2014

10 Minute Doll Necklace (Halloween Charm)

Make a cute doll necklace in 10 minutes from a a few easy to find craft shop items. No special tools. Just a pair of pliers and scissors for the fine chain.


I dabble in a lot of crafts. Beading and making jewellery is a lot of fun. When I tried the square neckline witch dress on my doll I realized she needed a necklace.
I went to my stash and found several metres of silver chain with fine links that need to be cut with scissors and a pair of earrings with owl charms that I bought at Melbourne Markets to use as zipper pull charms.
I have more packed away somewhere, but we are in the process of moving so I don't know where!
Off to Flash Harry's to get some supplies. Flash Harry's is what I call a junk shop. Everything is new but not everybody wants it. They do have a good lot of craft supplies.

I bought some jump rings, some parrot clasps, some key charms, some cord ends and some joiners. These cost me $10 for the 5 packets. The necklaces were 3 for $2.


This is what I made.


It is easy to do.


I cut 8 1/2 " of chain for the owl necklace. Opened and closed the jump rings with the pliers on one side and my fingers on the other.
Parrot clasp - jump ring - slide on owl on a jump ring - jump ring on the other end.


I cut my ribbon necklace in half and used the parrot clasp end. Slide the key charm on, on a jump ring. Gather the ribbon ends in the cord end and squeeze the little arms closed with the pliers. Add a jump ring and an adjusting chain. I had several of the adjusting chains in my stash. You don't really need it but it looks nice.

The key charm hangs a bit lower than the owl so I cut 7" of chain for that necklace.

Cheers,
Val