Saturday, August 25, 2018

Must Read Insights into The School Uniform Dress and Patterns 1804 and 2004


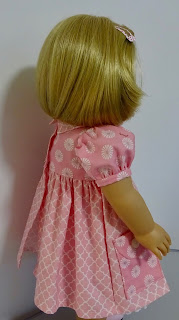
While making the school uniform dress I perfected a lot of my skills in making dresses.

If you have the Uniform Pattern No.1 It is worth reading through this post to get a better feel for why I have done things a certain way.

If you have the 1804 or 2004 Dress Pattern you should also have a read because you may be able to improve how you sew the dresses by applying some of the points. You should try adding an extra 1/4" to the back facings. One day I will redo the pattern pieces but not for a while yet.

There are some slight variations to the way I used to make dresses that I think make it easier to get a perfect result.

I will point out the things I did differently for the school dress and explain why I did them that way.


  1. I made the back facing 3/4". I did this so you can finish the raw back edge with a single fold hem or a rolled hem or overlocking while cutting off 1/8"
  2. I pressed the back facing fold line before finishing the back edge so you can just measure 3/4" and fold and press. If you do it after neatening the back edge you would have to check where the fold line was by using the pattern piece.
  3. When stitching the collar pieces together use a short 2mm stitch. This makes it easier to go round the curves and also helps to stop the corner poking out and breaking through the stitches while you are pushing out the corner.
  4. I placed and basted each collar 1 at a time. In the past I just pinned them on and basted right across. I also place the doll's left collar on first so the other collar lies on top at the CF. This makes it easier to sew across the front when you sew on the collar.
  5. The collars have to be at lest 1/4" from the facing fold line so you can overlap the backs to close.
  6. When I stitch on the collar I am happy with stitching the seam then overlocking it. Press it then under stitch on the right side 1/8" away from the seam line, keeping the collar out of the way.
  7. For the School dress I have added a bias facing to the neckline. I experimented with a 1" wide piece folded in half then I experimented with a 1 1/8" bias piece folded in half. Even though the narrower facing only just covers the trimmed seam it works best. When stitching it down you aim along the middle of the strip so you are close to the seam line and it all turns out good.

    If you use the wider strip you end up with a fraction too much facing width so you have a choice of stitching close to the neck seam line and having a flappy facing edge or sewing close to the facing edge and having trouble getting the neck to sit flat.
  8. I made the bias facing strip about an inch too long because there is nothing worse than finding you are just a fraction short with strips. This means that if you find that your are just a fraction short on fabric for the bias strip you can cut it back about 3/4" shorter and it should still work. I don't recommend doing this unless you have tried the design with the full strip at least once to calculate for yourself how much shorter you can make it.
  9. I am still not set in one way to do the hem and fold the back facings in. Sometimes I overlock the hem the fold in the back facing and stitch across the facing on the hemline. You then turn the back facing and stitch the hem. I do it this way in some of my instructions.
  10. Another way it to overlock the hem leaving thread tails at each end. Press up the hem tucking in the thread tails then fold in the back facing and stitch the hem and back facing at the same time. I do it this way in some of my instructions.
  11. A third way to do the hem is to overlock the hem leaving thread tails. Press up the hem tucking the tails in. Stitch the hem then turn in the back facing.
Happy Sewing,
Val

Thursday, August 16, 2018

How to Sew Doll Clothes: Petticoat straps for doll clothes

I am always a bit wary of satin ribbon when I need to secure the ends in a garment.

It tends to fray really easy so you need to allow plenty of overlap into a seam allowance and I like to stitch it more than once in order to secure it and prevent fraying.

When I put the straps in the bodice of my petticoat from Underwear No. 4 view 1 I had a 1/2" extending past the seam line. I cut two straps 5 1/2" long and put little dots a 1/2" in from the ends.


I lined up the dots with the seam line on the bodice where I had my pins to mark the position of the straps and pinned the ends in place.


I then stitched forward, back then forward again to secure the ends in place before adding the lining.
After securing the two fronts of the straps I curved each strap to lie correctly and pinned the back end in place then stitched each back end to secure it.


After enclosing the straps in the lining I trimmed the seam allowance around the bodice but I made sure I didn't cut off the stitching I used to secure the straps originally. This means there are two lots of stitching to prevent fraying of the ribbon if it is played with a lot.

For View 2 which isn't lined I secure the satin ribbon straps by stitching them to the wrong side first then folding the strap up and stitching them again. This also gives me two lots of stitching to keep the ribbon from fraying.

Mark the strap positions on the wrong side.


Place the ribbons right side up if it has different sides. Most satin ribbon is double sided. Make the ends level with the top of the bodice.

Stitch across each end 1/4" in from the end.


Pin the backs of the straps so they will lie flat on the doll and stitch across each end.


Fold the ribbon up and stitch across each end again, close to the top edge.


It is as neat as possible on my very sheer hankie fabric


Add something to cover the ends if you like. I just zig zagged across the bows the same as sewing on buttons.


I preferred my fancy trim for this design.


Happy Sewing,
Val

Pieced Pants FF5 as a Stand Alone Pattern for 18" Dolls


I have been threatening to create a pattern from the pieced pants fashion file for ages. I started drawing up the pieces but it was almost harder to draft them on the computer than it was to just cut up the pattern pieces from 1813 Gathered Pull-ons.

You can see how I first made these cute pants in this blog post from the past.

Now I have created pattern pieces for each section with the seam allowance included and I have written complete instructions to finish the trousers. I made a slight change to the waist by lowering it about 3/8". They reach to just under the doll tag on 18" American Girl dolls.

This design is for sale in my shop but adventurous designers will be able to see how easy it is to create it themselves from any pull-on pants pattern.


Happy Sewing,
Val

Doll Clothes Designer and Dressmaker

Wednesday, August 1, 2018

Why my petticoat pattern is worth having!

So you have seen the preview and you're thinking that petticoat looks pretty simple. It should be free. I could make that with one hand behind my back.


Yes, the design concept is simple. Just like a dress but the bodice is cut off.

What makes my pattern worth having is the fact that it takes the guess work out of your sewing.

By getting the pattern you can gayly make petticoats from your nice fabrics and be 99% sure that it will fit and look great. ( I can't control all the variables)


With this pattern you get step by step instructions for a method that works.

No need to think about making it work for the dress patterns you already have. Just line up your dress skirt with the petticoat skirt page before cutting out the petticoat skirt pattern pieces and you can adjust the length easily.  (The waist line of this petticoat sits about 1/4" above the doll label at the narrowest part of the waist)


Here I am using the knee length skirt for the waist level dress in 1804.


There is no need to experiment with strap lengths or skirt fullness. You can see what it will look like from my samples.


This is the knee length high waist dress from 1804. My waist style petticoat with the knee length skirt fits under perfectly.

I have 5 years experience making doll clothes and though I don't know it all yet I can help ease some of the pain when you need to get a cute outfit done fast. You have a much greater chance to "get it right the first time" if you follow a patten.


Happy Sewing,
Val

Preview of 18" Doll Clothes Patterns Underwear No.4 by valspierssews

I have wanted to draft a collection of underwear items like petticoats and panties and singlets and camisoles for several years now. Time just gets away while I work on the daywear. But, now is the time! I have committed to 5 items that I will be giving away for free in 5 of my newsletters over 5 months from August to December 2018.

The freeness will expire for each one after a week or so and then it will go in my shop.

Petticoat 1 (Underwear No. 4) is a simple design that was inspired by this image -

I believe it is a page from a paper doll book (1991) by Teresa Borelli but there isn't much that I can find about it.

It has a cute dolly look about it that I have tried to recreate for 18" dolls.


Happy Sewing,
Val

Free Petticoat Patterns through my Newsletter Valspierssews News

Valspierssews


Petticoats are just so sweet. They have a distinctly dolly feel these days because hardly anyone wears petticoats anymore.

The first one in my free collection is a simple vintage looking design.
It is very quick to make.

You can add lots of trims or just a bit. I bought a packet of ready tied bows that are perfect to add to underwear.


I have placed the skirt pieces at the top a the page so you can easily adjust the hem edge before you cut out the pattern pieces. Make pattern pieces for several different dress lengths or customise the length for each dress you make.


Valspierssews dress patterns have just enough ease to fit over the petticoat and still do up.


I have included instructions for two views. One with the finished border edge and one with a lined bodice.


Make sure you are subscribed to my newsletter before 14th August Australian time so you don't miss out. There will be 5 different petticoat patterns. One each month for the rest of this year.

When the second newsletter comes out for that month I will take down the free file and put it in my shop.

You can sign up for my newsletter HERE

Happy Sewing,
Val