Friday, December 28, 2018

How to make doll quilts Part 1

Doll quilt pattern by valspierssews
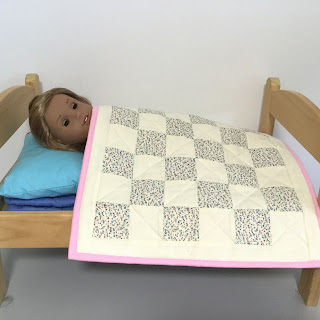
Easy patchwork doll quilt
Before I started designing doll clothes I did quite a lot of patchwork and quilting. I have a lot of patchwork fabrics that are not really suitable for doll clothes so I plan to get some of them out and make doll quilts.
I have started a Pinterest Board to save bed styling ideas that I like. I think the pillows and cushions are an essential part of the whole doll bed thing.
The number of patchwork ideas available for doll quilts is pretty much never ending but I do like the simple squares like the one from the American Doll Quilts book below.

This quilt book shows you how to make some of the quilts children might have made in the 1800s
https://www.shopmartingale.com/american-doll-quilts-ebook.html

Here is one of the quilts from the book. Those fabrics are beautiful.

If you have plenty of hours and you like patchwork and quilting you should spend some time browsing the boards at martingale
https://www.pinterest.com.au/shopmartingale/boards/

The history of doll quilts in America is a whole subject. 

Since sewing was an essential task for women in the 1800s girls were taught to sew from a very early age. Often the first practice piece would be a small quilt for their doll.
In the pioneer era quilting became very popular because of the rise of the textile industry and the availability of inexpensive fabrics.
Many of the quilts from that era are gone because they would have been used until they wore out.
You can read more in this article:
https://www.quiltingboard.com/resources/article-15.html

Until I started researching for this blog post I didn't realise there were actually career opportunities for quilt historians. Around the 1970s women started to take an interest in the women and quilts of historical times and it has grown from there.

Quilt Historians
You can find out more about the quilt historians in this article:
http://www.antiquequiltdating.com/Getting_to_Know_Today's_Quilt_Historians.html
"Today quilt history is a broad and recognized field of professional and personal study and enjoyment. "

Doll quilt designs
You will find lots here on Pinterest
I would love to make a few of these. Look out for the plans on my blog.
Coming up soon I will go through the steps to make my first contemporary quilt. Like this one.

https://www.pinterest.com.au/pin/575897871098721266/


Make sure you sign into dolldressmaking.teachable.com to have access to my free library and my newsletter.

Get the free plan for a quilt with little squares on Teachable 
(the photo tutorial will go up soon)


Look out for my Doll Dressmaking courses coming up for sale on Teachable in 2019.

Happy Sewing and Doll Dressmaking,
Val

Friday, December 21, 2018

Dressing your doll for Christmas


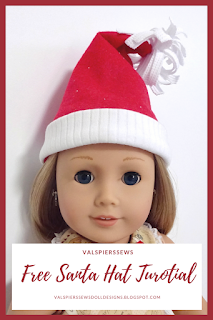
Santa hat tutorial for dolls


Dolls are so accommodating and don't mind dressing up warm in our sweltering hot Christmas season in Queensland Australia. Of course, it's not Christmas unless there is a summer outfit too.

This year I found the most amazing nordic style knit in Aldi of all places.


It was a big Santa sack so I have plenty to make some vests or dresses next year. I made a big sweater for this Christmas. I will be publishing a collection of bulky knit designs later in 2019.

The Santa sack was lined with red felt so I just had to try my hand at a Santa hat too.

I decided to do a quick and easy Christmas dress for our summer Christmas. The 1804 dress pattern comes with a collar that has a narrow collar cutting line drawn on it. I used the narrow collar with lace edging to give the dress a bit of a festive look.

The dress pattern is on special until Christmas Day. It comes with the add on bibs for free.


There is probably just enough time to make up a Christmas dress for your doll. If you keep it sleeveless and simple you can add some buttons or a sash and team it with a little cardigan for a more winter look.


Making a Santa hat pattern to fit any doll.

Use a tape measure to measure around your doll's head where you want the hat to sit.
Decide how high you want the hat. I just guessed about 6" for my 18" doll.
Divide that by 2
Measure out a line on the side of a piece of printer paper.
From the centre of the line measure up the height of your hat.


Draw lines to make a triangle.


Fold your page so you can cut out two triangles.


Tape them together along the sides.
Smooth out the brim edge with a curve.


Place the whole lot on a new sheet and create 1/2" ease and seam  space down each side and add 1/4" seam allowance to the brim edge.


Cut it out and label it.


You can use the same method for different size dolls. You may have to adjust the height of the hat. If your doll is very small you may have to adjust the 1/2" ease and seam allowance down a bit.

Sewing it up


  • To make the Santa hat you cut out the main part in red fleece or felt and the band in white fleece or felt.
  • Band is 2/1/2" wide for an 18" doll and long enough to fit your hat.
     
  • Double the band and stitch it to the right side of the hat with a 1/4" seam. Use a 1mm wide zig zag stitch so the hat will give a bit as you put it on the doll.
  • Turn up the band to the right side. Bring the back seam right sides together and stitch with a 1/4" seam.
  • Make a pom pom with fleece of felt. Cut a rectangle about 3" wide and 5" long. Roll it up and tie it tight in the middle, leaving thread tails so you can sew it on the hat.
  • I tied mine with crochet cotton.
  • To tie it on i doubled the thread and brought the two ends through the loop so I could pull it tight on the fabric roll. separate the ends and tie them around the roll with a few knots.
  • Snip the felt or fleece to make it stringy and fluff it out. Stitch it on the top of the hat.
  • I used a needle with a big eye to thread the two ends of the crochet cotton to the wrong side of the point at the top of the hat. I spaced them about 1/4" apart so I could just tie a few knots to secure it.


If you think others might like this idea don't forget to pin it.

Santa hat tutorial to fit 18" dolls and any size doll.


Merry Christmas,
Val

Friday, December 14, 2018

1804 Christmas Special Doll Clothes Pattern

I know how much fun it is to make some Christmas dresses for the dolls so I have wrapped up a Christmas Special on the 1804 Dress.

If you buy the 1804 Christmas Special Listing in my Etsy shop you will find the 1804a Add on Bibs included for free. Offer is available until midnight 25th Dec Australian time.

Just click the image to go to my shop.

Doll clothes patterns

Happy sewing,
Val

Saturday, November 3, 2018

Doll Clothes Petticoat Pattern with a 50s Look and Some Life Philosophy.

I love designing and one way to share my designs with as many doll dressmakers as possible is to offer them for free sometimes.


My next newsletter is due out in early November 2018 and if you are on my mailing list or join up before I send out the November newsletter you will be able to download the 50s petticoat pattern for free.
It only comes out in this one newsletter. You will not see this pattern for free any where else or at any other time. You must be subscribed to the newsletter before it comes out.

There is no link to the free petticoat pattern on this blog post. If you would like this petticoat pattern for free you   need to be signed up for my newsletter   before November 9th 2018.

The design has princess seams on the bodice. The bodice is shaped in the front and straight across the back and there are ribbon straps.
The skirt is a circle skirt made up of 4 quarter circles. The waist points down in the front and the garment opens all the way down the back with a 1/2" overlap for closure.


This petticoat bodice is lined so if you want the lace trim to stand up properly after stitching the bodice to the lining you will need to fold the ends of the lace at a right angle so it is not caught in the back seam. I will go into more detail on this in my Facebook Group this month. You can Join Here

I used the pattern from Underwear No. 5 to start developing this design. I used the same back pieces and changed the front. I already had some work done on the pointed front with another design but adding the point is very simple. For the skirt you just echo the point for the front skirt.
So if it is so simple to make a new design why do people buy my patterns? The main reason is that doll dressmakers want to make one garment and use their best fabric.

This pink petticoat is my first draft. There are a couple of things I am going to change to make it even better. This is my prototype.
What needs work?

  • The front points need to be a bit higher. I have tried to pull it up a bit in front for this photo so you can see it has some wrinkles. I couldn't believe how amazingly better it looked when I raised the bodice by 1/4".
  • I am going to deepen the point a bit. I have decided on 1/8" lower.
  • I'm happy with this length but I had to cut off an inch from the original skirt.
  • I only stitched the strap into the front bodice and sewed it on top for the back. I had to do this so I could judge the length of the strap. Now I know the length and the angle I have to cut it in the back so the next version will have the strap enclosed in front and in back.
I am always analysing why I do things. 
Back in June I posted on my Life Blog about how I hoped other people would see me. 
The following thoughts help me know that what I am doing is in alignment with my life values. I have quite a list of values that are important to me. For example, I strive to be creative, honest, passionate, generous and sincere and self-confident. It is quite empowering to have such strong guidelines. It makes life and business decisions much easier.

A bit of philosophy on why I turned my designing into a business.

I will be making at least two more petticoats while writing and checking the instructions for this design. All my efforts provide value for doll dressmakers. 
  • You can be 99% sure the garment will fit and look great. (You should always check the waist of any pattern bodice against your doll first)
  • You only have to make one but you won't want to stop at one when you see how versatile each pattern is.
  • You can use nice fabric first go.
  • You can follow the instructions to get all the steps in the right order. This saves mistakes and unpicking.
  • You can be confident the design will look as you expect.
A bit of philosophy on why I do some things for free.

Why am I offering such great designs for free? There are a number of reasons.
  • I love helping other doll dressmakers
  • I want to spread the word on how great my patterns are.
  • I want to promote my newsletter because I love connecting with like minded people.
  • I am passionate about designing doll clothes and want to share my skills.
  • It helps me grow in self confidence and independence because it helps my business grow.
  • All this is part of my grand plan to be happy and successful, share my knowledge and skills and be financially free to continue helping and sharing in all sorts of ways.
I am constantly being inspired by all the wonderful doll dressmakers all over the world. 
I hope you enjoy my patterns.

Cheers,
Val


Wednesday, October 3, 2018

Vintage doll clothes petticoat. A 40s design.

Pattern by valspierssews

The latest in  the Underwear Collection is a cute 40s design. It has curved panels in the front and back and a nice neat flare at the hem.


The instructions are for lace at the neck and armholes but 1/2" bias makes a good facing too.


The hem can be cut at this length or cut up to 1/2" longer. It can be made longer with lace at the hem too if you like. It is perfect for the 20" Australian Girl Doll.


It is also really sweet on the 17" Baby Born doll

It opens all the way down the back and I use velcro patches for ease of dressing.


Batiste is a perfect fabric that is easy to sew and has a nice crisp look about it.

Best of all this petticoat is part of my newsletter offer for October 2018 and will be free to download with the newsletter for a few weeks in October only. Iy then goes into my shop.


Make sure you are signed up for the newsletter. You can click on the link below. There are always great offers.


If you like doll dressmaking you should also join in the discussions on design in my Facebook group.
Click the link to join.


Sunday, September 9, 2018

Doll clothes pattern vintage petticoat design to fit American Girl dolls

American Girl Doll clothes pattern by valspierssews. Doll underwear.

This little girls' vintage petticoat design from the 50s era is perfect for dolls. I love the flat front panel and gathered side skirts. Without much more effort than a regular gathered skirt petticoat you can create this beautiful petticoat with stand out design features.


You can also make it without the ruffle. Just extend the hemline.


If you intend to sew this one I have written up some details that may be helpful.

Batiste
The best fabric for underwear is batiste. It is a moderately lose weave fabric that has a nice crisp feel to it. The slight stiffness is perfect for holding out dress skirts.


Polycotton
Another fabric I used was polycotton. This closely woven fabric is a bit softer and thinner than quilters 100% cotton and still fits under the dresses I make using my 1804 pattern.
I have started putting a 3/4" facing allowance on my designs so you can easily finish the egde as you please. I have done a single fold hem on this one.


Synthetic Lining
I had some synthetic lining fabric that I thought might be good. It is thin yet still has some body to it. Unfortunately it tends to fray easily and makes a fluffy ball of threads in seconds if you handle it a lot like when you are gathering the ruffle.


If I was to use this fabric again I would overlock the edge and pull up the overlocker thread to gather. You can see where the trim is that it is starting to fray.


I also tried zig zagging over a thin cord but found that the edge got messy as I stitched and I had to move further in than the 1/4" seam allowance. So if you want to zig zag over cord to gather the ruffle for this fabric you will need a wider seam allowance.

Adding trim to the ruffle
Because the ruffle edge is straight you will need to finish the edge to stop it fraying either before you sew on the trim or as you sew on the trim.
Some flat laces could be overlocked on. For other trims it is best to use pinking shears and just shave off the very edge so you don't reduce the seam allowance.


Trim at the neck and arm holes
The stretchiness of the gathered lace trim allowed the hem to turn smoothly. However, whenI used the rick rack I had to put a few snips at the tightest section of the curves to help it lie flat.
The raw edge on the garment and the snipping is not a problem because the curved edges of the neck and arm holes resist fraying.


The rick rack I used measures 1/4" from the crest to the trough so it just fits nicely on my 1/4" seam allowance leaving the little bumps to show when I turn it in.


Length
The length of my pattern finishes about 1/2" above the just on the knee skirt length for dresses I make with my 1804 pattern.
I haven't tried making it shorter or longer but my educated suggestion is that to make it longer you should lengthen the body section by just adding to the bottom edge. You will then have to lengthen the side skirt pattern piece by the same amount. Just make sure you lengthen the hem edge not the side edge. I have labelled the waist edge and the side edge on the pattern pieces.

Fit and resizing

Vintage AGD: I have found that this petticoat fits my plumper vintage Kit Kitridge doll without any changes and the 1804 dress goes over it also without any changes.
 

Our Generation Doll: If you just have an Our Generation Doll you can make a permanent change to the back facing by folding it in 1" and trimming it back to 1/2" when you hem the raw edge.

Both AGD and OGD: If you want the petticoat or 1804 dress to fit both OGD and AGD you can put a wider velcro patch for the hooks only, then you can pull it across further on the thinner OGD.

Australian Girl Doll: I have tried my AGD petticoat on the Australian Girl Doll and even though I haven't included fitting for the Australian Girl Doll you should be able to make a lovely petticoat for her by just adding 3/4" to the bottom of the main pieces and the side skirts so it is longer. This will make it about 1/2" shorter than the 2004 dress pattern. I will probably do up pattern pieces with the extra length soon so if you want Australian Girl pattern pieces you can convo me through your receipt or email valspierssews at gmail dot com with an image of the title page for the free version. Just give a a week or two to sew up one first.

Closure
As with nearly all my garments I have used velcro patches for closure. They don'y get in such a  muddle as the long strips do yet they seam to hold just as well for dressing. I have used my coloured velcro that I got from Allie Express. I cut off a piece just wide enough to fit on the facing.


I hope you enjoy this design. I have a dress or two planned using the same flat front panel design.

Look out for the petticoats as a collection in 2019. Sign up for my newsletter so you will always be kept up to date.

This petticoat is the second in a series of 5 that I am giving away for free in my newsletter.

Happy Sewing and Dress Making
Val


Saturday, August 25, 2018

Must Read Insights into The School Uniform Dress and Patterns 1804 and 2004


While making the school uniform dress I perfected a lot of my skills in making dresses.

If you have the Uniform Pattern No.1 It is worth reading through this post to get a better feel for why I have done things a certain way.

If you have the 1804 or 2004 Dress Pattern you should also have a read because you may be able to improve how you sew the dresses by applying some of the points. You should try adding an extra 1/4" to the back facings. One day I will redo the pattern pieces but not for a while yet.

There are some slight variations to the way I used to make dresses that I think make it easier to get a perfect result.

I will point out the things I did differently for the school dress and explain why I did them that way.


  1. I made the back facing 3/4". I did this so you can finish the raw back edge with a single fold hem or a rolled hem or overlocking while cutting off 1/8"
  2. I pressed the back facing fold line before finishing the back edge so you can just measure 3/4" and fold and press. If you do it after neatening the back edge you would have to check where the fold line was by using the pattern piece.
  3. When stitching the collar pieces together use a short 2mm stitch. This makes it easier to go round the curves and also helps to stop the corner poking out and breaking through the stitches while you are pushing out the corner.
  4. I placed and basted each collar 1 at a time. In the past I just pinned them on and basted right across. I also place the doll's left collar on first so the other collar lies on top at the CF. This makes it easier to sew across the front when you sew on the collar.
  5. The collars have to be at lest 1/4" from the facing fold line so you can overlap the backs to close.
  6. When I stitch on the collar I am happy with stitching the seam then overlocking it. Press it then under stitch on the right side 1/8" away from the seam line, keeping the collar out of the way.
  7. For the School dress I have added a bias facing to the neckline. I experimented with a 1" wide piece folded in half then I experimented with a 1 1/8" bias piece folded in half. Even though the narrower facing only just covers the trimmed seam it works best. When stitching it down you aim along the middle of the strip so you are close to the seam line and it all turns out good.

    If you use the wider strip you end up with a fraction too much facing width so you have a choice of stitching close to the neck seam line and having a flappy facing edge or sewing close to the facing edge and having trouble getting the neck to sit flat.
  8. I made the bias facing strip about an inch too long because there is nothing worse than finding you are just a fraction short with strips. This means that if you find that your are just a fraction short on fabric for the bias strip you can cut it back about 3/4" shorter and it should still work. I don't recommend doing this unless you have tried the design with the full strip at least once to calculate for yourself how much shorter you can make it.
  9. I am still not set in one way to do the hem and fold the back facings in. Sometimes I overlock the hem the fold in the back facing and stitch across the facing on the hemline. You then turn the back facing and stitch the hem. I do it this way in some of my instructions.
  10. Another way it to overlock the hem leaving thread tails at each end. Press up the hem tucking in the thread tails then fold in the back facing and stitch the hem and back facing at the same time. I do it this way in some of my instructions.
  11. A third way to do the hem is to overlock the hem leaving thread tails. Press up the hem tucking the tails in. Stitch the hem then turn in the back facing.
Happy Sewing,
Val

Thursday, August 16, 2018

How to Sew Doll Clothes: Petticoat straps for doll clothes

I am always a bit wary of satin ribbon when I need to secure the ends in a garment.

It tends to fray really easy so you need to allow plenty of overlap into a seam allowance and I like to stitch it more than once in order to secure it and prevent fraying.

When I put the straps in the bodice of my petticoat from Underwear No. 4 view 1 I had a 1/2" extending past the seam line. I cut two straps 5 1/2" long and put little dots a 1/2" in from the ends.


I lined up the dots with the seam line on the bodice where I had my pins to mark the position of the straps and pinned the ends in place.


I then stitched forward, back then forward again to secure the ends in place before adding the lining.
After securing the two fronts of the straps I curved each strap to lie correctly and pinned the back end in place then stitched each back end to secure it.


After enclosing the straps in the lining I trimmed the seam allowance around the bodice but I made sure I didn't cut off the stitching I used to secure the straps originally. This means there are two lots of stitching to prevent fraying of the ribbon if it is played with a lot.

For View 2 which isn't lined I secure the satin ribbon straps by stitching them to the wrong side first then folding the strap up and stitching them again. This also gives me two lots of stitching to keep the ribbon from fraying.

Mark the strap positions on the wrong side.


Place the ribbons right side up if it has different sides. Most satin ribbon is double sided. Make the ends level with the top of the bodice.

Stitch across each end 1/4" in from the end.


Pin the backs of the straps so they will lie flat on the doll and stitch across each end.


Fold the ribbon up and stitch across each end again, close to the top edge.


It is as neat as possible on my very sheer hankie fabric


Add something to cover the ends if you like. I just zig zagged across the bows the same as sewing on buttons.


I preferred my fancy trim for this design.


Happy Sewing,
Val